电气终端和电气连接区的修理REPAIR OF ELECTRICAL TERMINATIONS AND ELECTRICAL BONDING AREAS
1. INTRODUCTION 介绍
A.The data in this subject comes from Boeing Process Specifications BAC5117 (Electrical Bonding and Grounding), BAC5153 (Assembly of Electrical Terminations), BAC5155 (Heat-Shrinkable Materials on Electric Wiring) and BAC5120, BAC5120-1, and BAC5120-2 (Crimping). The airline has a copy of the Boeing Process Specification Manual.
本主题中的数据来自波音工艺规范 BAC5117(电气连接和接地)、BAC5153(电气终端组装)、BAC5155(电线热缩材料)和 BAC5120、BAC5120-1 和 BAC5120-2(压接)。航空公司有一份《波音工艺规范手册》副本。
B.The data is general. It is not about all situations or specific installations. Use this data as a guide to help you write minimum standards.
数据是通用的。它不是关于所有情况或特定的安装。使用这些数据作为指导,帮助您制定最低标准。
C.Refer to SOPM 20-00-00 for a list of all the vendor names and addresses.
有关所有供应商名称和地址的列表,请参阅SOPM 20-00-00。
2. MATERIALS AND EQUIPMENT 材料和设备
NOTE: Equivalent substitutes can be used.
注:可使用等效的替代品
A. Materials
材料
CAUTION :SOME OF THESE MATERIALS ARE FLAMMABLE, CORROSIVE OR TOXIC.
警告 :其中一些材料具有易燃性、腐蚀性或毒性。
(1) Cleaning Materials (SOPM 20-60-01)
(a) Acetone
(b) Aliphatic Naphtha — TT-N-95 (Supersedes BMS 3-2)
(c) Ethyl Alcohol, denatured
(d) Cleaning Solvent — BMS 11-7
(e) Isopropyl Alcohol — TT-I-735, Grade A
(f) Lacquer Thinner — TT-T-266
(g) Methyl Ethyl Ketone — TT-M-261
(h) Methyl Propyl Ketone (MPK) — BMS 11-9
(i) Sec-Butyl Alcohol
(j) Solvents per BAC5750 with code FB, for metals or organic coatings
(2) Varnish — Nycote 7-11 or 88 (V05803) or Vyna-Kote No. 6 (V55611)
(3) Shrink Fit Sleeving — Thermofit RNF, RT-876, CRN, or TFE (SOPM 20-60-04)
(4) Wipers — BMS 15-5, Class A or B (SOPM 20-60-04)
(5) End Caps — 324484, 324485, 324486, 324487 (V00779)
(6) Abrasives
(a) Abrasive Paper — P-P-121, Garnet
(b) Abrasive Cloth — P-C-451, Aluminum Oxide
(c) Abrasive Blast Grit — Aluminum Oxide, 100-325 grit
(d) Abrasive Pad — Scotch-Brite, Type A, cleaning and finishing, very fine (SOPM 20-60-04)
(7) Masking Tape — Protex 1321 D-3 (SOPM 20-60-04)
(8) Masking Film, Mylar — Protex 223-5 (SOPM 20-60-04)
B. Equipment
设备
(1) Brush, Rotary Wire — AISI 302 Stainless Steel, hard-drawn
(2) Brush, Nonmetallic — Soft natural bristle
(3) Abrasive Disk, Rotary
(4) Wire Stripping Tool — ST2346
(5) Hot-Air Gun — Raychem 500 (V06090)
(6) End Cap Crimping Tool — Amp 46063 (V00779)
(7) Power Supply — Hewlett-Packard 6269A (V28480)
(8) Bonding Meter
(a) Avtron Model T477W (V01014)
(b) BCD Electronics Ltd. Model M1, serial number A0000112 and on (VL1002)
(9) Multimeter (with milliohm scale) — Any certified and calibrated meter and probe can be used in
areas without an explosion hazard. Examples: Hewlett-Packard 3466A or 34401A (V28480)
(10) Micro-Ohm Meter — Keithley Model 580 (V80164)
3. SURFACE PREPARATION 表面处理
A. General
通用
(1) All surfaces for electrical bonding must be clean and have no contamination such as oil, grease, decorative or protective finishes, abrasive particles or metal oxides. These surfaces must be smooth and flat. If metal must be removed for preparation, removal must be kept to a minimum. Before you bond hardware to the surface, remove all temporary protective coatings and clean the bonding surfaces. Then wipe the cleaned area with lint-free cloth or gauze wipers.
所有用于电气连接的表面必须清洁、无污染,如油、油脂、装饰性或保护性饰面、 研磨颗粒或金属氧化物。这些表面必须光滑平整。如果在准备过程中必须移除金属,则必须尽量减少移除。在将硬件粘接到表面之前,应去除所有临时保护涂层并清洁粘接表面。然后用无绒布或纱布擦拭清洁区域。
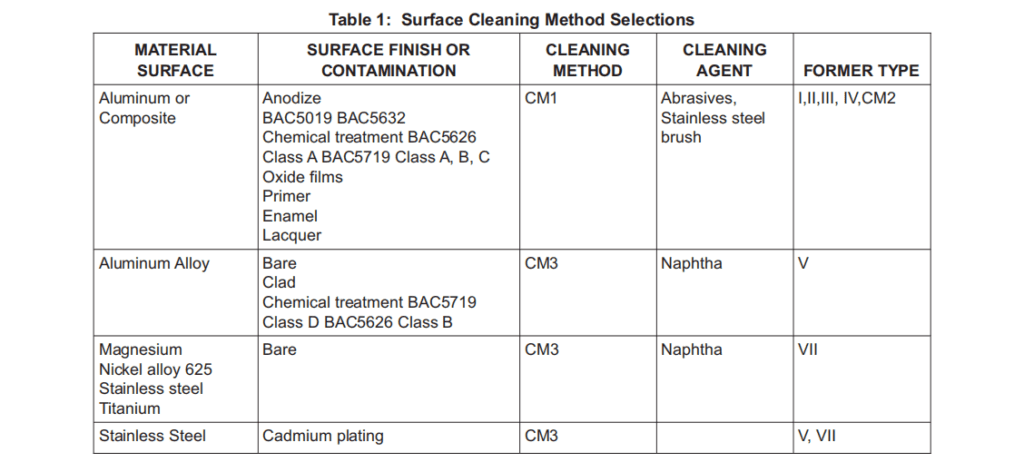
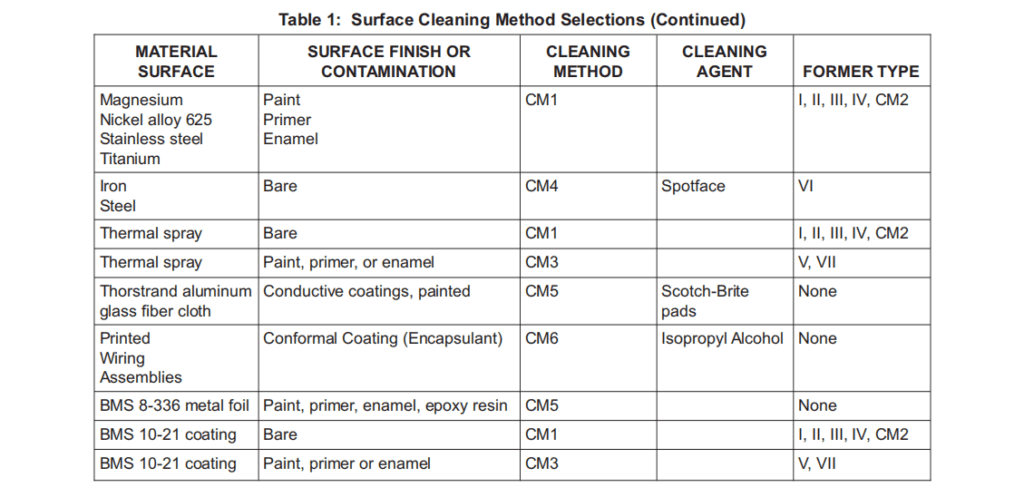
(2) Make your selection of the cleaning method from Table 1. Refer to Paragraph 3.B. thru Paragraph 3.G. for procedure details.
从表 1 中选择清洁方法。有关程序详情,请参阅第 3.B. 段至第 3.G. 段。
B. Cleaning Method CM1
清洁方法 CM1
CAUTION :DO NOT USE THE ABRASIVE MATERIAL ON MATERIAL DIFFERENT FROM THE TYPE ON WHICH IT WAS FIRST USED.
注意:请勿在与首次使用的材料类型不同的材料上使用磨料材料。
(1) Hand Application of Abrasives
手工使用磨料
(a) Clean the surface by hand with Scotch-Brite pads, garnet paper, or aluminum oxide or silicon carbide sandpaper.
用 Scotch-Brite 盘、石榴石纸或氧化铝或碳化硅砂纸手工清洁表面。
(b) Use a circular motion with the abrasive material.
使用研磨材料做圆周运动。
(c) Continue until the coating is removed and the metal surface is bright.
继续进行,直到涂层去除,金属表面光亮为止。
(d) On shot peened surfaces, if you remove an amount of material more than the larger of the nominal Almen A2 intensity or 0.001 inch, shot peen the surface again per SOPM 20-10-03. Then manually clean per BAC5744 or solvent clean per BAC5750 (SOPM 20-30-03).
对于喷丸表面,如果去除的材料超过 Almen A2 标称强度或 0.001 英寸的较大值,则应按照 SOPM 20-10-03 标准再次喷丸。然后按照 BAC5744 进行手工清理,或按照 BAC5750 进行溶剂清理 (SOPM 20-30-03)。
(e) Solvent clean the surface by the Final Cleaning procedure of BAC5750 (SOPM 20-30-03).
按照 BAC5750(SOPM 20-30-03)的最终清洁程序进行溶剂清洁表面。
CAUTION :DO NOT USE A BRUSH WITH CARBON STEEL BRISTLES, BECAUSE STEEL RUBBED INTO THE METAL SURFACES CAN CAUSE CORROSION. ALSO, DO NOT USE WIRE BRUSHES ON MAGNESIUM.
注意 :不要使用带有碳钢刷毛的刷子,因为碳钢与金属表面摩擦会导致腐蚀。另外,不要在镁上使用钢丝刷。
(2) Stainless Steel Rotary Brushes
不锈钢旋转刷
(a) Clean the surface with a rotary stainless steel wire brush in a manual or power drill motor.
使用手动或电动钻头马达上的旋转不锈钢钢丝刷清洁表面。
(b) Use light, intermittent pressure. Keep the cutting face parallel with the surface.
使用轻微、间歇的压力。保持切割面与表面平行。
(c) Examine the surface after each intermittent operation of the brush. Remove a minimum amount of the metal or conductive finish. Continue only until the metal surfaces is bright.
每次间歇性操作刷子后都要检查表面。尽量减少金属或导电表面的去除量。继续操作,直到金属表面光亮为止。
NOTE: Anodic layers can have different thicknesses, and are not always easy to remove with a wire brush. Then you can use an abrasive disk per step (3) below.
注意:阳极层的厚度可能不同,用钢丝刷不一定能轻易去除。这时可以按照下面的步骤 (3) 使用研磨盘。
(d) On shot peened surfaces, if you remove an amount of material more than the larger of the nominal Almen A2 intensity or 0.001 inch, shot peen the surface again per SOPM 20-10-03. Then manually clean per BAC5744 or solvent clean per BAC5750 (SOPM 20-30-03).
对于喷丸表面,如果去除的材料超过 Almen A2 标称强度或 0.001 英寸的较大值,则应按照 SOPM 20-10-03 标准再次喷丸。然后按照 BAC5744 进行手工清理,或按照 BAC5750 进行溶剂清理(SOPM 20-30-03)。
(e) Solvent clean the surface by the Final Cleaning procedure of BAC5750 (SOPM 20-30-03).
按照 BAC5750(SOPM 20-30-03)的最终清洁程序进行溶剂清洁表面。
CAUTION:DO NOT USE THE ABRASIVE DISK ON MATERIAL DIFFERENT FROM THE TYPE ON WHICH IT WAS FIRST USED.
注意:请勿在与首次使用的材料类型不同的材料上使用研磨盘。
(3) Rotary Abrasive Disk
旋转研磨盘
(a) Clean the surface with an abrasive sheet or disk in a rotary mandrel in a manual or power drill motor.
在手动或电动钻机马达的旋转轴上使用研磨片或研磨盘清洁表面。
(b) Use light, intermittent pressure. Keep the cutting edge parallel with the surface. If you use an abrasive disk without a pilot, keep the cutting edge at an angle less than 30 degrees to the surface.
使用轻微、间歇的压力。保持刀刃与表面平行。如果使用的是没有导向装置的研磨盘,则应保持切割边缘与表面的夹角小于 30 度。
(c) Continue until the coating is removed and the metal surface is bright.
继续进行,直到涂层被去除,金属表面光亮为止。
(d) On shot peened surfaces, if you remove an amount of material more than the larger of the nominal Almen A2 intensity or 0.001 inch, shot peen the surface again per SOPM 20-10-03. Then manually clean per BAC5744 or solvent clean per BAC5750 (Ref SOPM 20-30-03).
在经过喷丸的表面上,如果清除的材料量超过 Almen A2 标称强度或 0.001 英寸的较大值,则应根据 SOPM 20-10-03 对表面再次进行喷丸。然后按照 BAC5744 进行手工清理,或按照 BAC5750 进行溶剂清理(参考 SOPM 20-30-03)。
(e) Solvent clean the surface by the Final Cleaning procedure of BAC5750 (SOPM 20-30-03).
按照 BAC5750 的最终清洁程序(参考 SOPM 20-30-03)对表面进行溶剂清洁。
C. Cleaning Method CM2 — Superseded by Cleaning Method CM3
清洁方法 CM2 — 由清洁方法 CM3 取代
D. Cleaning Method CM3
清洁方法 CM3
CAUTION :BE SURE TO USE A SOLVENT THAT AGREES WITH THE SURFACE TO BE CLEANED.
注意 :务必使用与待清洁表面相适应的溶剂。
(1) Solvent clean the surface by the Final Cleaning procedure of BAC5750 (SOPM 20-30-03).Use a solvent from this list:
使用 BAC5750 的最终清洁程序(SOPM 20-30-03)对表面进行溶剂清洁,溶剂列表如下:
(a) Acetone
丙酮
(b) Ethyl alcohol, denatured
变性乙醇
(c) Isopropyl alcohol
异丙醇
(d) Methyl ethyl ketone – sec-butyl alcohol, 1-to-1 mix
甲基乙基酮-仲丁醇,1 比 1 的混合物
(e) Methyl propyl ketone
甲基丙基酮
(f) Solvents with FB code in BAC5750
FB 代码为 BAC5750 的溶剂
(2) If unwanted matter stays, it could be because of fast solvent evaporation. Try to clean a smaller area at one time.
如果有多余物质残留,可能是因为溶剂挥发过快。尝试一次清洗较小的区域。
E. Cleaning Method CM4 uses a hand spotface tool to prepare steel studs on ground support equipment. Refer to BAC5117 for details.
清洁方法 CM4 使用手工锪孔工具清洁地面支持设备上的钢螺栓。详情请参阅 BAC5117。
F. Cleaning Method CM5
清洁方法 CM5
CAUTION :BE CAREFUL TO REMOVE ONLY A MINIMUM OF ALUMINUM COATING FROM THE GLASS FIBERS.
注意 :小心只清除玻璃纤维上的最少量铝涂层。
(1) Use Scotch Brite cleaning and finishing Type A very fine abrasive pads to clean the paint or primer of conductivity-coated Thorstrand aluminum glass fiber cloth. Clean the surface only until the bright aluminum surface becomes bright.
使用Scotch Brite清洁和修整类型 A 极细研磨盘,清洁导电涂层 Thorstrand 铝玻璃纤维布的油漆或底漆。只清洁表面,直到光亮的铝表面变得光亮为止。
G. Cleaning Method CM6
清洁方法CM6
NOTE: This method comes from document D6-35610-1, section 9.5.3.4.
注: 此方法来自文件 D6-35610-1,第 9.5.3.4 节。
(1) Use a wiper or a nonmetallic brush soaked with clean isopropyl alcohol.
使用蘸有异丙醇的抹布或非金属刷。
(2) Clean the surface with light pressure. Continue to clean, with clean materials each time, until the unwanted matter is gone from the area.
用轻微的压力清洁表面。继续清洁,每次都使用干净的材料,直到该区域的杂质清除为止。
4. REPAIR OF TERMINAL LUG CONNECTIONS 修理接线片连接处
A. If there is contamination, disconnect the terminal lugs and fully clean the terminal lug and bonding area of the mating surface, as of the chassis (Figure 1). Solvent clean the surfaces with a cloth and naphtha per SOPM 20-30-03. Immediately wipe dry with a clean lint-free wiper.
如果存在污染,请断开接线端子,并完全清洁接线端子和连接表面的连接区域,如底盘(图 1)。按照 SOPM 20-30-03 标准,用抹布和石脑油溶剂清洁表面。立即用干净的无绒布擦干。
B. To replace a defective terminal lug, cut the defective terminal lug from the wire with a wire cutting tool. Make the cut as near to the terminal lug edge as possible.
为了更换故障端子接线片,使用切线工具将故障端子接线片从导线上切下。尽可能靠近接线片边缘切割。
(1) On uninsulated terminals or splices, cut the wire at the end of wire insulation.
对于未绝缘的接线端子或接线片,在导线绝缘层的末端剪断导线。
(2) On preinsulated terminals or splices, cut the wire at the end of terminal insulation.
对于预绝缘端子或接线片,在端子绝缘层末端剪断导线。
C. Remove the insulation from the end of the wire with a wire stripping tool such as ST2346.
用剥线工具(如 ST2346)从导线末端剥去绝缘层。
(1) Remove sufficient insulation to let the bare wire get to the bottom of the solder or crimp barrel of the terminal lug. Do not cut or nick the conductor strands. Conductor strands with rough surfaces, flat areas, or scrapes are acceptable, if the base metal of copper wire is not exposed.
剥去足够的绝缘层,让裸露导线到达端子接线片的焊料或压接筒底部。不要剪断或划伤导线。如果铜线的基体金属没有外露,表面粗糙、平坦或有刮痕的导线是可以接受的。
(2) Frayed insulation at the stripped wire ends is not acceptable. But fiberglass strands are permitted if they are no more than 10% of the total fiberglass stranding. A small amount of varnish grade A can be applied, if necessary to the frayed insulation. Do not get varnish on the bare conductor. Do not bend over the conductor ends to help in the removal of frayed insulation strands.
剥离导线末端的绝缘层有裂纹是不允许的。但如果玻璃纤维绞线不超过玻璃纤维绞线总数的 10%,则允许使用玻璃纤维绞线。如有必要,可在磨损的绝缘层上涂少量 A 级清漆。切勿将清漆涂在裸导体上。切勿弯折导体端部以帮助清除磨损的绝缘层。
D. Put the wire(s) into the terminal lug. Make sure that all conductor strands go in and go through the full length of the terminal lug barrel. Also, make sure the insulation of small diameter wires does not go into the terminal lug barrel and that you can see the conductor strands at the other end of the crimp barrel.
将导线插入端子接线片。确保所有导线股都能进入并穿过接线片桶的整个长度。此外,还应确保小直径导线的绝缘层不会进入接线片筒内,并且可以看到压接筒另一端的导线股。
(1) The conductors must not touch the adjacent installation screws, nuts or washers.
导线不得接触相邻的安装螺钉、螺母或垫圈。
(2) For preinsulated terminal lugs such as BACT12AC and BACT12S, push the end of the wire insulation against the end of the metallic conductor crimp barrel under the preinsulation sleeve.
对于 BACT12AC 和 BACT12S 等预绝缘接线片,应将导线绝缘层的末端推到预绝缘套管下的金属导体压接筒的末端。
(3) Refer to Table 2 for data about the distance between the end of the wire insulation and the end of the crimp barrel or preinsulated sleeve on the lug.
有关导线绝缘层末端与压接筒末端或接线片上的预绝缘套之间的距离数据,请参阅表 2。

E. Crimp the terminal lug on the wire with the correct crimping tool. Refer to BAC5153 for tables of applicable tools and adjustments.
使用正确的压接工具将接线片压接在导线上。有关适用工具和调整的表,请参阅 BAC5153。
(1) The crimp dents must be as symmetrical as possible (Figure 2).
压接凹痕必须尽可能对称(图 2)。
(2) The crimp dents must be confined to the conductor and/or insulation grip barrels.
压接凹痕必须限制在导体和/或绝缘夹筒内。
(3) The insulation grip barrels must be sufficiently closed by the crimping tool to prevent movement of the wire within the insulation grip barrel.
压接工具必须充分封闭绝缘夹筒,以防止导线在绝缘夹筒内移动。
(4) The insulation grip barrels must not break the wire insulation or the outer jacket.
绝缘夹筒不得弄破导线绝缘层或外护套。
(5) The terminals must not be cracked or show metal when examined under five-power.
在五倍功率下检查时,端子不得有裂纹或显示金属。
F. For easier installation, preinsulated terminals (size 10 thru 22 only) can be bent down 90 degrees (see Figure 3) if there is sufficient clearance between the terminal shank and the mounting stud to permit installation and removal as bent. On terminal blocks, the terminal can be bent up a maximum of 30 degrees. Bend the terminal only once, in the direction shown.
为便于安装,如果端子柄与安装螺柱之间有足够的间隙,可将预绝缘端子(仅规格 10 至 22)向下弯曲 90 度(见图 3),以便按弯曲方式安装和拆卸。在接线端子板上,端子最多可向上弯曲 30 度。接线端子只能按图示方向弯曲一次。
G. Install the terminal lugs by the overhaul instructions.
按照大修说明安装接线端子的接线片。


5. REPLACEMENT OF DEFECTIVE HEAT SHRINKABLE SLEEVING 更换有缺陷的热收缩套管
A. Carefully remove the defective sleeving from the component. Do not cut into or damage the component.
小心地从组件上拆下有缺陷的套管。切勿切割或损坏组件。
B. For the replacement sleeving, refer to the overhaul instructions for the correct sleeving type. If the type is not specified, use Raychem thermofit sleeving or equivalent.
更换套管时,请参考大修说明,选择正确的套管类型。如果没有规定的类型,则使用 Raychem thermofit 套管或同等产品。
(1) Get a sleeve which, while not yet shrunk, will be a loose fit over the part to be insulated, and will be permanently held in position after it is shrunk.
准备一个套管,虽然尚未收缩,但可以松动地套在要绝缘的零件上,并在收缩后永久固定在原位。
(2) Cut sleeve to the necessary length. Because the sleeve becomes approximately 10 percent shorter when it shrinks, cuts the new sleeve approximately 10 percent longer. The shrunk sleeve must overlap the wiring insulation 0.50 inch minimum inch on splices and terminals, 0.38 inch minimum on connector contacts, and 0.19 inch minimum on shield termination points, dead-ends, breakouts, unless specified by the overhaul instructions.
将套管剪成所需的长度。因为套管收缩后会变短约 10%,所以要将新套管剪长约 10%。除非大修说明有规定,否则收缩后的套管必须与接线和端子上的接线绝缘重叠至少 0.50 英寸,与连接器触点上的接线绝缘重叠至少 0.38 英寸,与屏蔽终止点、死端和断开处的接线绝缘重叠至少 0.19 英寸。
(3) If you must replace defective sleeving on the emitter and base terminals of transistors, refer to the applicable overhaul instructions for special details, because this sleeving is usually not heat shrinkable sleeving.
如果必须更换晶体管发射极和基极上有缺陷的套管,请参阅适用的大修说明了解特殊细节,因为这种套管通常不是热收缩套管。
C. Shrink the sleeving into position with a hot air gun, an oven, an infrared radiant heater, or a shop air heater. If you use a gun:
用热风枪、烤箱、红外线辐射加热器或车间空气加热器将套管收缩到位。如果使用热风枪
(1) Adjust the air vent on the gun to the fully open position.
将烘枪上的排气口调到完全打开的位置。
(2) If this is one of those guns that is switched on immediately before you use it, let it heat up for 3-15 seconds before you turn it on the hardware. The time limit for the gun applied to the hardware is applicable with or without the preheat time.
如果烘枪是在使用前立即开启的,则在对硬件使用烘枪前,先让烘枪预热 3-15 秒钟。烘枪应用于硬件的时间限制适用于是否有预热时间。
(3) Hold the gun at a minimum of one inch from the shrinkable sleeve and point it at the center of the sleeve.
将烘枪握在距离收缩套管至少一英寸的地方,对准套管中心。
(4) Apply heat to the sleeving until it shrinks into position, but do not keep the heat in one area for more than 20 seconds, to prevent damage to the wiring inside the sleeving. Usually 5 to 10 seconds is sufficient.
对套管进行加热,直至其收缩到位,但不要在一个区域持续加热超过 20 秒,以防损坏套管内的接线。通常 5 至 10 秒钟即可。
(5) The shrunk sleeve must not be burnt, cracked, split or show other damage, but a small color change is acceptable.
收缩套管不得烧焦、破裂、裂开或出现其他损坏,但颜色略有变化是可以接受的。
(6) If the shrunk sleeve is not permanently held in position, let it get cool (about 2 minutes or until you can hold it tightly in your bare hand). Then apply heat again per Paragraph 5.C.(3) and Paragraph 5.C.(4) above.
如果收缩套管没有被永久固定,让其冷却(约 2 分钟或直到可以用手紧握)。然后按照上文第 5.C.(3)段和第 5.C.(4)段再次加热。
6. INSULATING UNATTACHED WIRE ENDS 未连接导线末端的绝缘
A. Before you apply power to the equipment, give protection to all unattached wire ends or terminals.
在给设备供电之前,对所有未连接的线端或端子进行保护。
B. One procedure covers unstripped ends of wire with end caps as shown in Table 3 below. Crimp these end caps with AMP (V0779) tool 46063 or equivalent.
有一种程序涉及未剥线端,其端盖如下表 3 所示。使用 AMP (V0779) 工具 46063 或同等工具压接这些端盖。

C. For other procedures, refer to BAC5153.
其他程序请参阅 BAC5153。
7. MULTIPLE WIRE AND UNDERSIZED WIRE COMBINATIONS 多导线和过小导线组合
A. Multiple Wire Combinations
多线组合
(1) When specified by the overhaul instructions, you can install more than one wire in a termination barrel, and crimp them with the same tool as for one wire.
在大修说明书规定的情况下,可以在一个终端筒中安装多根导线,并用与一根导线相同的工具进行压接。
(a) In a size 18 thru 22 crimp barrel, you can install two size 22 wires, or one size 22 wire and one size 20 wire.
在 18 号至 22 号压接筒中,可以安装两根 22 号导线,或一根 22 号导线和一根 20 号导线。
(b) Also, for preinsulated terminal lugs, you can install these combinations in a size 16 thru 22 crimp barrel:
对于预绝缘端子接线片,也可以在 16 号至 22 号压接筒中安装这些组合:
1) One size 20 wire and one size 20 or 22 wire.
一根 20 号导线和一根 20 号或 22 号导线。
2) Two or three size 22 wires.
两根或三根 22 号导线。
(2) When you install two or more wires in a one barrel, put the stripped wire ends together and put them into the barrel as a unit. Make sure all conductor strands go into the conductor crimp barrel. Keep the wire insulation out of the barrel. The individual wire strands can be twisted to help keep them together. If loose insulation fibers become a problem, you can install a heat shrinkable sleeve around the wires per Paragraph 3.
将两根或更多导线装入一个压线筒时,应将剥皮导线的两端放在一起,然后作为一个整体装入压线筒。确保所有导线都进入导线夹筒。不要让导线绝缘层进入线筒。可以扭转单股导线,使其保持在一起。如果出现绝缘纤维松散的问题,可以按照第 3 段在导线周围安装热缩套管。
(3) Push the insulation of all wires to the bottom of the insulation barrel if possible. If this is not possible because of the size and/or number of wires, let the insulation of one or more wires stay out of the insulation barrel.
如果可能,将所有导线的绝缘层推到绝缘筒的底部。如果由于导线的尺寸和/或数量而无法做到这一点,则应让一根或多根导线的绝缘层留在绝缘筒外。
B. An adapter can be used as filler to adapt an undersize wire or group of wires to a crimp barrel. Refer to BAC5120-1 and BAC5120-2 for more details.
可以使用适配器作为填充物,将尺寸不足的导线或导线组适配到压接筒中。详情请参阅 BAC5120-1 和 BAC5120-2。
C. To adapt oversize wires to connectors and solder cups, refer to the procedure for soldering wires to solder type contacts in, SOPM 20-11-02, par. 5.
要将过大尺寸的导线与连接器和焊杯适配,请参阅 SOPM 20-11-02 第 5 段中将导线焊接到焊接型插针的程序。
8. LOW RESISTANCE BONDS 低电阻连接
A. Low resistance bonds (approximately 0.0025 ohm) are specified at some electrical terminations and between some assembly part faying surfaces. After you clean and install all the related parts, measure the bonding resistance. Use Method 1 or 2 in areas without an explosive hazard. Use Method 3 in areas with an explosive hazard.
在某些电气终端和某些装配零件连接面之间规定了低电阻连接(约 0.0025 欧姆)。清洁和安装所有相关零件后,测量连接电阻。在没有爆炸危险的区域使用方法 1 或 2。在有爆炸危险的区域使用方法 3。
B. Method 1 (For areas without an explosion hazard)
方法 1(用于无爆炸危险的区域)
(1) Test Equipment 测试设备
(a) Voltmeter
电压表
(b) Power Supply
电源
(c) Ammeter
电流表
(2) Connect the test equipment as shown in Figure 4 with the power supply set to zero volts.
按图 4 所示连接测试设备,电源设置为零伏。
(3) Slowly increase the power supply voltage output until the ammeter indicates exactly 1 ampere.
缓慢增加电源电压输出,直至电流表显示正好 1 安培。
(4) At this condition, the voltmeter reading becomes numerically equal to the resistance between the contact surfaces. This value must be no larger than the bonding resistance specified by the overhaul instructions.
此时,电压表读数在数值上等于接触面之间的电阻。该值不得大于大修说明书规定的连接电阻。
(5) As an alternate to Paragraph 8.B.(3) and Paragraph 8.B.(4), calculate the resistance from the voltmeter and ammeter readings, as shown.
作为第 8.B.(3)段和第 8.B.(4)段的替代方法,根据电压表和电流表的读数计算电阻,如图所示。
C. Method 2 (For areas without an explosion hazard) — Use a multimeter with milliohm scale and measure the bonding resistance directly. Use standard industry practices and the instructions of the meter vendor.
方法 2(适用于无爆炸危险的区域) — 使用毫欧刻度的万用表直接测量连接电阻。使用标准行业惯例和万用表供应商的说明。
D. Method 3 — (For areas with an explosion hazard) 方法 3 — (用于有爆炸危险的区域)
(1) Use a bonding meter, such as an Avtron (V01014) Model T477W, to measure the bonding resistance directly. Use standard industry practices and the instructions of the meter vendor.
使用 Avtron (V01014) T477W 型等连接计直接测量连接电阻。使用标准行业惯例和测量仪供应商的说明。
(2) The bonding meter you use must agree with Underwriters Laboratory Standard 913 for Class I, Group A atmosphere or Factory Mutual Approval Standard 3610.
所使用的连接计必须符合Underwriters Laboratory I 类 A 组大气标准 913 或工厂相互认可标准 3610。
E. For other surfaces and special situations, such as conductive finishes, refer to BAC5117.
对于其他表面和特殊情况,如导电饰面,请参阅 BAC5117。

9. ELECTRICAL FAYING SURFACE BONDS 电接合表面连接
A. BAC5117 has different categories for electrical faying surface bonds (Table 4).
BAC5117 对电接合表面连接有不同的分类(表 4)。
B. This paragraph does not apply to the other bonding procedures in SOPM 20-11-03.
本段不适用于 SOPM 20-11-03 中的其它连接程序。
C. If the overhaul instructions do not identify the procedure for the bond, or if they specify an electrical faying surface bond without a category, use a Category One bond.
如果大修说明中没有确定连接程序,或规定的电接合表面连接没有类别,则使用第一类连接。
D. Refer to BAC5117 for procedure details.
有关程序详情,请参阅 BAC5117。
