更换轴承和衬套BEARING AND BUSHING REPLACEMENT
1. INTRODUCTION 介绍
A. The data in this subject comes from Boeing Process Specifications BAC5040 and BAC5435, Boeing drawing 66-19908, and some tool drawings. Access to the Boeing Process Specifications is available.
本主题中的数据来自波音工艺规范 BAC5040 和 BAC5435、波音图纸 66-19908 以及一些工具图纸。可查阅波音工艺规范。
B. Use these procedures to replace rolling-element (antifriction) bearings, sliding-surface (plain) bearings, self-lubricated (Teflon) bearings, sintered bearings, and bushings (journal bearings).
使用这些程序更换滚动(减摩)轴承、滑动面(滑动)轴承、自润滑(特氟龙)轴承、烧结轴承和衬套(轴颈轴承)。
C. The data is general. It is not about all situations or specific installations. Use it as a guide to help you write minimum standards.
数据具有通用性。并非适用于所有情况或特定安装。请将其作为编写最低标准的指南。
D. If the component overhaul instructions are different than the data in this subject, use the component overhaul instructions.
如果部件大修说明与本主题中的数据不同,请使用部件大修说明。
E. Refer to SOPM 20-00-00 for a full list of all the vendor names and addresses.
有关所有供应商名称和地址的完整列表,请参阅 SOPM 20-00-00。
2. DEFINITIONS 定义
A. Bearing — A general term used in this subject to refer to a component with inner and outer parts that can move one relative to the other. Rolling element bearings, sometimes also known as antifriction bearings, have rolling elements (balls, rollers, or needles) that send the load between the inner and outer race. Sliding surface bearings, also known as plain bearings, include all bearings in which one surface slides relative to another. Sliding surface bearings can be spherical bearings or journal bearings. Journal bearings are also known as bushings, which is the term used in this subject.
轴承 — 本主题中使用的通用术语,指具有可相对移动的内部和外部零件的部件。滚动体轴承,有时也称为抗摩擦轴承,具有滚动体(球、滚子或滚针),在内外滚道之间传递载荷。滑动表面轴承也称为滑动轴承,包括所有一个表面相对于另一个表面滑动的轴承。滑动表面轴承可以是球轴承或轴颈轴承。轴颈轴承也称为衬套,是本主题中的术语。
B. Bushing — A lining of metal or similar material for a hole, to give the hole protection from wear, or to put replaceable material in the hole of a larger part not as economically replaceable.
衬套 — 孔的金属或类似材料衬里,用于保护孔免受磨损,或在较大零件的孔中放入可更换材料,但在经济上不可更换。
C. Clearance fit — A fit where the inner part is smaller than the mating hole, which permits installation without force or heat or cold.
间隙配合 — 内部零件小于配合孔的配合,允许在不受力或冷热的情况下安装。
D. Expanded fit — An installation procedure where the bushing is installed in the housing as a clearance fit, and then a tool is put into the bore to expand the bushing to make it become an interference fit.
膨胀配合 — 一种安装程序,将衬套作为间隙配合安装在外壳中,然后将工具放入孔中膨胀衬套,使其成为过盈配合。
E. Housing — The material around the hole in a larger part which gets a bushing, bearing, or similar part.
外壳 — 安装衬套、轴承或类似零件的较大零件孔周围的材料。
F. ID — Inside diameter.
ID — 内径。
G. Installation — A procedure that puts the mating parts together, without damage to either part.
安装 — 在不损坏任何零件的情况下,将配合零件安装在一起的程序。
H. Installation finish — Grease, sealant, or other material applied to mating surfaces before assembly, for corrosion protection or to help the installation or retention process.
安装表面处理 — 在装配前涂抹在配合表面的润滑脂,密封剂或其他材料,用于防腐蚀或帮助安装或固定过程。
I. Interference fit — A fit where the inner part is slightly larger than the mating hole.
过盈配合 — 内部零件略大于配合孔的配合。
J. Net fit bushing — A bushing made to tighter tolerances, to give acceptable assembled dimensions without adjustment after installation.
净配合衬套 — 按照较小公差制造的衬套,安装后无需调整即可获得可接受的装配尺寸。
K. OD — Outside diameter.
OD — 外径
L. Press fit — Installation of interference-fit mating parts when the amount of interference is sufficiently small that parts will not be damaged by the mechanical force that installs one part in the other.
压配 — 安装过盈配合零件,过盈量足够小,零件不会因机械力将一个零件安装到另一个零件上而损坏。
M. Retention — Any procedure, such as intentional deformation of one of the mating parts, which is used to hold parts together after installation.
保留 — 任何程序,如故意使其中一个配合零件变形,用于在安装后将零件固定在一起。
N. Shrink fit — An installation procedure in which one part is chilled, to temporarily change the interference fit to a clearance fit for installation without damage to the parts. Also known as temperature differential. Some component-specific overhaul instructions could also heat the mating part.
收缩配合 — 一种安装程序,将一个零件冷却,暂时将过盈配合变为间隙配合,以便在不损坏零件的情况下安装。也称为温度差。一些针对部件的大修说明也可以加热配合零件。
O. Slip fit — A clearance fit with zero to small clearance.
滑动配合 — 间隙为零或很小的间隙配合。
P. Stake — To deform, usually by pressure or impact at isolated points, for retention purposes. Sometimes used interchangeably with swage.
铆钉 — 通常通过压力或撞击在孤立点变形,以达到固定目的。有时与压接互换使用。
Q. Swage — To deform, usually by pressure or impact over an extended area, for retention purposes.
压接 — 通常通过压力或冲击力在较大范围内变形,以达到固定目的。
R. Substrate part — Same as housing.
基底零件 — 与外壳相同。
S. Temperature differential — Same as shrink fit.
温差 — 与收缩配合相同。
3. MATERIALS 材料
A. Adhesives
接合剂
(1) EA 913 or EA 913.1 (SOPM 20-60-04)
(2) BAC5010 Type 70 (BMS 5-92) (SOPM 20-50-12)
B. Coolants for shrink fit procedure
用于收缩配合程序的冷却剂
(1) Dowanol DPM, V71984
(2) Dry ice
(3) Ethyl alcohol (SOPM 20-60-01)
(4) Liquid nitrogen
(5) Methanol (SOPM 20-60-01)
C. Grease (SOPM 20-60-03)
润滑脂(SOPM 20-60-03)
(1) BMS 3-24 (Superseded by BMS 3-33)
(2) BMS 3-33
(3) MIL-G-23827 (Replaced by MIL-PRF-23827)
(4) MIL-PRF-23827 (Replaced by BMS 3-33)
D. Oil, lubricating, for sintered bearings — MIL-PRF-7870 (Replaces MIL-L-7870) (SOPM 20-60-03)
烧结轴承润滑油–MIL-PRF-7870(取代 MIL-L-7870)(SOPM 20-60-03)
E. Paper, grease-proof — MIL-DTL-121 (Replaces MIL-B-121) (SOPM 20-60-04)
防油纸–MIL-DTL-121(替代 MIL-B-121)(SOPM 20-60-04)
F. Sealant — BMS 5-95 (SOPM 20-60-04)
密封胶 — BMS 5-95 (SOPM 20-60-04)
G. Solvents
溶剂
(1) Methanol (methyl alcohol) (SOPM 20-60-01)
(2) Series 98 (SOPM 20-30-98)
4. BEARING REMOVAL 轴承拆卸
A. Bearings held by a staked or swaged outer race over the housing, or by a staked or swaged sleeve.
由外壳上的外滚道或由轴承套固定的轴承。(柱子支撑或者压接)
(1) These bearings can be removed without housing damage with ST927 or equivalent tools.
这些轴承可以用 ST927 或类似工具在不损坏外壳的情况下拆卸。
(2) Removal is a two-step operation. The swaged lip material that covers the housing is removed with a hole saw. Then the bearing or sleeve is punched or pressed out of its housing (Figure 1).
拆卸分为两个步骤。先用孔锯锯掉覆盖轴承座的压接材料。然后将轴承或轴承套冲压出外壳(图 1)。
(a) For the F80118-55 kit, assemble the tool components around the installed bearing as shown.
对于 F80118-55 套件,如图所示在已安装的轴承周围组装工具部件。
(b) For ST927 or equivalent tools:
对于 ST927 或同等工具:
1) Put the part on the anvil, with the bearing bore on the pilot bushing.
将零件放在砧座上,轴承孔位于导向套上。
2) Install the applicable hole saw on the cutter pilot or arbor. Some applications use a different hole saw, such as ST1212E- or A32091-series, to replace the saw that comes with the tool.
将适用的孔锯安装在刀具导向套或心轴上。有些应用使用不同的孔锯,如 ST1212E- 或 A32091-系列,以取代工具附带的孔锯。
(c) Turn the arbor or cutter pilot to saw away the deformed lip metal. Stop when the lip metal is removed to prevent damage to the housing bore.
旋转心轴或刀具导向套,锯掉变形的边缘金属。当唇口金属被锯掉时停止,以防损坏外壳孔。
(d) Lift off the cutter. Press or punch out the bearing, such as with a punch and a pilot as shown.
抬起铣刀。压出或冲出轴承,如图所示使用冲头和导向器。
B. Bearings or bushings or sleeves installed by interference fit, or held by a swaged or staked housing.
以过盈配合方式安装的或压接或柱子支撑式外壳固定的轴承、衬套或套筒。
(1) Press the bearing, bushing, or sleeve out of the housing with the same tool setup as for the proof load test, shown in Figure 9.
如图 9 所示,使用与验证负载测试相同的工具将轴承、衬套或套筒从外壳中压出。
(2) As an alternative, push or punch the bushing down through the lug or housing bore with a stepped mandrel (such as an A20011-series removal mandrel) that has a smaller OD to fit the bushing bore and a larger OD to push against the bushing end, but not larger than the mating hole in the housing
作为替代方法,使用阶梯心轴(如 A20011 系列拆卸心轴)将衬套从凸耳或外壳孔中向下推压或冲压,该心轴的外径较小,可与衬套孔配合,外径较大,可顶住衬套端部,但不得大于外壳上的配合孔。
(3) Be sure to give the housing support to prevent damage.
确保为外壳提供支撑,以防损坏。
C. Bushings installed with a swaged or flared end.
安装时,衬套的端部为压接式或扩口式。
(1) Cut off the flange with a ream or cutter (such as the A20011-series tools specially made for some bushings).
用铰刀或切割器(如 A20011 系列工具,专门用于某些衬套)切下法兰。
(2) Push or punch out the bushing with a stepped mandrel (such as A20011 tools) that has a smaller OD to fit the bushing bore and a larger OD to push against the bushing end, but not larger than the mating hole in the housing.
用阶梯心轴(如 A20011 工具)将衬套推出或冲出,该心轴的外径较小,以适合衬套孔,外径较大,以抵住衬套端部,但不得大于外壳上的配合孔。
(3) If the bushing was also installed with an interference fit, it could be necessary to make the bushing cold to decrease the interference fit to make removal easier.
如果衬套也是以过盈配合方式安装的,则有必要对衬套进行冷加工,以减小过盈配合,使拆卸更容易。
D. Bushings installed back-to-back in a lug or housing
背靠背安装在凸耳或外壳中的衬套
(1) Cut off the flange of one of the bushings with a ream or cutter (such as the A20011-series tools specially made for some bushings).
用铰刀或切割器(如 A20011 系列工具,专门用于某些衬套)切下其中一个衬套的法兰。
(2) Push or punch the bushing down through the lug or housing bore with a stepped mandrel (such as an A20011-series removal mandrel) that has a smaller OD to fit the bushing bore and a larger OD to push against the bushing end, but not larger than the mating hole in the housing. Push this bushing down against the other bushing and push the two bushings out the other end of the lug or housing bore.
用阶梯心轴(如 A20011 系列拆卸心轴)将衬套从凸耳或外壳孔中推下或冲出,该心轴的外径较小,可与衬套孔配合,外径较大,可顶住衬套端部,但不得大于外壳上的配合孔。将此衬套向下顶住另一个衬套,然后将两个衬套从凸耳或外壳孔的另一端推出。
(3) Because such bushings are usually installed with an interference fit, it could be necessary to make the bushings cold to decrease the interference fit to make removal easier.
由于此类衬套通常是以过盈配合方式安装的,因此可能有必要使衬套变冷,以减少过盈配合,从而使拆卸更容易。

5. BENCH INSPECTION OF BEARINGS AND BUSHINGS 轴承和衬套的台架检查
A. Precautions
注意事项
CAUTION :BE CAREFUL TO KEEP ADVERSE MATERIALS AWAY FROM SELFLUBRICATED BEARINGS BEFORE, DURING OR AFTER INSTALLATION.
注意 :在安装前、安装过程中或安装后,请注意不要让有害物质接触自润滑轴承。
(1) Materials which will chemically attack bearing components
会对轴承部件产生化学侵蚀的材料
(a) Acid brighteners for aluminum
铝的酸性光亮剂
(b) Phosphoric acid corrosion removers for aluminum or steel
用于铝或钢的磷酸腐蚀去除剂
(c) Paint strippers
脱漆剂
(2) Materials which will collect dust and dirt in the bearings, and increase friction and wear
会在轴承中聚集灰尘和污垢并增加摩擦和磨损的材料
(a) Oils and greases
润滑油和润滑脂
(b) Cutting oils
切削油
(c) Antiseize compounds
防咬剂
(3) Be careful not to misalign the bearing more than the angle specified in the bearing specification or drawing, or you could damage races, rolling elements, seals, or seal retainers.
请注意不要将轴承错位超过轴承规格或图纸规定的角度,否则可能会损坏滚道、滚动体、密封件或密封挡圈。
B. General
通用
(1) Examine the bearing or bushing for damage, cracks, corrosion, or other defects on the bearing bore and outside diameter. If you find defects, make a check of the dimensions of the bearing or bushing to make sure they are within limits.
检查轴承或衬套的内孔和外径是否有损坏、裂纹、腐蚀或其他缺陷。如果发现缺陷,应检查轴承或衬套的尺寸,确保其在限定范围内。
(2) Turn the races of the bearings manually and look for roughness, unusual looseness, unusual drag (more than the usual preload drag), or drag that is not constant.
手动转动轴承的滚道,查看是否有粗糙、异常松动、异常阻力(超过通常的预紧阻力)或阻力不恒定。
C. Teflon Liner Condition
特氟龙衬垫状况
(1) Examine the liner for wear. Generally, wear to cause an internal diametrical play of 0.005 inch could make the bearing unserviceable. But you can use service experience with the wear limits for specific applications.
检查衬垫是否磨损。一般来说,磨损导致内径游隙达到 0.005 英寸时,轴承就不能使用了。但您可以根据维修经验来确定具体应用的磨损极限。
NOTE: On most spherical bearings, you can turn the ball to let you see the liner through the bearing bore. But be careful not to misalign the ball more than the angle specified in the bearing specification or drawing, or you could damage races, seals, rolling elements, or seal retainers.
注:在大多数外球轴承上,可以转动球使衬垫穿过轴承孔。但要注意不要将球错位超过轴承规格或图纸规定的角度,否则可能会损坏滚道、密封件、滚动体或密封保持架。
(2) Examine the mating surfaces of the liner and ball. If the bearing was incorrectly swaged, local wear can occur at the edges of the liner. Such bearings are usually not serviceable.
检查衬垫和球的配合面。如果轴承装配错误,衬圈边缘会出现局部磨损。这种轴承通常无法维修。
(3) Examine the liner for rubbed-in unwanted material.
检查衬垫是否有摩擦产生的不需要的材料。
(4) Examine the liner and its bond for signs of damage from chemical agents.
检查衬垫及其接合处是否有化学试剂损坏的痕迹。
D. Special Configurations
特殊配置
(1) Examine aluminum bearing races for the quality of the surface treatment or plating, and for corrosion, cracks and other defects.
检查铝制轴承滚道的表面处理或电镀质量,以及是否有腐蚀、裂纹和其他缺陷。
(2) Look for cracks in such areas as threads, holes, keyways, and flanges, which are local stress risers.
检查螺纹、孔、键槽和法兰等局部应力上升区域的裂纹。
E. Finite Wear
有限磨损
(1) To find how much wear there is, you can manually apply a reversing load of 10-15 pounds to the bearing in a holding fixture and measure the play with a dial indicator. First apply the load radially and measure total diametrical play. Then apply this load in an axial (thrust) direction and measure the axial play.
要了解磨损程度,可以在固定夹具中手动对轴承施加 10-15 磅的反向负荷,然后用千分表测量游隙。首先沿径向施加载荷,测量总的直径游隙。然后向轴向(推力)施加载荷,测量轴向游隙。
(2) When you measure radial play, do it at several positions. Turn the outer race relative to the inner race to find the point of maximum play before you try to make an accurate wear reading.
测量径向游隙时,应在多个位置进行。相对于内滚道转动外滚道,找到最大游隙点,然后再尝试进行精确的磨损读数。
F. Breakaway and Rotational Torque
松动和旋转扭矩
(1) To measure breakaway and rotational preload torques, measure the torque which will turn one race with the other race held stopped. The bearing must be free of lubricants and all other contaminants. Make all tests at room temperature.
要测量松动扭矩和旋转预紧扭矩,应测量在另一个滚道停止转动的情况下转动一个滚道的扭矩。轴承必须没有润滑剂和所有其他污染物。在室温下进行所有测试。
(2) Measure the breakaway torque before you measure the rotational torque. For rotational torque tests, turn the bearing through two or three revolutions immediately before you measure the torque.
在测量旋转扭矩之前先测量松动扭矩。对于旋转扭矩测试,在测量扭矩之前应立即将轴承旋转两到三圈。
(3) Refer to the bearing specification or standard for the permitted rotational preload torques. These torque values are for new bearings only. For used bearings, only the maximum torque value is important. Because some friction will go away during the break-in, the minimum torque of a used bearing can be less than that specified for the new bearing.
有关允许的旋转预紧扭矩,请参考轴承规格说明书或标准。这些扭矩值仅适用于新轴承。对于旧轴承,只有最大扭矩值是重要的。因为在磨合过程中一些摩擦会消失,所以使用过的轴承的最小扭矩可以小于新轴承的规定扭矩。
6. BEARING INSTALLATION 轴承安装
A. General
通用
(1) Antifriction bearings
抗摩擦轴承
(a) Do not remove the bearing from its package until all parts are prepared for the installation of the bearing.
在安装轴承的所有零件准备就绪之前,不要将轴承从包装中取出。
(b) Before installation, examine the bearings for damage, corrosion, and contamination. Clean and lubricate them as specified in SOPM 20-30-01, if necessary.
安装前,检查轴承是否有损坏、腐蚀和污染。如有必要,按照 SOPM 20-30-01 的规定进行清洁和润滑。
(c) Grease-lubricated rolling element bearings (such as needle, roller or sealed ball bearings) must be installed by the installation date given by the bearing standard or drawing. If the bearing standard or drawing does not give the installation date, the bearing must be installed within 6 years of the lubrication date marked on the bearing package. Bearings with lubrication dates more than these limits must be discarded or returned to the manufacturer to be cleaned and lubricated again. Examine bearings with lubrication dates more than 6 years old by the Storage procedure in SOPM 20-30-01.
润滑脂润滑的滚动体轴承(如滚针轴承、滚子轴承或密封球轴承)必须在轴承标准或图纸规定的安装日期前安装。如果轴承标准或图纸没有给出安装日期,轴承必须在轴承包装上标注的润滑日期后 6 年内安装。润滑日期超过上述限制的轴承必须报废或退回制造商重新清洗和润滑。按照 SOPM 20-30-01 中的存储程序检查润滑日期超过 6 年的轴承。
NOTE: Sealed ball bearings have a seal on each side of the bearing.
注: 密封球轴承的两侧各有一个密封圈。
(d) The assembly area must be free from dust and dirt.
装配区必须没有灰尘和污垢。
(2) Plain and spherical bearings
普通轴承和球轴承
(a) Give protection to these bearings and put them away without lubrication (unless specified by the overhaul instructions) by standard industry practices.
对这些轴承给予保护,并按标准行业惯例在不加润滑的情况下(除非大修说明有规定)将其放好。
(b) Immediately before installation, examine, clean and lubricate these bearings as specified in SOPM 20-50-07.
安装前,应立即按照 SOPM 20-50-07 的规定检查、清洁和润滑这些轴承。
B. Unless specified by the overhaul instructions, apply installation finish as follows:
除非大修说明书有规定,否则按以下方法进行安装处理:
(1) Installation in housings
安装于外壳
(a) Surface preparation
表面处理
1) Installation with sealant
用密封剂安装
a) Clean the mating surfaces of the housing and the bushing or bearing.
清洁外壳和衬套或轴承的配合表面。
b) If BMS 5-63, Type 1 sealant is specified as the installation finish
如果规定使用 BMS 5-63,1 型密封剂作为安装饰面
<1> Apply a thin layer of BMS 5-63 primer to the surface of the housing bore, and also to the surface of the housing (the chamfer around the hole) that will be under the flange of a bushing. Make sure the primer layer is continuous in the housing bore.
在外壳内孔表面和外壳表面(孔周围的倒角)(位于衬套法兰下)涂一薄层 BMS 5-63 底漆。确保底漆层在外壳孔内是连续的。
<2> Let the BMS 5-63 primer cure as specified in BAC5000.
按照 BAC5000 的规定,让 BMS 5-63 底漆固化。
2) Installation without sealant
无密封剂安装
a) Remove all cutting fluid, oil, grease or other contamination from the housing with a solvent as specified in BAC5750 (SOPM 20-30-03).
按照 BAC5750(SOPM 20-30-03)的规定,用溶剂清除外壳上的所有切削液、油、油脂或其他污染物。
b) Keep solvents out of faying surfaces, crevices and bearing lubricated areas.
使溶剂远离摩擦表面、缝隙和轴承润滑区。
(b) Application of installation finishes
安装饰面的应用
1) Shrink fit installations
收缩配合安装
a) Do not apply installation finish to surfaces which will be wet with coolant.
不要在会被冷却液浸湿的表面涂抹安装面漆。
b) For bearings and bushings without a lubrication path:
对于没有润滑通道的轴承和衬套:
<1> Apply the specified installation finish to the housing ID.
在外壳内径上涂抹规定的安装面漆。
<2> Apply installation finish to the housing faying surface which will touch the bushing flange.
在与衬套法兰接触的外壳接合表面上涂抹安装面漆。
c) For lubricated joints that use two bushings back-to-back with a lubrication path to the gap between the bushing ends
对于使用两个背靠背衬套的润滑接头,衬套两端的间隙有润滑通道
<1> If the minimum gap is less than 0.300 inch, do not apply installation finish to the housing bore or bushing OD surfaces. Apply the specified installation finish only to the housing faying surface that will touch the bushing flange, if applicable.
如果最小间隙小于 0.300 英寸,则不要在外壳内孔或衬套外径表面涂抹安装面漆。如果适用,仅在将接触衬套法兰的外壳接合表面涂抹规定的安装面漆。
<2> If the minimum gap is 0.300 inch or more, apply the installation finish to the housing bore and, where applicable, to the housing faying surface that will touch the bushing flange.
如果最小间隙为 0.300 英寸或更大,则在外壳孔上涂抹安装面漆,并在适用情况下,在将接触衬套法兰的外壳接合表面上涂抹安装面漆。
<3> After installation, make sure the lubrication passages and the gap between the bushings are open to let the lubricant flow all around the groove circumference.
安装后,确保润滑通道和衬套之间的间隙打开,让润滑油流遍凹槽圆周。
d) For lubricated joints that use one bushing or two bushings with a lubrication path through the housing to the lubrication groove or hole of the bushing:
对于使用一个衬套或两个衬套的润滑接头,其润滑通道穿过外壳到达衬套的润滑槽或孔:
<1> Apply the specified installation finish to the housing faying surface that will touch the bushing flange, when applicable.
适用时,将规定的安装面漆涂抹在与衬套法兰接触的外壳接合表面上。
<2> Do not apply installation finish to the housing bore or to the bushing OD.
不要在外壳孔或衬套外径上涂抹安装面漆。
2) Expanded bushing method, with sealant specified as the installation finish:
膨胀衬套法,作为安装面漆所规定的密封剂:
a) Apply the sealant to the bushing flange and the housing surface that fays with the bushing flange, when applicable.
在适当情况下,将密封剂涂抹在衬套法兰和与衬套法兰接合的外壳表面。
b) Do not apply sealant to the housing bore or bushing OD surfaces.
不要将密封剂涂在外壳内孔或衬套外表面。
3) For all other installations:
对于所有其他安装:
a) Apply the installation finish to these faying surfaces, as applicable:
视情况在这些接合面上涂抹安装面漆:
<1> Bearing or bushing OD
轴承或衬套外径
<2> Housing ID
外壳内径
<3> Swaging ring ID and OD
压接环内径和外径
<4> Bushing flange and housing faying surfaces
衬套法兰和外壳接合面
b) Apply a continuous bead of installation finish to the surface of the housing (the chamfer around the hole) that will be under the flange of the bushing.
在衬套法兰下的外壳表面(孔周围的倒角)上涂抹一圈连续的安装面漆。
(c) Installation of bearings and bushings
轴承和衬套的安装
1) Install the bearing or bushing with an interference fit or as a rod end bearing.
以过盈配合或作为杆端轴承安装轴承或衬套。
2) If sealant is used as the installation finish, be sure to do it within the squeeze-out life of the sealant.
如果使用密封剂作为安装面漆,应确保在密封剂的挤出寿命内完成。
3) If the overhaul instructions specify a shrink fit with BMS 5-63 sealant, be sure to use only liquid nitrogen as the coolant.
如果大修说明规定使用 BMS 5-63 密封剂进行收缩配合,则务必只使用液氮作为冷却剂。
(d) Sealing of flanged and unflanged ends of bushings
轴承套法兰和无法兰端部的密封
1) After installation, bearings and bushings installed with sealant must have a continuous line (squeeze-out) of the sealant at each faying surface edge. Unless specified by the overhaul instructions, fairing out of the squeeze-out is optional, and fillet seal dimensions are not necessary.
安装后,使用密封剂安装的轴承和衬套必须在每个接合面边缘有一条连续的密封剂线(挤出)。除非大修说明书有规定,挤出的整平是可选的,圆角密封尺寸不是必须的。
2) When the overhaul instructions specify a fillet seal but do not give the details, fillet seal as specified in BAC5000 (SOPM 20-50-19).
当大修说明规定了圆角密封但未给出详情时,应按照 BAC5000(SOPM 20-50-19)的规定进行圆角密封。
3) On installed flanged bushings, the gap between the flange and the housing must be filled with installation finish, and the location of the flange compared to the housing must be as follows:
对于已安装的法兰衬套,法兰与外壳之间的间隙必须用安装面漆填满,法兰与外壳的位置必须如下:
a) For bushings installed with sealant, the distance between the top of the flange and the top of the housing must not be more than the following:
对于用密封剂安装的衬套,法兰顶部与外壳顶部之间的距离不得大于以下值:
<1> The minimum design flange thickness plus 0.008 inch, or
最小设计法兰厚度加 0.008 英寸,或
<2> The actual measured flange thickness plus 0.005 inch.
实际测量的法兰厚度加 0.005 英寸。
b) For bushings installed with or without other finish materials, the gap between the bottom of the bushing flange and the top of the housing must not be more than 0.0025 inch.
对于安装了或未安装其他面漆材料的衬套,衬套法兰底部与外壳顶部之间的间隙不得大于 0.0025 英寸。
4) If two bushings are installed back to back with wet sealant, the unflanged ends must be sealed with the specified sealant unless the gap between the bushings is used as a lubrication path. If the gap is not used as a lubrication path and the overhaul instructions do not specify a sealant, see Table 1. It is acceptable to fill the gap between the bushings with sealant, but do not let the sealant get onto the bushing ID surfaces.
如果使用湿密封剂背靠背安装两个衬套,除非衬套之间的间隙被用作润滑通道,否则无法兰的两端必须使用规定的密封剂密封。如果间隙未用作润滑通道,且大修说明未规定密封剂,请参见表 1。用密封剂填充衬套之间的间隙是可以接受的,但不要让密封剂进入衬套内径表面。
(e) After installation and retention of the bearing, make sure the lubrication passages are open, if they are included in the design.
安装和固定轴承后,如果设计中包含润滑通道,应确保润滑通道畅通。
(f) If swaged surfaces have damaged finish, touch up or refinish the surfaces as specified by the overhaul instructions.
如果压接表面的光洁度受损,则按照大修说明书的规定进行修整或修补。
(2) Installation on shafts
轴的安装
(a) If the bearing has a Teflon liner, install it dry, with no installation finish.
如果轴承有特氟龙衬垫,应在干燥状态下安装,不做任何安装面漆。
(b) If the bearing is in a fluid system, install it with the system fluid on the shaft OD and the bearing ID. Do not use grease or sealants on these parts.
如果轴承在流体系统中,安装时应在轴外径和轴承内径上涂抹系统流体。不要在这些零件上使用润滑脂或密封剂。
(c) For all other bearings, apply a good layer of BMS 3-33 or MIL-PRF-23827 grease on the shaft OD and the bearing ID.
对于所有其他轴承,在轴外径和轴承内径上涂一层 BMS 3-33 或 MIL-PRF-23827 润滑脂。
(3) Unwanted installation finish
不需要的安装面漆
(a) After bearing installation, remove unwanted installation finish with a clean, dry cloth. Unwanted installation finish that cannot be removed by this procedure is acceptable.
轴承安装后,用干净的干布清除不需要的安装面漆。无法通过此程序清除的不需要的安装面漆是可以接受的。
(b) If permitted by the overhaul instructions, you can remove unwanted installation finish with a solvent as specified in BAC5750 (SOPM 20-30-03).
如果大修说明允许,可以用 BAC5750(SOPM 20-30-03)规定的溶剂清除不需要的安装面漆。
(4) If the installation finish is not specified by the overhaul instructions, see Table 1.
如大修说明书未规定安装面漆,请参见表 1。

C. Sintered Bearings (Figure 2)
烧结轴承(图 2)
(1) Get a mandrel, such an ST918D-series, to fit the sintered bearing.
准备一个适合烧结轴承的心轴,如 ST918D 系列。
(2) Wipe the mandrel and the housing ID with a clean, lint-free cloth.
用干净的无绒布擦拭心轴和外壳内径。
(3) To help installation, you can apply a thin layer of BMS 3-33 or MIL-PRF-23827 grease to the housing ID and the bushing OD, unless specified by the overhaul instructions.
为帮助安装,可在外壳内径和衬套外径涂上一层薄薄的 BMS 3-33 或 MIL-PRF-23827 润滑脂,除非大修说明书有规定。
(4) Install the mandrel on the ram. Align the housing bore with the ram stroke.
将心轴安装到柱塞上。将外壳孔与柱塞冲程对准。
(5) Install the bearing on the mandrel. Make sure the bearing is aligned with the mating bore in the housing.
将轴承安装到心轴上。确保轴承与外壳的配合孔对准。
(6) Set the stops between the ram and the press bed to control the ram stroke.
在柱塞和压力机床之间设置止挡,以控制柱塞行程。
(7) Press the bearing into the housing. Remove the mandrel.
将轴承压入外壳。取下心轴。
(8) Carefully remove the unwanted grease or other installation finish with a clean, dry cloth. Do other operations as necessary.
用干净的干布仔细清除不需要的油脂或其他安装面漆。根据需要进行其他操作。
(9) If necessary to machine the bore of a sintered bearing after installation, use button sizing, broaching, or reaming procedure. Lubrication of the bearing after the operation is not necessary unless the bearing gets contamination such as dirt or other unwanted material during the procedure. Refer to BAC5040 for more details about these operations.
如果需要在安装后加工烧结轴承的孔,可使用按钮定径、拉削或铰孔程序。除非轴承在加工程序中受到污染,如灰尘或其他不需要的物质,否则无需在加工后对轴承进行润滑。有关这些操作的详细信息,请参阅 BAC5040。
(10) Lubricate and give these bearings protection as specified in SOPM 20-30-01 for Type 6 bearings.
按照 SOPM 20-30-01 中对 6 类轴承的规定润滑轴承并给予保护。
D. Rod End Bearings
杆端轴承
(1) Make sure the threads of the rod end bearings and of the terminal ends have no dust, dirt, chips, or similar material. Clean as necessary.
确保杆端轴承和端头的螺纹没有灰尘、污垢、碎屑或类似物质。必要时进行清洁。
(2) By hand, turn the threaded portion of the rod end bearing into or onto the threaded terminal fitting until the bearing comes to the bottom or the threads are fully engaged. Let the assembly stay here until the final installation adjustment.
用手将杆端轴承的螺纹部分转入或转到螺纹端头上,直到轴承到达底部或螺纹完全啮合。让组件停留在此处,直到最后的安装调整。
CAUTION: DO NOT USE A CRESCENT WRENCH, BECAUSE THE ADJUSTABLE JAWS COULD SLIP AND DAMAGE THE SEALS, PLATING, OR THREADS OF THE ROD END BEARING. DO NOT ASSEMBLE ROD END BEARINGS TO TERMINALS WITH FORCE ON A BOLT OR SHAFT THROUGH THE BEARING BORE, BECAUSE THE INNER RACE WILL COME OUT OF ALIGNMENT AND CAUSE DAMAGE TO SEALS AND INTERNAL SURFACES.
注意:不要使用月牙扳手,因为可调钳可能会打滑,损坏杆端轴承的密封件、镀层或螺纹。不要用螺栓或轴穿过轴承孔,强行将杆端轴承装配到终端,因为内圈会失准,导致密封件和内表面损坏。
(3) For the final adjustment, turn the rod end bearing by hand to get the correct distance or until the torque increase does not let you turn it more. Then tighten the rod end bearing the specified distance with the applicable tool, such as an F71313-series socket or an ST2580-103-series wrench.
最后调整时,用手转动杆端轴承以获得正确的距离或直到扭矩增加到无法再转动为止。然后使用适用的工具,如 F71313 系列套筒或 ST2580-103 系列扳手,将杆端轴承拧紧到规定的距离。
(4) Use the applicable tool, such as an F71313-series socket or an ST2580-103 series wrench, to hold the rod end bearing when you tighten checknuts or similar locking devices.
当拧紧止动螺母或类似锁紧装置时,使用 F71313 系列套筒或 ST2580-103 系列扳手等适用工具夹住杆端轴承。
E. Studded Track Roller Bearings
滚动轴承
(1) Install the bearing into the housing with the specified installation finish on the threads. If the overhaul instructions do not specify the installation finish, use BMS 3-33 grease.
将轴承安装到外壳中,螺纹上要有规定的安装面漆。如果大修说明书没有规定安装面漆,则使用 BMS 3-33 润滑脂。
(2) Turn the nut on the threads. While the nut turns, measure and record the run-on torque of the nut.
旋转螺纹上的螺母。在螺母转动的同时,测量并记录螺母的连贯扭矩。
(3) Tighten the nut to fully install the bearings, but do not tighten more than these values:
拧紧螺母以完全安装轴承,但拧紧力不要超过上述值:

7. INTERFERENCE FIT INSTALLATION OF BEARINGS AND BUSHINGS 轴承和衬套的过盈配合安装
A. General
通用
(1) Unless specified by the overhaul instructions, press fit all rolling element bearings that are installed with interference. The subzero temperature of the shrink fit procedure can change dimensions and properties of rolling element bearing steel.
除非大修说明书有规定,否则应压装所有过盈配合安装的滚动体轴承。收缩配合程序的零下温度会改变滚动体轴承钢的尺寸和性能。
(2) Unless specified by the overhaul instructions, use the shrink fit procedure to install spherical bearings and bushings.
除非大修说明书有规定,否则应使用收缩配合程序安装球轴承和衬套。
(3) For spherical or journal bearings (bushings), you can install the part with a shrink fit or a press fit, unless the shrink fit procedure is specified by the overhaul instructions. The shrink fit procedure is preferred. Also, the shrink fit procedure must be used:
对于球轴承或轴颈轴承(衬套),可以用收缩配合或压入配合安装零件,除非大修说明书规定了收缩配合程序。最好采用收缩配合程序。此外,必须使用收缩配合程序:
(a) If one of the parts is titanium or titanium alloy.
如果其中一个零件是钛或钛合金。
(b) If the press fit procedure could damage the bearing or housing mating surfaces.
如果压配程序可能会损坏轴承或外壳的配合表面。
(c) If the mating surfaces of the bearing or the housing have protective finishes or plating.
如果轴承或外壳的配合表面有保护性涂层或电镀层。
B. Shrink Fit (Temperature Differential) Procedure
收缩配合(温差)程序
(1) Do not install grease-lubricated airframe rolling element (roller, needle or ball) bearings by the shrink fit procedure. Coolants used for the shrink fit procedure can damage seals and change the dimensions and metallurgical properties of the bearings.
不要用收缩配合程序安装油脂润滑的机身滚动体(滚子、滚针或滚珠)轴承。用于收缩配合程序的冷却剂会损坏密封件并改变轴承的尺寸和冶金特性。
(2) Coolants
冷却剂
(a) Liquid nitrogen — This coolant is preferred for installation of most metal and metal-backed bearings and bushings. This includes Teflon-lined bearings and bushings. The temperature is approximately -320°F and gives the part a shrinkage approximately two times that of dry ice in methyl alcohol. But liquid nitrogen is not recommended for installation of phenolic backed parts because the chilled phenolic material becomes brittle and could break.
液氮 — 在安装大多数金属和金属背衬轴承和衬套时,首选这种冷却剂。这包括特氟龙衬里轴承和衬套。 温度约为 -320°F,使零件的收缩率约为干冰在甲醇中收缩率的两倍。但不建议在安装酚醛背衬零件时使用液氮,因为冷冻后的酚醛材料会变脆,可能会断裂。
(b) Dry ice in methanol (methyl alcohol) or in Dowanol DPM — This coolant is recommended for nonmetallic bushings, and can be used for installation of metal or metal-backed bearings or bushings where the temperature of approximately -120°F will make the part sufficiently small. But Dowanol DPM is not permitted on Teflon-lined bushings, and dry ice in methanol is not permitted if the bearing or the housing is titanium.
甲醇(甲醇)中的干冰或 Dowanol DPM 中的干冰 — 这种冷却剂推荐用于非金属衬套,可用于安装金属或金属背衬轴承或衬套,大约 -120 °F 的温度会使零件足够小。但特氟龙衬套不允许使用 Dowanol DPM,如果轴承或外壳为钛金属,则不允许使用甲醇干冰。
(c) Other coolants can be acceptable if approved by Boeing. Such coolants must not cause too much frost and must not damage the bearing, bushing, or housing.
如果波音公司批准,可以使用其他冷却剂。此类冷却剂不得造成过多结霜,也不得损坏轴承、衬套或外壳。
(3) Installation in housings
安装于外壳
(a) Get the applicable mandrel, such as one of the F70321-series.
获取适用的心轴,如 F70321 系列的心轴。
(b) Apply the specified installation finish as specified in Paragraph 6.B..
按照第 6.B. 段的规定涂上规定的安装面漆。
(c) Put the bearing or the bushing, and the mandrel, in the coolant. Keep these items in the coolant until the coolant stops boiling.
将轴承或衬套以及心轴放入冷却液中。将这些物品放在冷却液中,直到冷却液停止沸腾。
(d) Remove the cold bearing or bushing and the mandrel from the coolant, and immediately (within 30 seconds) install the bearing or bushing in the housing or lug with the mandrel. You can use mechanical pressure (screw thread) or hydraulic pressure to help the installation. Make sure the face of the flanged bushings touches the mating surface of the housing as specified in Paragraph 6.B.(1)(d).
从冷却液中取出冷轴承或衬套和心轴,并立即(在 30 秒内)将轴承或衬套与心轴一起安装到外壳或凸耳中。可以使用机械压力(螺纹)或液压帮助安装。确保法兰衬套的端面接触到第 6.B.(1)(d)段规定的外壳配合面。
(e) After the parts are back at room temperature, remove unwanted installation finish with a clean, dry cloth. Make sure that lubrication passages and cavities are not blocked with sealant.
在零件恢复室温后,用干净的干布清除不需要的安装面漆。确保润滑通道和空腔没有被密封剂堵塞。
(f) Push on the bearing or bushing with your hand. It must not be loose in the housing (that is, the outer race must not be movable). A proof load test is not necessary unless specified by the overhaul instructions.
用手推动轴承或衬套。轴承在外壳中不能松动(即外圈不能移动)。除非大修说明有规定,否则不必进行证明负荷测试。
(g) Refer to the overhaul instructions for applicable operations that machine the bushing surfaces or apply special finishes or sealant fillets.
有关加工衬套表面或涂抹特殊表面处理剂或密封剂圆角的适用操作,请参阅大修说明。
(4) Installation on shafts
安装在轴上
(a) Apply the specified installation finish.
涂抹规定的安装面漆。
(b) Put the shaft and installation alignment tools into the coolant. Keep these items in the coolant until the boiling stops.
将轴和安装对准工具放入冷却液中。保持这些物品在冷却液中,直到沸腾停止。
(c) Install the bearing on the cold shaft as quickly as possible. You can use mechanical pressure (screw thread) or hydraulic pressure as necessary to help the installation.
尽快将轴承安装到冷轴上。可根据需要使用机械压力(螺纹)或液压帮助安装。
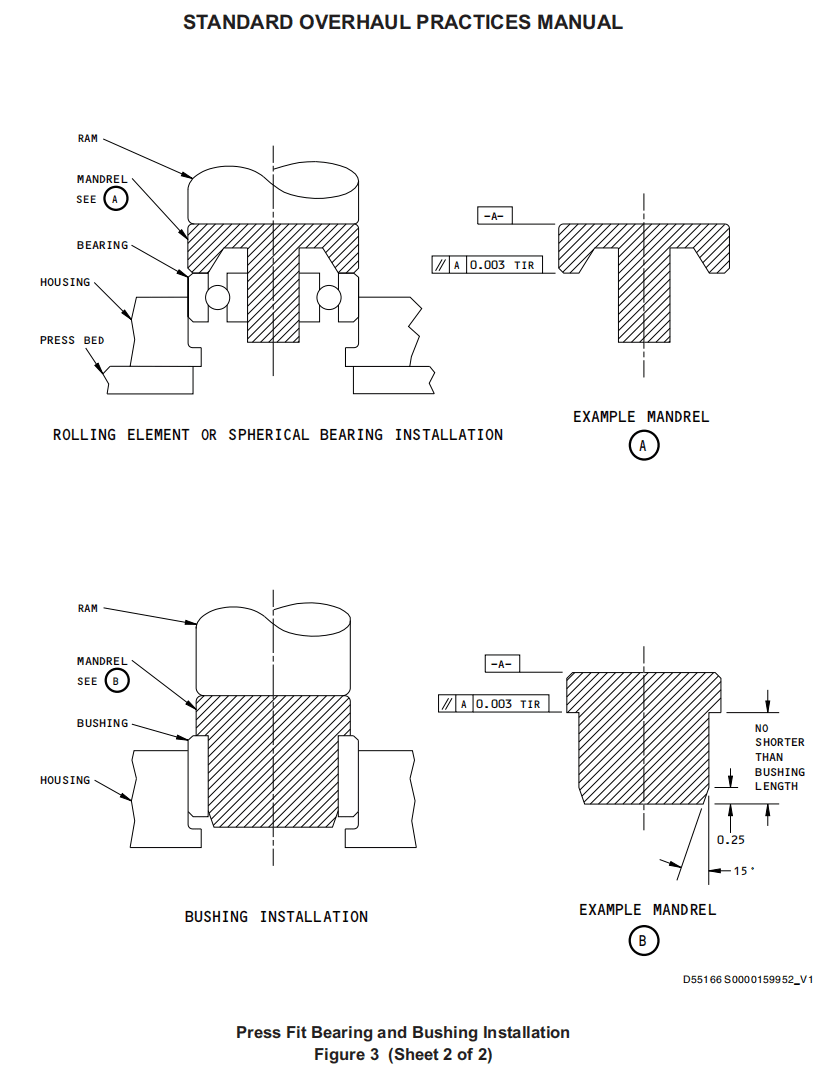
C. Press Fit Procedure (Figure 3)
压配程序(图 3)
(1) Examine the bearing or bushing OD and the housing ID for sharp edges and burrs which could cause scratches or remove metal from the mating parts during installation. If necessary, break sharp edges approximately 0.005 inch.
检查轴承或衬套外径和外壳内径是否有尖锐边缘和毛刺,这些边缘和毛刺可能会在安装过程中造成划痕或去除配合零件上的金属。如有必要,将尖锐边缘倒角 0.005 英寸。
(2) Apply the specified installation finish to the mating parts before installation.
安装前在配合零件上涂抹规定的安装面漆。
(3) Install the bearing or bushing with tools that apply the force only to the bearing race that will touch the housing or shaft. Make sure the tools keep the bearing or bushing correctly aligned with the mating part. The press fit operation must not remove metal as the parts come together.
安装轴承或衬套时,使用的工具应只对接触外壳或轴的轴承滚道施力。确保工具使轴承或衬套与配合零件正确对齐。压装操作不得在零件接触时去除金属。
(4) Remove unwanted installation finish with a clean, dry cloth. Make sure that lubrication passages and cavities are not blocked with sealant.
用干净的干布清除不需要的安装面漆。确保润滑通道和空腔没有被密封剂堵塞。
(5) Push on the bearing or bushing with your hand. It must not be loose in the housing (that is, the outer race must not be movable). A proof load test is not necessary unless specified by the overhaul instructions.
用手推动轴承或衬套。轴承在外壳中不能松动(即外圈不能移动)。除非大修说明书有规定,否则不必进行证明载荷试验。
(6) Refer to the overhaul instructions for applicable operations that machine the bushing surfaces or apply special finishes or sealant fillets.
有关加工衬套表面或涂抹特殊表面处理剂或密封剂圆角的适用操作,请参阅大修说明书。
(7) Flanged bushings installed by a press fit have the same gap and sealing requirements as flanged bushings installed by a shrink fit. Refer to Paragraph 6.B.(1)(d) details.
通过压配安装的法兰衬套与通过收缩配合安装的法兰衬套具有相同的间隙和密封要求。详见第 6.B.(1)(d)段。
D. Expanded Fit Procedure
膨胀配合程序
(1) This procedure installs bushings into housings with a mandrel which becomes larger in the bore of the installed bushing. This force makes the bushing outer diameter larger to become an interference fit. Special bushings and tools must be used. The overhaul instructions will give details.
该程序使用心轴将衬套安装到外壳中,心轴在安装衬套的孔中变大。这种力会使衬套外径变大,成为过盈配合。必须使用特殊衬套和工具。大修说明中会有详细介绍。
(2) Get the necessary bushings and tools. Example tools are given in Table 2. The overhaul instructions will give the part numbers of the applicable replacement and oversize bushings. Or refer to BAC5435 PSD 6-50 or PSD 6-71, or their successors, for charts that give updated tool details.
获取必要的衬套和工具。表 2 给出了工具示例。大修说明将给出适用的替换衬套和大尺寸衬套的件号。或参考 BAC5435 PSD 6-50 或 PSD 6-71,或其后续版本,以获得提供最新工具详细信息的图表。
(3) Make sure the mating hole in the housing is within the specified design dimensions (to let you install the standard bushing) or repair limit (to let you install an oversize bushing) and surface finish. If the overhaul instructions do not give the surface finish, make sure it is 63 microinches or smoother.
确保壳体上的配合孔在规定的设计尺寸(允许您安装标准衬套)或修理极限(允许您安装超大衬套)和表面光洁度范围内。如果大修说明中没有给出表面光洁度,请确保其为 63 微英寸或更光滑。
(4) If an oversize bushing will be installed, machine the OD of the bushing to give a clearance fit with the mating oversize hole in the housing, as shown in Table 2.
如果要安装超大尺寸衬套,则应加工衬套的外径,使其与外壳上的超大尺寸孔有间隙配合,如表 2 所示。
(5) Assemble the tool parts. Be sure to use an oversize mandrel if the oversize hole is larger than the limits shown in Table 2.
组装工具零件。如果尺寸过大的孔大于表 2 所示的限值,请务必使用尺寸过大的心轴。
(6) Apply the specified installation finish to the bushing.
给衬套涂上规定的安装面漆。
(7) Put the bushing on the mandrel, then put the bushing-mandrel unit into the hole in the housing (Figure 4).
将衬套套在心轴上,然后将衬套心轴单元放入外壳孔中(图 4)。
(8) Push the nosecap assembly tightly against the housing. The detent on the face of the jaw will put the bushing end lower than the housing face if this is a plain bushing (without a flange) or a flanged bushing installed from the end opposite the flange. If this is a flanged bushing installed from the flanged end, be sure to push the tool against the bushing flange to keep the flange tightly against the housing.
将衬套组件紧紧地推到外壳上。如果是普通衬套(无法兰)或法兰衬套,则钳口面上的制动装置会使衬套端面低于外壳端面。如果是从法兰端安装法兰衬套,则一定要将工具推到衬套法兰上,使法兰紧贴外壳。
(9) Operate the puller to pull the mandrel back through the bushing. This will put force on the bushing walls to make it tight in the hole and locally cold-work the housing material around the hole.
操作拉拔器,将心轴拉回衬套。这将对衬套壁施加压力,使其紧贴孔,并在孔周围对外壳材料进行局部冷加工。
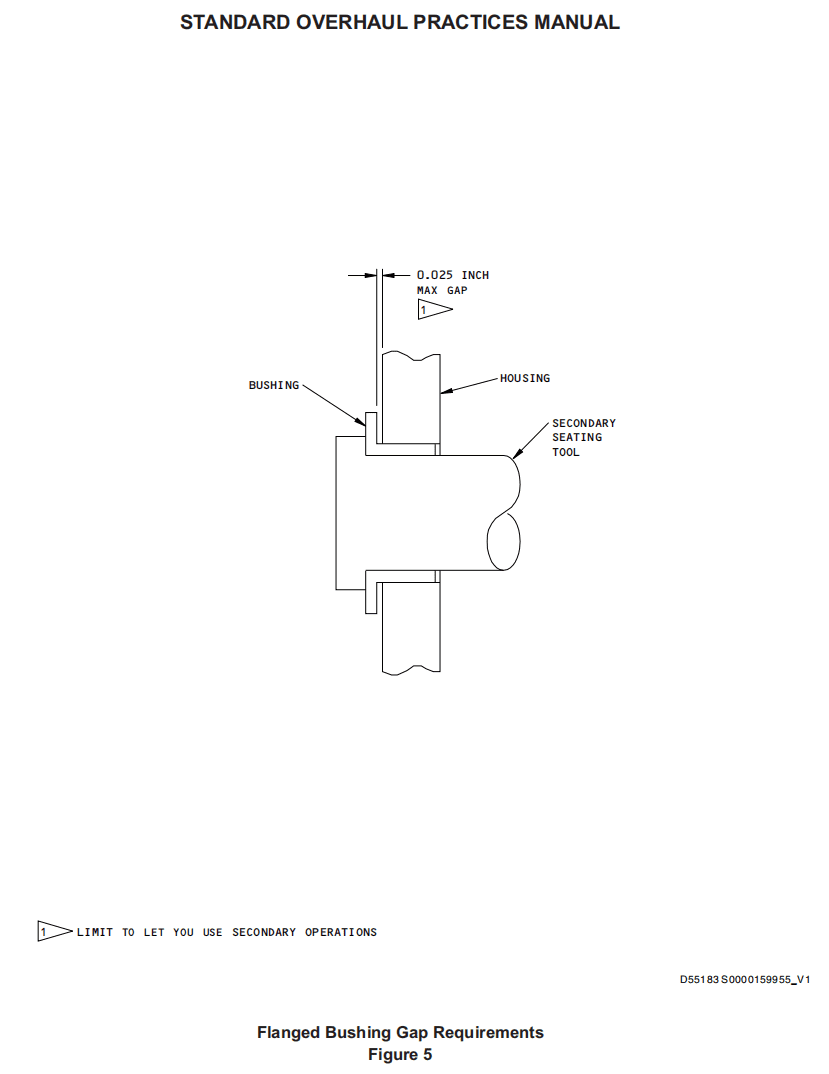
(10) If this is a flanged bushing, make sure the flange is tightly against the mating surface of the housing. If there is a gap no wider than 0.025 inch, you can use a secondary procedure such as shown in Figure 5. If the gap is more than 0.025 inch, remove the bushing and try again with a new bushing.
如果是法兰衬套,确保法兰紧贴外壳的配合面。如果间隙不大于 0.025 英寸,可以使用图 5 所示的辅助程序。如果间隙超过 0.025 英寸,则卸下衬套,换上新衬套重试。
(11) If applicable, machine the bore of the bushing and apply sealant and other finish as specified by the overhaul instructions.
如果适用,对衬套内孔进行机加工,并按照大修说明的规定涂抹密封剂和其他面漆。


8. BEARING RETENTION BY MECHANICAL MEANS 用机械方法保持轴承
NOTE: Unless specified by the overhaul instructions, use the same type of bearing retention for assembly or replacement as when the parts were first made.
注: 除非大修说明书有规定,否则在装配或更换时应使用与最初制造零件时相同类型的轴承保持架。
CAUTION :IF THE BEARING RETENTION PROCEDURE CAUSES CRACKS IN THE BEARING, HOUSING, OR SLEEVE, THE PARTS WITH THE CRACKS MUST BE REPLACED.
注意 :如果轴承保持程序导致轴承、外壳或轴承套出现裂纹,则必须更换出现裂纹的零件。
A. Point Staked Housing Retention (Figure 6)
点式外壳固定(图 6)
(1) Assemble the staking tool with the number of inserts N as specified in Table 3. For the number of stakes S, use the number given by the overhaul instructions or the original number of stakes found on the bearing housing.
按照表 3 规定的插入件数量 N 装配打桩工具。对于桩数 S,使用大修说明中给出的数量或在外壳上找到的原始桩数。
(2) Apply the specified installation finish to the bearing OD and the housing ID. Install the bearing in the housing. Make sure dimension A is within the limits shown. The bearing must be down against the shoulder of the housing bore. For bearings to be swaged on two sides, make sure the bearing is centered in the housing within 0.010 inch.
在轴承外径和外壳内径上涂抹规定的安装面漆。将轴承安装到外壳中。确保尺寸 A 在所示范围内。轴承必须紧靠外壳孔肩。对于双面压接的轴承,确保轴承在外壳中的中心位置在 0.010 英寸范围内。
(3) Move the staking tool down to the housing surface to be staked, with the tool pilot in the bore of the bearing.
将打桩工具向下移动到外壳表面,使工具先导进入轴承孔。
(4) Push the stakes into the housing surface to the staking depth shown. For bearing replacement, put the new stakes between the old ones.
将桩推入外壳表面,深度如图所示。更换轴承时,将新桩放在旧桩之间。
(5) Make sure the staked bearing turns freely by hand.
确保用手可以自由转动已标记的轴承。
(6) Push on the bearing with your hand. It must not be loose in the housing (that is, the outer race must not be movable). A proof load test is not necessary unless specified by the overhaul instructions.
用手推动轴承。轴承在外壳中不能松动(即外圈不能移动)。除非大修说明书有规定,否则不必进行证明载荷试验。
(7) Touch up protective finishes as necessary.
根据需要修补保护层。
B. Ball Staked Housing Retention (Figure 7)
球形固定壳体(图 7)
(1) Assemble the staking tool with the number of inserts N as specified in Table 3. For the number of stakes S, use the number given by the overhaul instructions or the original number of stakes found on the bearing housing.
按表 3 规定的插入件数 N 装配定位工具。对于定位桩的数量 S,使用大修说明中给出的数量或在外壳上找到的原始定位桩数量。
(2) Apply the specified installation finish to the bearing OD and the housing ID. Install the bearing in the housing. Make sure Dimension A is within the limits shown. The bearing must be down against the shoulder of the housing bore. For bearings to be swaged on two sides, make sure the bearing is centered in the housing within 0.010 inch.
在轴承外径和外壳内径上涂抹规定的安装面漆。将轴承安装到外壳中。确保尺寸 A 在所示范围内。轴承必须紧靠外壳孔肩。对于双面压接的轴承,确保轴承在外壳中的中心位置在 0.010 英寸范围内。
(3) Move the staking tool down to the housing surface to be staked, with the tool pilot in the bore of the bearing.
将打桩工具向下移动到外壳表面,使工具先导进入轴承孔。
(4) Push the stakes into the housing surface to the staking depth shown. For bearing replacement, put the new stakes between the old ones.
将桩推入外壳表面,深度如图所示。更换轴承时,将新桩放在旧桩之间。
(5) Unless this is a Teflon-lined spherical bearing, the staked bearing must turn freely by hand, and not catch. Unless specified by the overhaul instructions, the no-load breakaway torque for an installed Teflon-lined spherical bearing must not be more than two times the uninstalled maximum breakaway torque specified in the bearing specification or standard.
除非是聚四氟乙烯衬里外球面轴承,否则必须用手自由转动打好桩的轴承,不得卡住。除非大修说明书有规定,已安装的聚四氟乙烯衬里外球面轴承的空载松动扭矩不得超过轴承规格或标准中规定的未安装最大松动扭矩的两倍。
(6) Push on the bearing with your hand. It must not be loose in the housing (that is, the outer race must not be movable). A proof load test is not necessary unless specified by the overhaul instructions.
用手推动轴承。轴承在外壳中不得松动(即外圈不得移动)。除非大修说明书有规定,否则不必进行证明载荷试验。
(7) Touch up protective finishes as necessary.
根据需要修补保护层。

C. Roller Swaged Housing Retention (Figure 8, Figure 9)
滚子压接式外壳固定 (图 8、图 9)
NOTE: Use this procedure to roller swage the housing over the bearing with ST932 tools. Refer to Paragraph 8.D. below to roller swage the bearing outer race over the housing with F80113 and F80117 tools. Refer to Paragraph 8.E. below to roller swage the outer race of a self-lubricated spherical bearing over the housing with ST926 tools.
注:使用此程序,用 ST932 工具将外壳滚压在轴承上。请参阅下文第 8.D 段,使用 F80113 和 F80117 工具在外壳上滚压轴承外圈。参考下文第 8.E 段,使用 ST926 工具将自润滑球轴承的外圈滚子压入外壳。
(1) Set the speed of the drill press to make the rollers have a surface speed of approximately 50 feet per minute. (Spindle RPM = 200 divided by bearing OD in inches.)
设置钻床速度,使滚子的表面速度约为每分钟 50 英尺 (主轴转数 = 200 除以轴承外径(以英寸为单位))。
(2) Install the swaging tool into the driving chuck.
将压接工具装入驱动卡盘。
(3) Apply the specified installation finish to the bearing OD and the housing ID.
在轴承外径和外壳内径上涂抹规定的安装面漆。
(4) Install the bearing into the housing as specified in Figure 9. The bearing must be down against the housing shoulder, but double-swaged bearings must be centered in the housing as shown.
按图 9 规定将轴承装入外壳。轴承必须向下紧靠外壳轴肩,但双头轴承必须如图所示在外壳中居中。
(5) Apply BMS 3-33 or MIL-PRF-23827 grease or other lubricant to the area to be swaged to prevent galling.
将 BMS 3-33 或 MIL-PRF-23827 润滑脂或其他润滑剂涂抹在要压接的区域,以防止咬合。
(6) Set the surface to be swaged perpendicular to the axis of the spindle.
将待压接表面垂直于主轴轴线。
(7) Move the tool down to the surface to be swaged, start the drill press, and apply sufficient force to swage the housing. The swage is complete when the rollers burnish the surface of the groove.
将工具向下移动至待压接表面,启动钻床,施加足够的力压接外壳。当滚子将凹槽表面烧焦时,即完成压接。
(8) The roller swaged housing must agree with the configuration shown in Figure 9. Galling of the swaged surface is not acceptable.
滚子压接的外壳必须与图 9 所示的结构一致。铆接表面的缺口是不可接受的。
(9) After the housing is swaged, the inner race of the bearing (unless it is a Teflon-lined spherical bearing) must turn freely by hand and must not catch. Unless specified by the overhaul instructions, the no-load breakaway torque of an installed Teflon-lined bearing must not be more than two times the uninstalled maximum breakaway torque specified in the bearing specification or standard. The torque necessary to misalign KP-BS type self-aligning torque tube bearings must not be more than 75 pound-inches for each inch of bore diameter.
压接外壳后,用手转动轴承内圈(除非是特氟隆衬里球轴承)必须自如,不得卡住。除非大修说明书有规定,否则已安装的特氟龙衬里轴承的空载松动扭矩不得超过轴承规格或标准中规定的未安装最大松动扭矩的两倍。使 KP-BS 型自动调心扭矩管道轴承错位所需的扭矩不得超过孔径每英寸 75 磅英寸。
(10) Push on the bearing with your hand. It must not be loose in the housing (that is, the outer race must not be movable). A proof load test is not necessary unless specified by the overhaul instructions.
用手推动轴承。轴承在外壳内不得松动(即外圈不得移动)。除非大修说明书有规定,否则不必进行证明载荷试验。
(11) Touch up protective finishes as necessary.
根据需要修补保护层。
D. Roller Swaged Bearing Retention with F80113 or F80117-1 tools (Figure 10, Figure 13).
用 F80113 或 F80117-1 工具固定滚子压接轴承(图 10、图 13)。
(1) These tools can sometimes be better or easier to use than ST926 standard tools. The F80113-series kits are adaptable to many different bearing sizes. Both F80113 and F80117 tools are manually operated. A drill press is not necessary.
这些工具有时比 ST926 标准工具更好用或更容易使用。F80113 系列工具包适用于多种不同尺寸的轴承。F80113 和 F80117 工具都是手动操作的。不需要钻床。
(2) The F80113-series roller swage kits each include body, spacers, rollers, retaining rings, pilot, anvil, thrust bearing, tension bolt and lockbolt. The F80113-50 kit uses a special hex-head body used with two jamnuts, but its operation is equivalent to the other F80113-series kits. The F80117-1 roller swage tool is almost the same as the F80113-series kits, but it does not have spacers or other components to let it be used on bearings of different sizes.
F80113 系列滚子压接工具包包括本体、垫片、滚子、挡圈、导向器、砧座、止推轴承、拉伸螺栓和锁紧螺栓。F80113-50 套件使用一种特殊的六角头主体,并配有两个防松螺母,但其操作与其他 F80113 系列套件相同。F80117-1 滚子压接工具与 F80113 系列工具包几乎相同,但它没有垫片或其他部件,无法用于不同尺寸的轴承。
(3) When you use F80113-series kits:
当您使用 F80113 系列组件时:
(a) Measure the diameter of the swaging groove of the bearing to find the swaging diameter.
测量轴承压接槽的直径,找出压接直径。
(b) Get the correct body and install the spacers and the rollers on the shaft to make the tool agree with the swaging diameter.
获取正确的主体,并在轴上安装垫片和滚子,使工具与预装直径一致。
(c) Use the correct pilot for the bearing ID and anvil.
为轴承内径和砧座使用正确的导向器。
CAUTION :DO NOT LET GREASE OR OTHER LUBRICANTS GET INTO TEFLONLINED BEARINGS. LUBRICANTS CAN COLLECT CONTAMINATION WHICH COULD DAMAGE THE TEFLON SURFACES.
注意 :不要让油脂或其他润滑剂进入有特氟龙衬里的轴承。润滑剂会聚集污染物,损坏特氟龙表面。
(4) Assemble and install swaging tool components as shown in Figure 10. Apply a thin layer of lubricating oil to the anvil, rollers, pilot and body before assembly.
如图 10 所示组装和安装压接工具部件。组装前在砧座、滚轮、导向器和本体上涂一薄层润滑油。
(5) Apply a thin layer of BMS 3-33 or MIL-PRF-23827 grease or other lubricant to the area to be swaged to prevent damage to the surface.
在待压接部位涂上一层薄薄的 BMS 3-33 或 MIL-PRF-23827 润滑脂或其他润滑剂,以防损坏表面。
(6) Tighten the tension bolt or jamnut A, lock it in position with the lockbolt or jamnut B, and turn the tool assembly with a wrench.
拧紧拉紧螺栓或防松螺母 A,用锁定螺栓或防松螺母 B 将其锁 定,并用扳手转动工具组件。
CAUTION :DO NOT OVERSWAGE.
注意 :不要过度压接。
(7) Tighten the lockbolt or the jamnuts and turn the tool assembly again. Do this again as necessary to complete the swage. The swage is completed when you can feel the load increase as you try to continue. The swage must have the dimensions shown in Figure 13.
拧紧锁紧螺栓或防松螺母,然后再次转动工具组件。必要时再做一次,以完成压接。当您尝试继续操作时,可以感觉到载荷增加时,即完成了压接。压入的尺寸必须如图 13 所示。
(8) If the bearing is to be swaged on the other side also, remove the swaging tool and install it on the reverse side to do the second swage.
如果轴承的另一侧也要进行压接,则卸下压接工具,将其安装在反面,进行第二次压接。
(9) After you remove the swaging tool, wipe off the lubricant that was applied in the swaging procedure.
取下压接工具后,擦去压接程序中涂抹的润滑剂。
(10) Make sure the swaged bearing turns freely. Unless specified by overhaul instructions, the no-load breakaway torque of an installed Teflon-lined bearing must not be more than two times the uninstalled maximum breakaway torque specified in the bearing specification or standard.
确保安装好的轴承转动自如。除非大修说明书有规定,否则已安装的特氟龙衬里轴承的空载松动扭矩不得超过轴承规格或标准中规定的未安装最大松动扭矩的两倍。
(11) Touch up protective finishes as necessary.
根据需要修补保护层。
(12) Give the bearing a push-out load test. Apply the load only to the outer race, as shown in Figure 13. The bearing must not move in the housing more than 0.003 inch axially, or come loose. If the overhaul instructions do not give the load value, you can calculate it. The load value in pounds equals the bearing OD in inches multiplied by the applicable push-out load factor in Figure 13.
对轴承进行推出负荷试验。如图 13 所示,仅在外滚道上施加载荷。轴承在外壳内的轴向移动不得超过 0.003 英寸,也不得松动。如果大修说明中没有给出载荷值,可以计算出来。以磅为单位的载荷值等于以英寸为单位的轴承外径乘以图 13 中适用的推出载荷系数。
E. Roller Swaged Bearing Retention with ST926-type tools (Figure 11, Figure 12, Figure 13)
使用 ST926 型工具保持滚子压接轴承 (图 11、图 12、图 13)
NOTE: If the side clearance is limited, ST926A tools can be used. Spherical bearings can also be roller swaged as specified in Paragraph 8.D. with F80113 or F80117 tools.
注: 如果侧隙有限,可使用 ST926A 工具。球面轴承也可按照第 8.D 段的规定,使用 F80113 或 F80117 工具进行滚子压接。
CAUTION :DO NOT LET GREASE OR OTHER LUBRICANTS GET INTO TEFLON-LINED BEARINGS. LUBRICANTS CAN COLLECT CONTAMINATION WHICH COULD DAMAGE THE TEFLON SURFACES.
警告 :不要让油脂或其他润滑剂进入特氟龙衬里轴承。润滑剂会聚集污染物,损坏特氟龙表面。
(1) This procedure is applicable to spherical bearings, rolling element bearings, and bushings with the V-groove retention design. You can use ST926A-type tools, or equivalent tools, such as those from vendors such as Rexnord (77896) or Cabco (V50830). These tools could be used with a drill press, a radial drill, or the tools could be hand-operated. These instructions are for the general ST926-type tool with primary and secondary anvils, used with a drill press. If you use alternative tools, use the equivalent instructions for the tools you do use.
本程序适用于球轴承、滚动轴承和具有 V 型槽保持架设计的衬套。可以使用 ST926A 型工具或同等工具,如 Rexnord (77896) 或 Cabco (V50830) 等供应商提供的工具。这些工具可以与钻床、摇臂钻配合使用,也可以手动操作。这些说明适用于通用的 ST926 型工具,带有主砧和副砧,与钻床一起使用。如果使用其他工具,请使用与所使用工具同等的说明。
(2) If you use a drill press, use a heavy duty drill press with a quill diameter of not less than 2 inches, and gearing that will give not less than 200 pounds of force at the chuck with the usual operator input. Set the drill press for approximately 150 rpm for 1 inch or smaller bore diameters, or proportionately slower for larger bearings.
如果使用钻床,则应使用直径不小于 2 英寸的重型钻床,其齿轮传动装置在操作员正常输入的情况下,可在卡盘上提供不小于 200 磅的力。对于 1 英寸或更小的内孔直径,将钻床的转速设定为大约 150 转/分,对于更大的轴承,则按比例降低转速。
(3) Set the rollers of the swaging tool to agree with the diameter of the bearing swage groove. Make sure the rollers turn freely. Examine the fit of the pilot in the guides of the primary and the secondary anvils.
将压接工具的滚轮调至与轴承压接槽的直径一致。确保滚子转动自如。检查主砧和副砧导轨中的导向装置的配合情况。
(4) Install the swaging tool in the chuck of the drill press.
将压接工具安装在钻床的卡盘上。
(5) Apply the specified installation finish to the ID of the housing and the OD of the bearing.
在外壳的内径和轴承的外径上涂抹规定的安装面漆。
(6) Install the bearing in the housing. Make sure the outer race of the bearing is 0.010 inch above the housing surface to 0.005 inch below the housing surface (Figure 13).
将轴承装入外壳。确保轴承外圈在外壳表面以上 0.010 英寸至以下 0.005 英寸处(图 13)。
(7) Apply a thin layer of BMS 3-33 or MIL-PRF-23827 grease or other lubricant to the swaging groove to prevent damage to the surface. If the bearing has Teflon-coated surfaces, be sure to keep the grease away from them, or the grease could collect dirt and other contamination which could damage the Teflon.
在压接槽上涂一薄层 BMS 3-33 或 MIL-PRF-23827 润滑脂或其他润滑剂,以防止损坏表面。如果轴承表面有聚四氟乙烯涂层,则应确保润滑脂远离这些表面,否则润滑脂可能会聚集灰尘和其他污染物,从而损坏聚四氟乙烯。
(8) Set the surface to be swaged perpendicular to the axis of the spindle.
将待压接表面垂直于主轴轴线。
(9) With the primary anvil, swage the first side of bearing with approximately 100 pounds of force and 10 revolutions of the chuck.
使用主砧,以大约 100 磅的力和卡盘 10 转的速度压接轴承的第一面。
(10) Change to the secondary anvil (if applicable) and swage the second side with approximately 200 pounds of force and 15 revolutions of the chuck. Do not let the rollers touch the inner face of the swaging groove in the bearing outer race.
换上副砧(如适用),用大约 200 磅的力和卡盘 15 转的速度压接第二面。不要让滚子接触到轴承外圈中的压接槽内侧。
(11) Clean the lubricant from the bearing with a rag wet with a small amount of a Series 98 solvent (SOPM 20-30-98). Give the inner race protection from the solvent and all lubricants.
用抹布蘸少量 98 系列溶剂(SOPM 20-30-98)清洗轴承上的润滑剂。保护内圈不受溶剂和所有润滑剂的影响。
(12) Examine the swaged lip for clearance and damage. Gall marks are not permitted. Such damage can be caused when the rollers did not turn or the roller lubrication was insufficient.
检查压接唇的间隙和损坏情况。不允许有压痕。这种损坏可能是由于滚子未转动或滚子润滑不足造成的。
(13) The stake is completed when you can feel the load increase as you try to continue. The swage must have the dimensions shown in Figure 13.
当您在尝试继续操作时能感觉到负荷增加时,即表示桩基已完成。压接的尺寸必须如图 13 所示。
(14) Unless specified by the overhaul instructions, the no-load breakaway torque of an installed Teflon-lined spherical bearing must not be more than two times the uninstalled maximum breakaway torque specified in the bearing specification or standard.
除非大修说明书有规定,已安装的聚四氟乙烯衬里球轴承的空载松动扭矩不得超过轴承规格或标准中规定的未安装最大松动扭矩的两倍。
(15) Give the bearing a push-out load test (on each side unless specified by the overhaul instructions). Apply the load only to the outer race, as shown in Figure 13. The bearing must not move in the housing more than 0.003 inch axially, or come loose. If the overhaul instructions do not give the load value, you can calculate it. The load value in pounds equals the bearing OD in inches multiplied by the applicable push-out load factor in Figure 13.
对轴承进行推出负荷试验(每侧,除非大修说明有规定)。如图 13 所示,仅在外滚道上施加载荷。轴承在外壳内的轴向移动不得超过 0.003 英寸或松动。如果大修说明中没有给出载荷值,可以计算出来。以磅为单位的载荷值等于以英寸为单位的轴承外径乘以图 13 中适用的推出载荷系数。
F. Anvil Swaged Bearing or Bushing Retention
砧座压接轴承或衬套保持架
NOTE: This procedure uses a ST930B or C type tool, a guide pilot, and a hydraulic press that can measure the load. If you use other tools, be sure they swage with a 60-degree angle, because tools with a 45-degree swage angle will not swage the lip of the bearing or bushing sufficiently over the housing chamfer.
注: 本程序使用 ST930B 或 C 型工具、导向引杆和可测量载荷的液压机。如果使用其他工具,请确保它们以 60 度角压接,因为压接角为 45 度的工具无法将轴承或衬套的唇缘充分压接外壳倒角。
(1) Apply the specified installation finish to the housing ID and the bearing or bushing OD.
在外壳内径和轴承或衬套外径上涂抹规定的安装面漆。
(2) Install the bearing or bushing in the housing. The bearing outer race or bushing must be aligned with the housing within the limits specified by the overhaul instructions.
将轴承或衬套安装到外壳中。轴承外圈或衬套必须在大修说明书规定的范围内与外壳对齐。
(3) Apply a thin layer of BMS 3-33 or MIL-PRF-23827 grease or other lubricant to the swaging lips of the tool.
在工具的压入唇上涂一薄层 BMS 3-33 或 MIL-PRF-23827 润滑脂或其他润滑剂。
(4) Put the tools and the parts in the hydraulic press.
将工具和零件放入液压机。
(a) Calculate the swaging force. The swaging force in pounds equals the nominal OD of the bearing in inches multiplied by the applicable swage force factor in Figure 13. Example: For a 2-inch-OD bearing with a Type II groove and an aluminum race, the swaging force is 2 x 9000 = 18000 ±2000 pounds. Note that the tolerance in the table is applied to the calculated swaging force after the multiplication.
计算预装力。以磅为单位的压接力等于以英寸为单位的轴承公称外径乘以图 13 中适用的压接力系数。举例说明:对于带有 II 型沟槽和铝滚道的 2 英寸外径轴承,压接力为 2 x 9000 = 18000 ±2000 磅。注意表中的公差应用于乘法后计算出的压接力。
(b) Apply the correct swaging force to the bearing or bushing. On bearings, be sure that the swaging tool does not touch the inner face of the groove in the outer bearing race, or the bearing races could become caught.
对轴承或衬套施加正确的压入力。在轴承上,应确保压接工具不接触轴承外圈沟槽的内面,否则可能会卡住轴承滚道。
(5) After swaging:
压接后:
(a) The groove dimensions and edge gap must agree with Figure 13.
沟槽尺寸和边缘间隙必须与图 13 一致。
(b) The swaged lip must touch a minimum of one third of the housing chamfer.
压接唇缘必须至少接触外壳倒角的三分之一。
(c) The swaged surface of the lip must not be damaged by the tool.
工具不得损坏唇缘的压接表面。
(d) Unless this is a Teflon-lined spherical bearing, the inner race of the bearing must turn freely by hand, and not catch. Unless specified by the overhaul instructions, the no-load breakaway torque of an installed Teflon-lined spherical bearing must not be more than two times the uninstalled maximum breakaway torque specified in the bearing specification or standard.
除非是特氟隆衬里外球面轴承,否则轴承内圈必须用手转动自如,不得卡住。除非大修说明书有规定,已安装的特氟龙衬里球轴承的空载松动扭矩不得超过轴承规格或标准中规定的未安装最大松动扭矩的两倍。
(e) Give the bearing or bushing a push-out load test (on each side unless specified by the overhaul instructions). On bearings, apply the load only to the outer race. The bearing or bushing must not move in the housing more than 0.003 inch axially, or come loose. If the overhaul instructions do not give the load value, you can calculate it. The load value in pounds equals the bearing OD in inches multiplied by the applicable push-out load factor in Figure 13.
对轴承或衬套进行推出负荷测试(每侧,除非大修说明有规定)。对于轴承,仅在外滚道上施加载荷。轴承或衬套在外壳中的轴向移动不得超过 0.003 英寸或松动。如果大修说明中没有给出载荷值,可以计算出来。以磅为单位的载荷值等于以英寸为单位的轴承外径乘以图 13 中适用的推出载荷系数。
(6) Touch up protective finishes as necessary.
根据需要修整保护层。
G. Anvil Swaged Ring Retention (Figure 14 thru Figure 17)
铁砧压接环固定(图 14 至图 17)
(1) Apply the specified installation finish to the ring and the mating part before you put them together.
在将压接环和配合零件组装在一起之前,先在压接环和配合零件上涂上规定的安装面漆。
(2) Assemble parts and tool components as shown in Figure 14 or Figure 15.
如图 14 或图 15 所示组装零件和工具部件。
NOTE: Use a ST933-series tool to swage the ring in a housing. Use a ST933-100-series tool to swage the ring on a shaft.
注: 使用 ST933 系列工具将压接环压入外壳。使用 ST933-100 系列工具将压接环压紧在轴上。
(3) Put the tool setup in a press and apply sufficient pressure to make sure that the swaged ring agrees with the configuration shown in Figure 16 or Figure 17.
将安装好的工具放入压力机中并施加足够的压力,以确保压接环与图 16 或图 17 所示的结构一致。
(4) Make sure the bearing inner race turns freely.
确保轴承内圈转动自如。
(5) Push on the bearing with your hand. It must not be loose in the housing (that is, the outer race must not be movable). A proof load test is not necessary unless specified by the overhaul instructions.
用手推动轴承。轴承在外壳中不能松动(即外滚道不能移动)。除非大修说明书有规定,否则无需进行证明载荷试验。
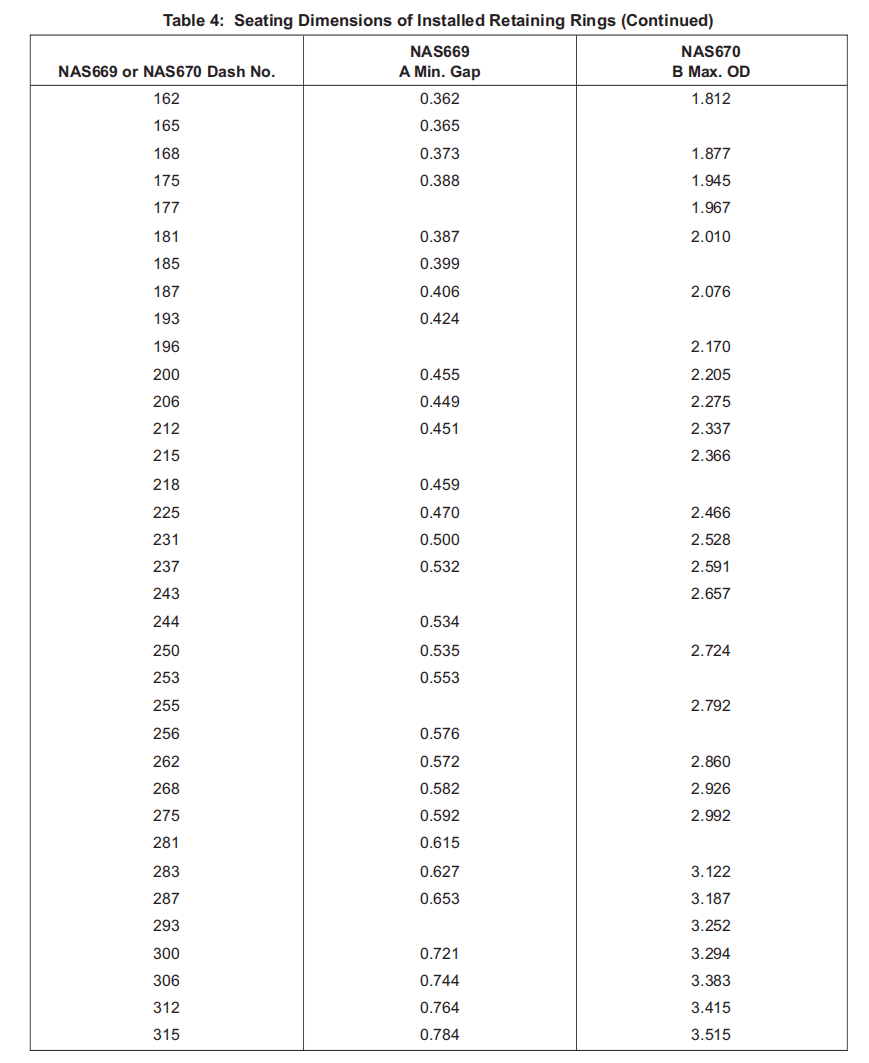
H. Installation of Retaining (Snap) Rings NAS669 and NAS670 (Figure 18)
安装卡环 NAS669 和 NAS670(图 18)
(1) Be careful not to put a set in the snap ring during installation. A compressing sleeve or an expansion shaft is preferred for snap ring installation (Figure 18). As an option, ST2597 pliers can be used for snap ring installation and removal.
安装时注意不要将卡环套入。安装卡环时最好使用压缩套筒或膨胀轴 (图 18)。可选择使用 ST2597 钳子安装和拆卸卡环。
(2) The NAS669 snap rings can be contracted until the lugs touch. Do not let the lugs cross.
可以收缩 NAS669 卡环,直至凸耳接触。不要让凸耳交叉。
(3) The NAS670 snap rings must not be expanded more than is necessary to slip them onto a shaft (nominally 1% greater than shaft diameter).
NAS670 卡环的膨胀程度不得超过将其滑入轴所需的程度(名义上大于轴直径的 1%)。
(4) Examine the mating grooves in the housing or shaft for corrosion, damage or contamination before you install the new rings.
安装新卡环之前,检查外壳或轴的配合槽是否有腐蚀、损坏或污染。
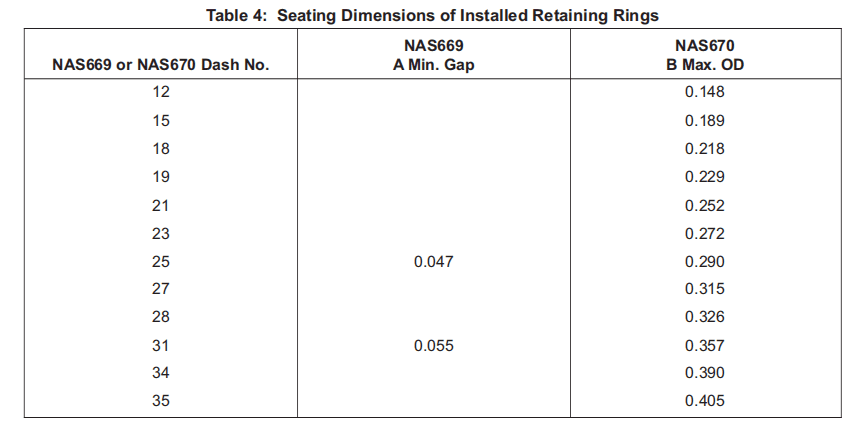
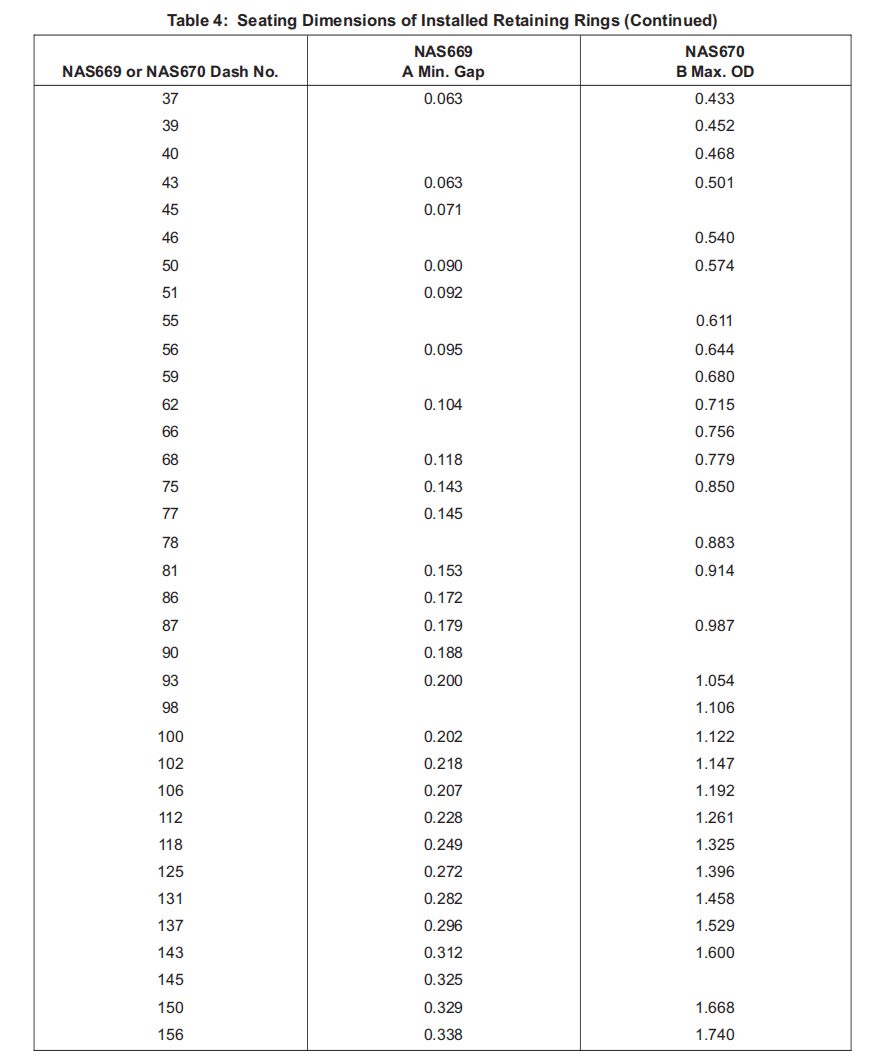
(5) After installation, make a check of NAS669 dimension A, or NAS670 dimension B, to be sure the ring is correctly seated (Figure 19).
安装后,检查 NAS669 尺寸 A 或 NAS670 尺寸 B,确保卡环正确就位(图 19)。
(6) Discard the removed retaining rings. Do not try to use them again.
报废拆下的挡圈。不要再尝试使用它们。

I. Line Staked Sleeve Retention (Figure 20)
管线固定套的固定(图 20)
(1) Get the correct guide and pilot for the sleeve staking tool.
为套筒固定工具准备正确的导向器和先导器。
(2) Apply the specified installation finish on the housing ID, the bearing OD, and the sleeve ID and OD.
在外壳内径、轴承外径、轴承套内径和外径上涂抹规定的安装面漆。
(3) At the two ends of the split sleeve, fill the gap with the specified installation finish.
在剖分轴承套的两端,用规定的安装面漆填满间隙。
(4) Put the sleeve into the housing. Wipe out unwanted installation finish. Put the bearing into the sleeve.
将轴承套装入外壳。擦去不需要的安装面漆。将轴承装入轴承套。
(5) Make sure the assembly is tightly installed down against the housing shoulder (if applicable) and the bearing outer race, sleeve and housing surfaces are all aligned within plus or minus 0.005 inch.
确保组件紧靠外壳轴肩(如适用)安装,轴承外圈、轴承套和外壳表面全部对齐,误差不超过正负 0.005 英寸。
(6) Use a press with approximately a 5000-pound capacity to apply the staking force. The surface to be staked must be perpendicular to the direction of the load. Stake the sleeve to the dimensions shown. The stake is completed when the tool touches the housing surface.
使用承重约 5000 磅的压力机来施加支撑力。桩击的表面必须垂直于载荷方向。按照所示尺寸对轴承套进行桩击。当工具接触到外壳表面时,桩击完成。
(7) After installation, the inner ring of the rolling element and grease or solid-film-lubricated metal-to-metal spherical bearings must turn freely by hand. The outer ring of the bearing must not turn in relation to the housing by hand pressure. The maximum misalignment of the ball of a spherical bearing must be as specified on the bearing standard or drawing, or 10 degrees, whichever is less.
安装后,滚动体和油脂或固体薄膜润滑的金属对金属外球面轴承的内圈必须用手转动自如。轴承外圈不得用手压着外壳转动。外球面轴承的球的最大不对中度必须符合轴承标准或图纸上的规定,或 10 度,以较小者为准。
(8) If the overhaul instructions do not give the no-load breakaway torque and running torque of the installed bearing, use the values given on the bearing drawing, standard or procurement specification. The torque necessary to misalign installed torque tube bearings with a self-aligning outer ring must not be more than 75 pound-inches for each inch of bore diameter, unless specified differently.
如果大修说明没有给出已安装轴承的空载松动扭矩和运转扭矩,则使用轴承图纸、标准或采购规格上给出的数值。除非另有规定,否则已安装的带有自动对中外圈的扭矩管轴承的对中所需扭矩不得超过每英寸孔径 75 磅-英寸。
(9) If the overhaul instructions, bearing drawing, part standard or procurement specification do not give the no-load breakaway torque and running torque of Teflon-lined bearings installed by swaging, do a test of the no-load breakaway torque as specified in BPS-B-111 to make sure the bearings satisfy these conditions:
如果大修说明、轴承图纸、零件标准或采购规格书中没有给出以压接方式安装的铁氟龙衬里轴承的空载松动扭矩和运行扭矩,应按 BPS-B-111 的规定做空载松动扭矩测试,以确保轴承满足这些条件:
(a) The maximum torque of the installed bearing must not be more than two times the value for the uninstalled bearing.
已安装轴承的最大扭矩不得超过未安装轴承值的两倍。
(b) The minimum torque must be more than half the minimum value for the uninstalled bearing. If the torque is less than half the minimum value, the internal radial clearance must not be more than 0.0005 inch when measured at room temperature. Measure the clearance with a displacement indicator while you give the bearing a load of 5.0-6.0 pounds applied in alternate directions.
最小扭矩必须大于未安装轴承最小值的一半。如果扭矩小于最小值的一半,在室温下测量的内部径向游隙不得超过 0.0005 英寸。用位移指示器测量游隙,同时在两个方向上给轴承施加 5.0-6.0 磅的载荷。
(c) The outer ring must not turn in relation to the bearing by hand pressure.
用手压轴承时,外圈不得转动。
(10) Unless specified in the overhaul instructions, loader slot bearings must be installed as specified by the bearing drawing, standard or procurement specification. Unless specified differently, the bearings must turn freely. The outer ring of the bearing must not turn in relation to the housing by hand pressure.
除非大修说明书有规定,装载机槽轴承必须按轴承图纸、标准或采购规格的规定安装。除非另有规定,轴承必须自由转动。用手按压轴承,轴承外圈不得相对于外壳转动。
(11) There must be no cracks in the bearing, housing, or sleeve.
轴承、外壳或轴承套不得有裂缝。
(12) Do a proof load test of the bearing installation if visual inspections with up to 10X magnification shows staked lips that are not continuous.
如果用 10 倍放大镜进行目视检查,发现钉唇不连续,则对轴承安装进行证明载荷测试。
(13) Remove unwanted installation finish. Touch up protective finishes as necessary.
去除不需要的安装面漆。必要时修整保护层。
(14) Push on the bearing with your hand. It must not be loose in the housing (that is, the outer race must not be movable). A proof load test is not necessary unless specified by the overhaul instructions.
用手推动轴承。轴承在外壳中不能松动(即外圈不能移动)。除非大修说明书有规定,否则不必进行证明载荷试验。
J. Roller Swaged Sleeve Retention with Standard Tools (Figure 21)
使用标准工具固定滚子压接轴承套 (图 21)
NOTE: This procedure uses standard tools such as ST928 or ST929-1. ST928 tools are for aluminum sleeves and ST929-1 tools are for CRES sleeves.
注: 本程序使用 ST928 或 ST929-1 等标准工具。ST928 工具用于铝轴承套,ST929-1 工具用于 CRES 轴承套。
(1) Get the correct collar and pilot for the roller swaging tool. Install the swaging tool into the drill press or equivalent machine.
为滚子压接工具准备正确的轴环和导向器。将压接工具安装到钻床或类似机器上。
(2) Apply the specified installation finish on the housing ID, the bearing OD, and the sleeve.
在外壳内径、轴承外径和套筒上涂抹规定的安装面漆。
(3) At the two ends of the split sleeve, fill the gap with the specified finish material.
在剖分轴承套的两端,用规定的饰面材料填满间隙。
(4) Put the sleeve into the housing. Wipe out unwanted installation finish. Put the bearing into the sleeve.
将轴承套装入外壳。擦掉不需要的安装面漆。将轴承装入轴承套。
(5) Make sure the assembly is tightly installed down against the housing shoulder (if applicable) and that the bearing outer race, sleeve, and housing surfaces are correctly aligned. Make sure the sleeve is at the correct height above the housing and bearing surfaces as shown.
确保组件紧贴外壳轴肩(如适用),并确保轴承外圈、轴承套和外壳表面正确对齐。确保轴承套位于外壳和轴承表面上方的正确高度,如图所示。
(6) Set the speed of the drill press to make the rollers have a surface speed of approximately 50 feet per minute. (Spindle RPM = 200 divided by bearing OD in inches.)
设置钻床速度,使滚子的表面速度约为每分钟 50 英尺(主轴转速 = 200 除以轴承外径(以英寸为单位))。
(7) Move the tool down to the surface to be swaged. Start the drill press and apply sufficient force to swage the sleeve. The swage is completed when the rollers touch the housing.
将工具向下移动到要压接的表面。启动钻床并施加足够的力以压接轴承套。当滚子接触到外壳时,压接完成。
(8) After installation, the inner ring of the rolling element and grease or solid-film-lubricated metal-to-metal spherical bearings must turn freely by hand. The outer ring of the bearing must not turn in relation to the housing by hand pressure. The maximum misalignment of the ball of a spherical bearing must be as specified on the bearing standard or drawing, or 10 degrees, whichever is less.
安装后,滚动体内圈和油脂或固体薄膜润滑的金属对金属球轴承必须用手转动自如。用手按压轴承外圈时,轴承外圈不得相对于外壳转动。外球面轴承的球的最大不对中度必须符合轴承标准或图纸上的规定,或 10 度,以较小者为准。
(9) If the overhaul instructions do not give the no-load breakaway torque and running torque of the installed bearing, use the values given on the bearing drawing, standard or procurement specification. The torque necessary to misalign installed torque tube bearings with a self-aligning outer ring must not be more than 75 pound-inches for each inch of bore diameter, unless specified differently.
如果大修说明书没有给出已安装轴承的空载松动扭矩和运行扭矩,则使用轴承图纸、标准或采购规格上给出的数值。除非另有规定,否则已安装的带有自动对中外圈的扭矩管轴承的对中所需扭矩不得超过每英寸孔径 75 磅-英寸。
(10) If the overhaul instructions, bearing drawing, part standard or procurement specification do not give the no-load breakaway torque and running torque of Teflon-lined bearings installed by swaging, do a test of the no-load breakaway torque as specified in BPS-B-111 to make sure the bearings satisfy these conditions:
如果大修说明、轴承图纸、零件标准或采购规格书中没有给出以压接方式安装的铁氟龙衬里轴承的空载松动扭矩和运转扭矩,应按 BPS-B-111 的规定做空载松动扭矩测试,以确保轴承满足这些条件:
(a) The maximum torque of the installed bearing must not be more than two times the value for the uninstalled bearing.
已安装轴承的最大扭矩不得超过未安装轴承值的两倍。
(b) The minimum torque must be more than half the minimum value for the uninstalled bearing. If the torque is less than half the minimum value, the internal radial clearance must not be more than 0.0005 inch when measured at room temperature. Measure the clearance with a displacement indicator while you give the bearing a load of 5.0-6.0 pounds applied in alternate directions.
最小扭矩必须大于未安装轴承最小值的一半。如果扭矩小于最小值的一半,在室温下测量的内部径向游隙不得超过 0.0005 英寸。用位移指示器测量游隙,同时在两个方向上给轴承施加 5.0-6.0 磅的载荷。
(c) The outer ring must not turn in relation to the bearing by hand pressure.
用手压轴承时,外圈不得转动。
(11) Unless specified in the overhaul instructions, loader slot bearings must be installed as specified by the bearing drawing, standard or procurement specification. Unless specified differently, the bearings must turn freely. The outer ring of the bearing must not turn in relation to the housing by hand pressure.
除非大修说明书有规定,装载机槽轴承必须按轴承图纸、标准或采购规格的规定安装。除非另有规定,轴承必须自由转动。用手按压轴承,轴承外圈不得相对于外壳转动。
(12) There must be no cracks in the bearing, housing, or sleeve.
轴承、外壳或轴承套不得有裂缝。
(13) Do a proof load test of the bearing installation if visual inspections with up to 10X magnification shows swaged lips that are not continuous.
如果用 10 倍放大镜进行目视检查,发现压接唇不连续,则对轴承安装进行验证载荷测试。
(14) Remove unwanted installation finish. Touch up protective finishes as necessary.
去除不需要的安装面漆。必要时修整保护层。
(15) The completed swaged sleeve configuration must be made by the specified tooling. No removal of feathered edges or burrs is permitted.
完成的压接轴承套构型必须由规定的工具制作。不允许去除毛边或毛刺。
(16) Give the bearing a push-out load test (unless you can measure the width of the swaged sleeve as shown). Do the test on each side of the bearing, unless specified by the overhaul instructions. Apply the load only to the outer race, as shown. The bearing must not move in the housing more than 0.003 inch axially, or come loose. If the overhaul instructions do not give the load value, use 10% of the specified bearing radial load limit or 100% of the specified axial load limit, whichever is less. The load limit values are specified in the bearing specification or standard.
对轴承进行推出载荷测试(除非可以如图所示测量压接轴承套的宽度)。除非大修说明有规定,否则在轴承的每一侧都进行测试。如图所示,仅在外滚道上施加载荷。轴承在外壳中的轴向移动不得超过 0.003 英寸或松动。如果大修说明中没有给出载荷值,则使用规定轴承径向载荷极限的 10%或规定轴向载荷极限的 100%,以较小者为准。轴承规格或标准中规定了载荷极限值。
K. Roller Swaged Sleeve Retention with F80118-Series Tools (Figure 22)
使用 F80118 系列工具的滚子压接轴承套紧固(图 22)
(1) The F80118-series tools sometimes can be better or easier to use than standard tools. For example, the F80118 kits are manually operated. A drill press is not necessary.
F80118 系列工具有时比标准工具更好用或更容易使用。例如,F80118 工具包是手动操作的。不需要钻床。
(2) The F80118-1 roller swaging kit includes a body, rollers, retaining rings, pilot, thrust bearing, anvil, tension bolt, and lockbolt. The F80118-54, -55 kits have jamnuts and a shaft, not a lockbolt and tension bolt, and are used with a separate ratchet wrench; otherwise, their operation is equivalent to the F80118-1 kit.
F80118-1 滚子压接工具包包括主体、滚柱、挡圈、导向器、止推轴承、砧、拉紧螺栓和锁紧螺栓。F80118-54 和 -55 套件有防松螺母和轴,而没有锁紧螺栓和拉紧螺栓,使用时需要单独的棘轮扳手;除此之外,其操作与 F80118-1 套件相同。
CAUTION :DO NOT LET GREASE OR OTHER LUBRICANTS GET INTO TEFLONLINED BEARINGS. LUBRICANTS CAN COLLECT CONTAMINATION WHICH COULD DAMAGE THE TEFLON SURFACES.
警告 :不要让油脂或其他润滑剂进入带特氟龙衬里的轴承。润滑剂会聚集污染物,损坏特氟龙表面。
(3) Apply the specified installation finish on the housing ID, the bearing OD, and the sleeve ID and OD.
在外壳内径、轴承外径、轴承套内径和外径上涂抹规定的安装面漆。
(4) Install the sleeve in the housing. Wipe out unwanted installation finish. Install the bearing in the sleeve. Make sure the bearings and the sleeve are correctly in the center of the housing.
将轴承套装入外壳。擦掉不需要的安装面漆。将轴承装入轴承套。确保轴承和轴承套正确位于外壳的中心。
(5) Assemble the swaging tool components as shown in Figure 22. Use the pilot that agrees with the bearing ID. Apply a thin layer of lubricating oil to rollers, anvil, pilot, body assembly, and threads to decrease friction during the swaging operation.
如图 22 所示,组装压接工具部件。使用与轴承内径一致的导向器。在滚轮、砧座、导向器、主体组件和螺纹上涂抹一薄层润滑油,以减少压接操作过程中的摩擦。
(6) Tighten the tension bolt or jamnut A until the rollers start to change the shape of the sleeve.
拧紧拉紧螺栓或防松螺母 A,直到滚子开始改变轴承套的形状。
(7) Tighten the lockbolt or jamnut B and turn the tool assembly with a wrench. Continue until the sleeve is swaged to agree with Figure 21.
拧紧锁紧螺栓或防松螺母 B,并用扳手转动工具组件。继续,直到轴承套被压接至与图 21 一致。
(8) Remove the swage tool and install it on the reverse side to do the second swage. Use the flat side of the anvil for the second swage.
取下压接工具,将其安装在反面,进行第二次压接。第二次压接时使用砧座的平面。
(9) After installation, the inner ring of the rolling element and grease or solid-film-lubricated metal-to-metal spherical bearings must turn freely by hand. The outer ring of the bearing must not turn in relation to the housing by hand pressure. The maximum misalignment of the ball of a spherical bearing must be as specified on the bearing standard or drawing, or 10 degrees, whichever is less.
安装后,滚动体和油脂或固体膜润滑的金属对金属球轴承的内圈必须用手转动自如。用手按压轴承外圈时,轴承外圈不得相对于外壳转动。球轴承的球的最大不对中度必须符合轴承标准或图纸上的规定,或 10 度,以较小者为准。
(10) If the overhaul instructions do not give the no-load breakaway torque and running torque of the installed bearing, use the values given on the bearing drawing, standard or procurement specification. The torque necessary to misalign installed torque tube bearings with a self-aligning outer ring must not be more than 75 pound-inches for each inch of bore diameter, unless specified differently.
如果大修说明没有给出已安装轴承的空载松动扭矩和运行扭矩,则使用轴承图纸、标准或采购规格上给出的数值。除非另有规定,否则已安装的带有自动对中外圈的扭矩管轴承的对中所需扭矩不得超过每英寸孔径 75 磅-英寸。
(11) If the overhaul instructions, bearing drawing, part standard or procurement specification do not give the no-load breakaway torque and running torque of Teflon-lined bearings installed by swaging, do a test of the no-load breakaway torque as specified in BPS-B-111 to make sure the bearings satisfy these conditions:
如果大修说明、轴承图纸、零件标准或采购规格书中没有给出以压接方式安装的铁氟龙衬里轴承的空载松动力矩和运行力矩,则按 BPS-B-111 的规定做空载松动力矩测试,以确保轴承满足这些条件:
(a) The maximum torque of the installed bearing must not be more than two times the value for the uninstalled bearing.
已安装轴承的最大扭矩不得超过未安装轴承值的两倍。
(b) The minimum torque must be more than half the minimum value for the uninstalled bearing. If the torque is less than half the minimum value, the internal radial clearance must not be more than 0.0005 inch when measured at room temperature. Measure the clearance with a displacement indicator while you give the bearing a load of 5.0-6.0 pounds applied in alternate directions.
最小扭矩必须大于未安装轴承最小值的一半。如果扭矩小于最小值的一半,在室温下测量的内部径向游隙不得超过 0.0005 英寸。用位移指示器测量游隙,同时在两个方向上给轴承施加 5.0-6.0 磅的载荷。
(c) The outer ring must not turn in relation to the bearing by hand pressure.
用手压轴承时,外圈不得转动。
(12) Unless specified in the overhaul instructions, loader slot bearings must be installed as specified by the bearing drawing, standard or procurement specification. Unless specified differently, the bearings must turn freely. The outer ring of the bearing must not turn in relation to the housing by hand pressure.
除非大修说明书有规定,装载机槽轴承必须按轴承图纸、标准或采购规格的规定安装。除非另有规定,轴承必须自由转动。用手按压轴承,轴承外圈不得相对于外壳转动。
(13) There must be no cracks in the bearing, housing, or sleeve.
轴承、外壳或轴承套不得有裂缝。
(14) Do a proof load test of the bearing installation if visual inspections with up to 10X magnification shows swaged lips that are not continuous.
如果用最大 10 倍的放大镜目视检查发现压接唇不连续,则对轴承安装进行证明载荷测试。
(15) Wipe off unwanted installation finish. Touch up protective finishes as necessary.
擦去不需要的安装面漆。必要时修补保护层。
(16) Give the bearing a push-out load test (unless you can measure the width of the swaged sleeve, as shown in Figure 21). Do this test on each side of the bearing, unless specified by the overhaul instructions. Apply the load only to the outer race, as shown in Figure 21. The bearing must not move in the housing more than 0.003 inch axially, or come loose. If the overhaul instructions do not give the load value, use 10% of the specified bearing radial load limit or 100% of the specified axial load limit, whichever is less. The load limit values are specified in the bearing specification or standard.
对轴承进行推出负荷测试(除非可以测量压接轴承套的宽度,如图 21 所示)。除非大修说明有规定,否则在轴承的每一侧都要进行该测试。如图 21 所示,仅在外滚道上施加载荷。轴承在外壳中的轴向移动不得超过 0.003 英寸或松动。如果大修说明中没有给出载荷值,则使用规定轴承径向载荷极限的 10%或规定轴向载荷极限的 100%,以较小者为准。轴承规格或标准中规定了载荷极限值。
L. Staked Flanged Bushings (Figure 23)
柱击法兰衬套(图 23)
NOTE: This procedure is for BACB28B-series bushings, and some equivalent special bushings, which have a tail end specially cut to be bent over the housing. The procedure uses the CP 450 squeeze riveter and ST922-type bushing staking tools.
注: 该程序适用于 BACB28B 系列衬套和一些同等的特殊衬套,这些衬套的尾端经过特殊切割,可在外壳上弯曲。该程序使用 CP 450 挤压铆接机和 ST922 型衬套固定工具。
(1) Install the bushing into the housing by the shrink-fit or press-fit procedure, Paragraph 7. Be sure to use the applicable installation finish on the mating parts.
按照第 7 段的收缩配合或压入配合程序将衬套安装到外壳中。务必在配合零件上使用适用的安装面漆。
(2) Put the curling punch and the flat anvil in the squeeze riveter. Adjust the stroke of the press to curl the bushing end tightly against the housing, as shown.
将卷曲冲头和平砧放入挤压铆接机中。如图所示,调整压力机的行程,使衬套端部紧贴外壳卷曲。
(3) Replace the curling punch with the flattening punch. Apply the punch to give a final set to the bushing to make sure it will not turn in the housing.
用压平冲头替换卷曲冲头。用冲头对衬套进行最后的固定,以确保其在外壳内不会转动。
(4) Push on the bushing with your hand. It must not be loose in the housing. A proof load test is not necessary unless specified by the overhaul instructions.
用手推衬套。衬套在外壳内不得松动。除非大修说明有规定,否则无需进行证明负载测试。
M. Swaged Flanged Bushing (Figure 24)
压接法兰衬套 (图 24)
NOTE: This procedure is for BACB28AT, AU, AV and AY-series bushings, and some equivalent special bushings, which have a tail end specially cut to be bent over the chamfer in the mating bore of the housing.
注: 该程序适用于 BACB28AT、AU、AV 和 AY 系列衬套,以及一些同等的特殊衬套,这些衬套的尾端经过特殊切割,可在机壳配合孔的倒角上弯曲。
(1) Install the bushing into the housing by the shrink fit or press fit procedure, Paragraph 7. Be sure to use the applicable installation finish on the mating parts.
按照第 7 段的收缩配合或压入配合程序将衬套安装到外壳中。务必在配合零件上使用适用的安装面漆。
(2) Roller swage or anvil swage the tail end of the bushing (Paragraph 8.D., Paragraph 8.E. or Paragraph 8.F.).
辊压或砧压轴承套尾端(第 8.D.、8.E.或 8.F.段)。
(3) Push on the bushing with your hand. It must not be loose in the housing. A proof load test is not necessary unless specified by the overhaul instructions.
用手推动衬套。衬套在外壳中不得松动。除非大修说明有规定,否则无需进行证明负载测试。
N. Flared Bushings (Figure 25 or Figure 26)
扩口衬套 (图 25 或图 26)
NOTE: This procedure uses a special tool, such as A20011 or B32070 equipment, to bend the tail end of the bushing over the chamfer in the mating bore of the housing.
注: 该程序使用专用工具,如 A20011 或 B32070 设备,将衬套的尾端弯曲到机壳配合孔的倒角上。
(1) Install the bushing into the housing by the shrink fit or press fit procedure, Paragraph 7. Be sure to use the applicable installation finish on the mating parts.
按照第 7 段的收缩配合或压入配合程序将衬套安装到外壳中。务必在配合零件上使用适用的安装面漆。
(2) Bend (flare, expand) the tail end of the bushing over the chamfer of the housing bore, as shown.
如图所示,将衬套的尾端弯曲(扩口、膨胀)到外壳孔的倒角上。
(3) Push on the bushing with your hand. It must not be loose in the housing. A proof load test is not necessary unless specified by the overhaul instructions.
用手推衬套。衬套在外壳内不得松动。除非大修说明有规定,否则无需进行证明负载测试。
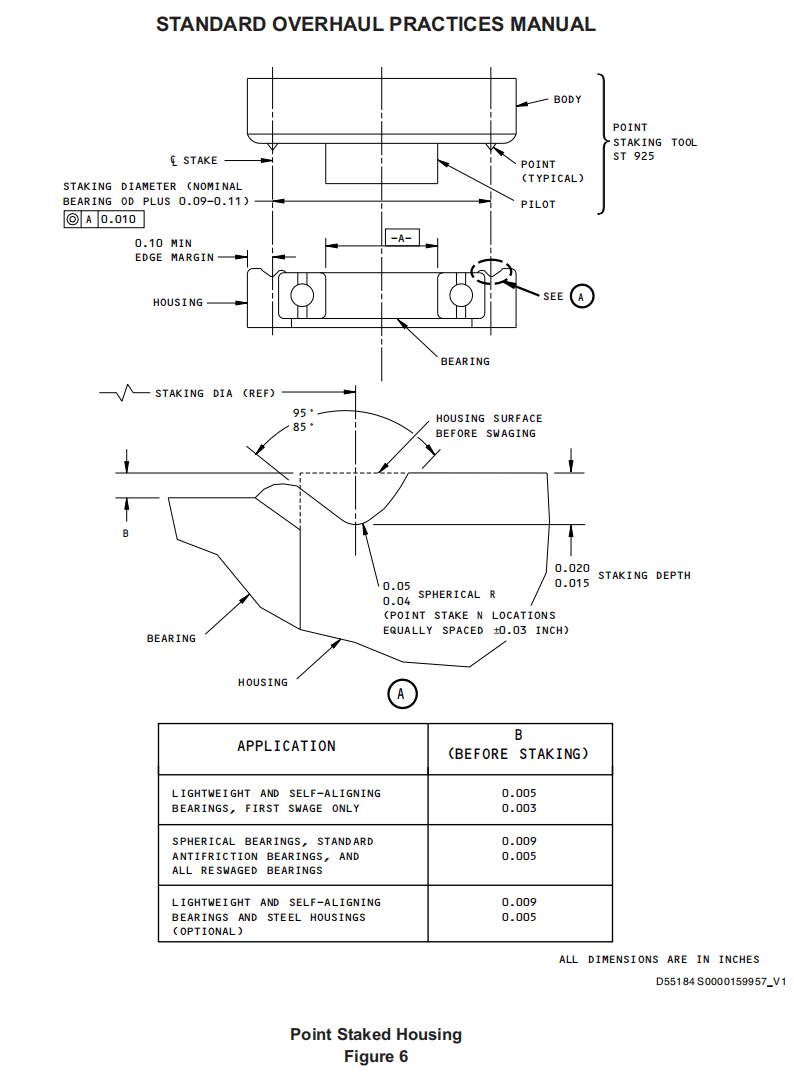
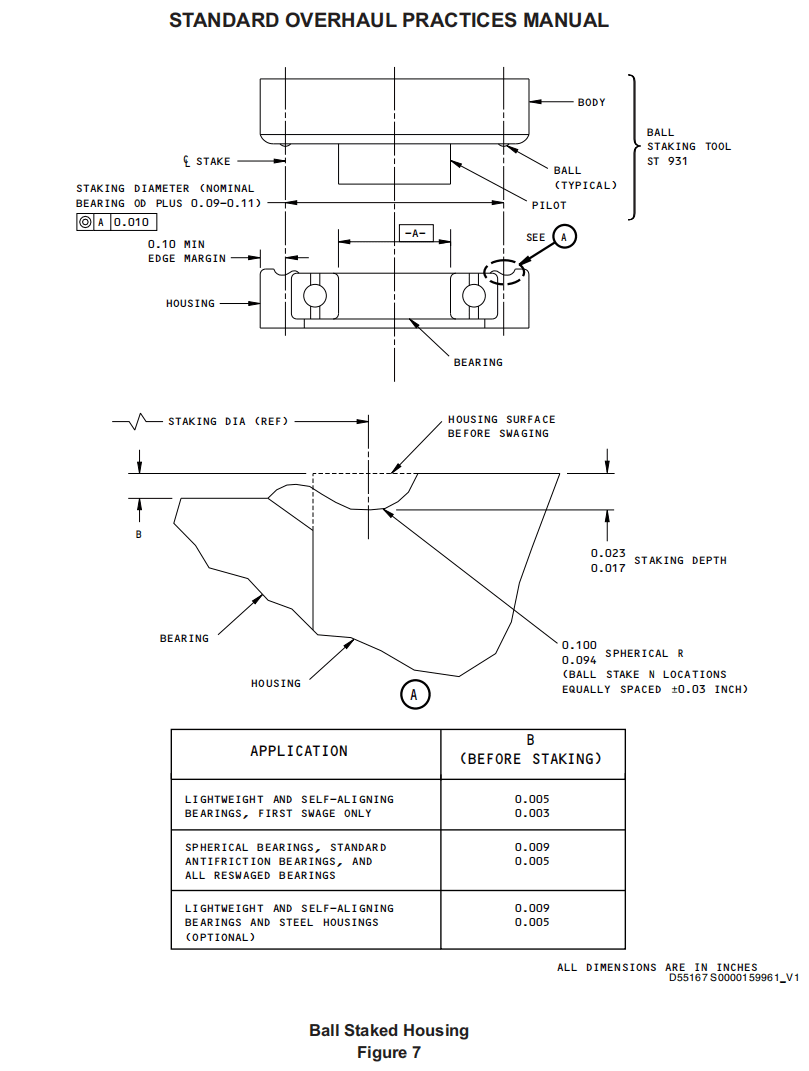

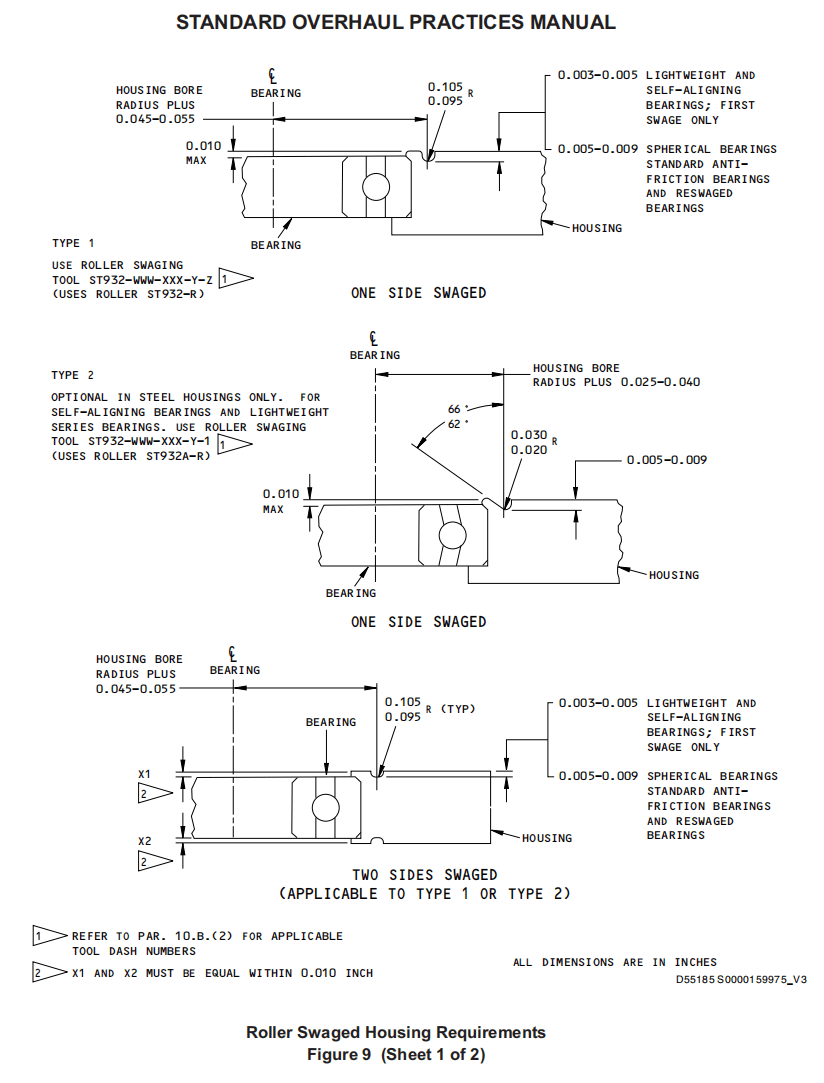
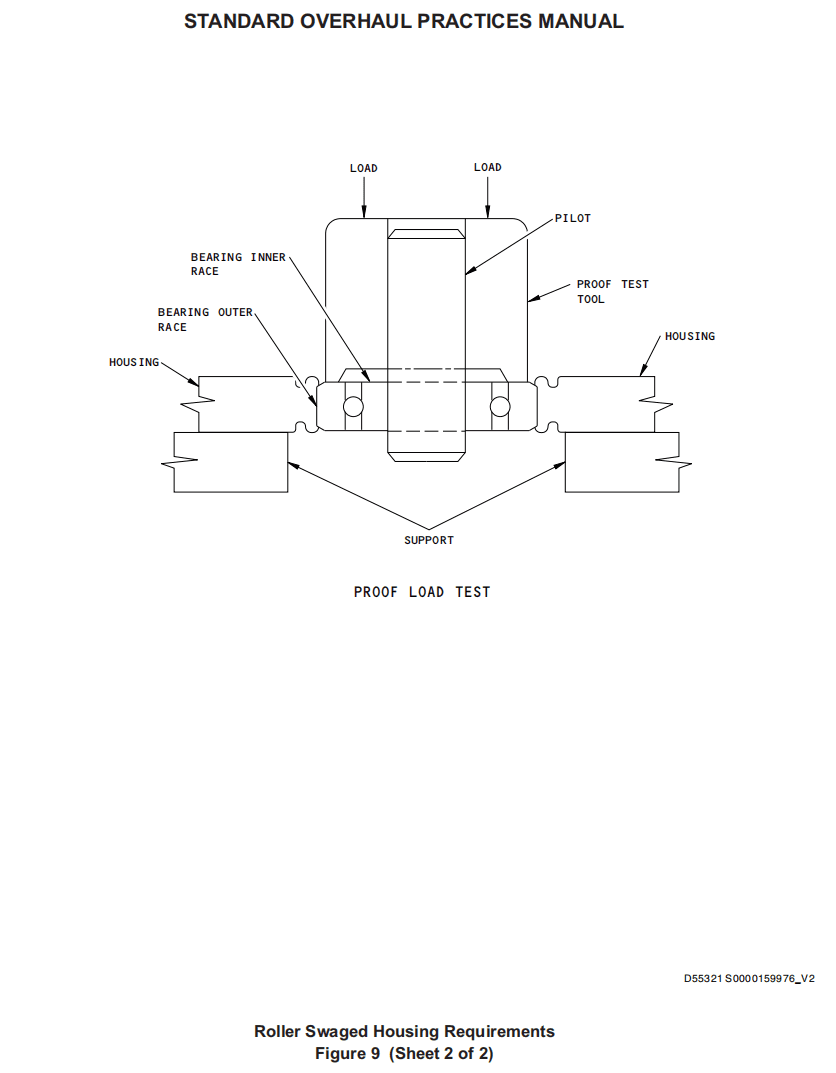
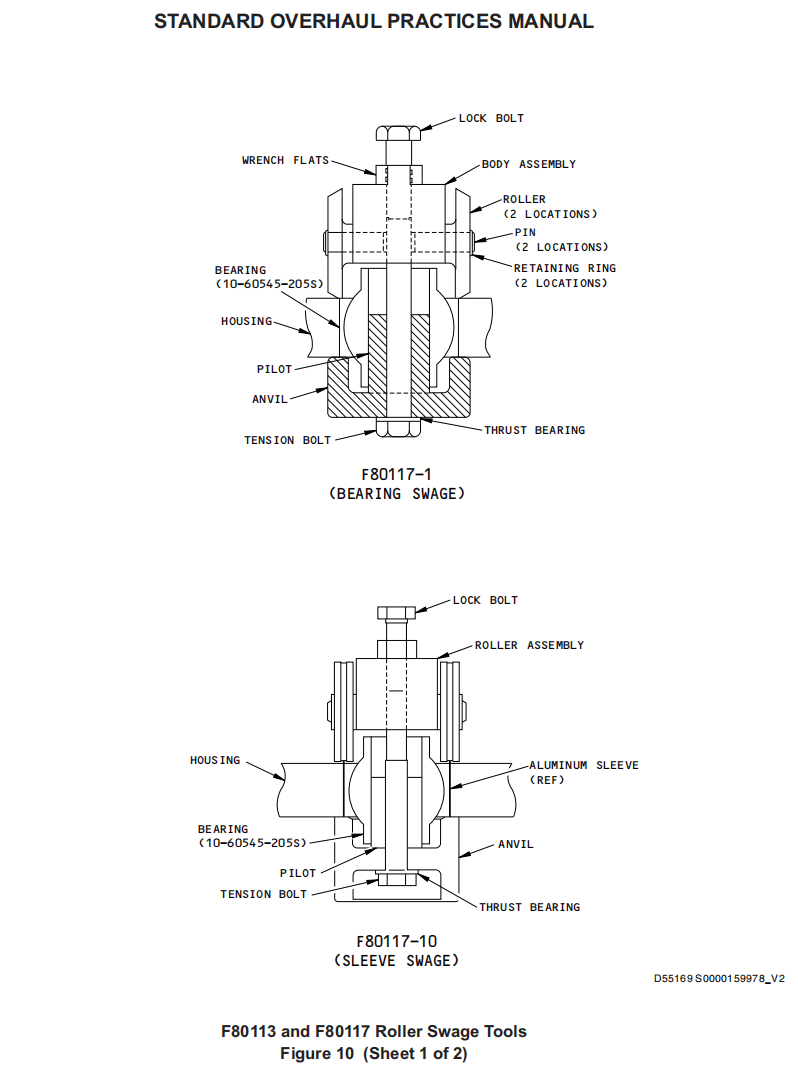
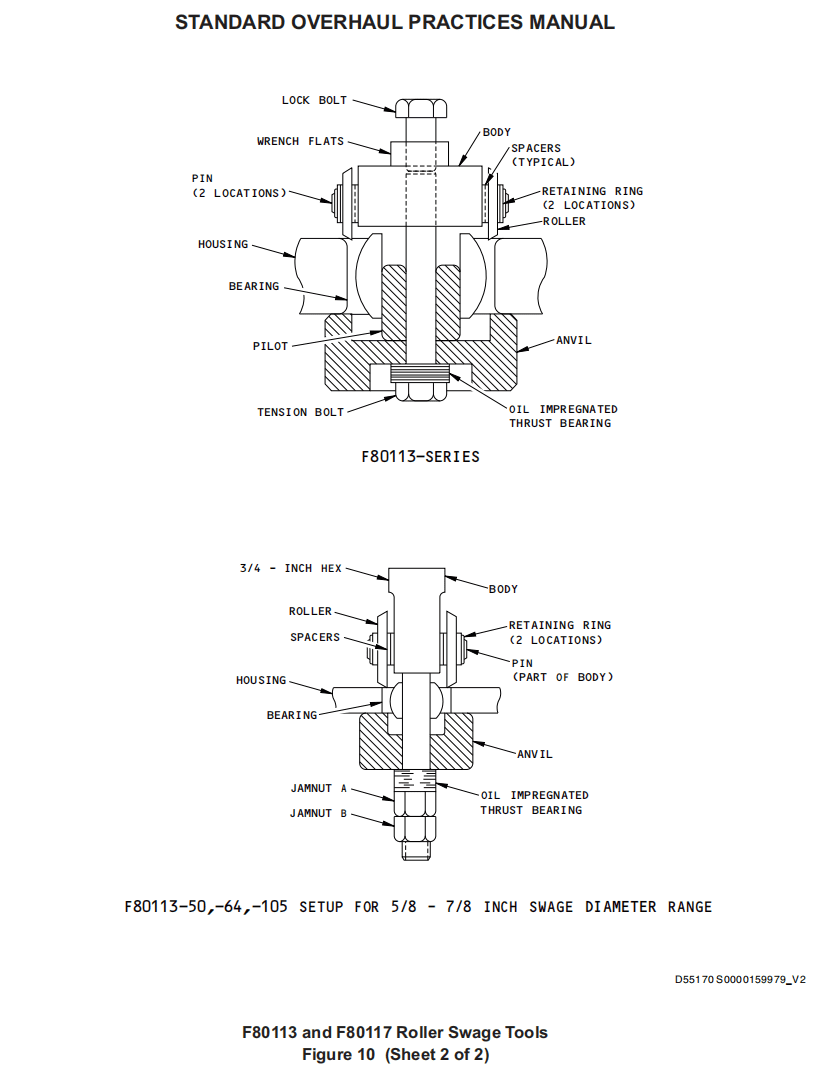
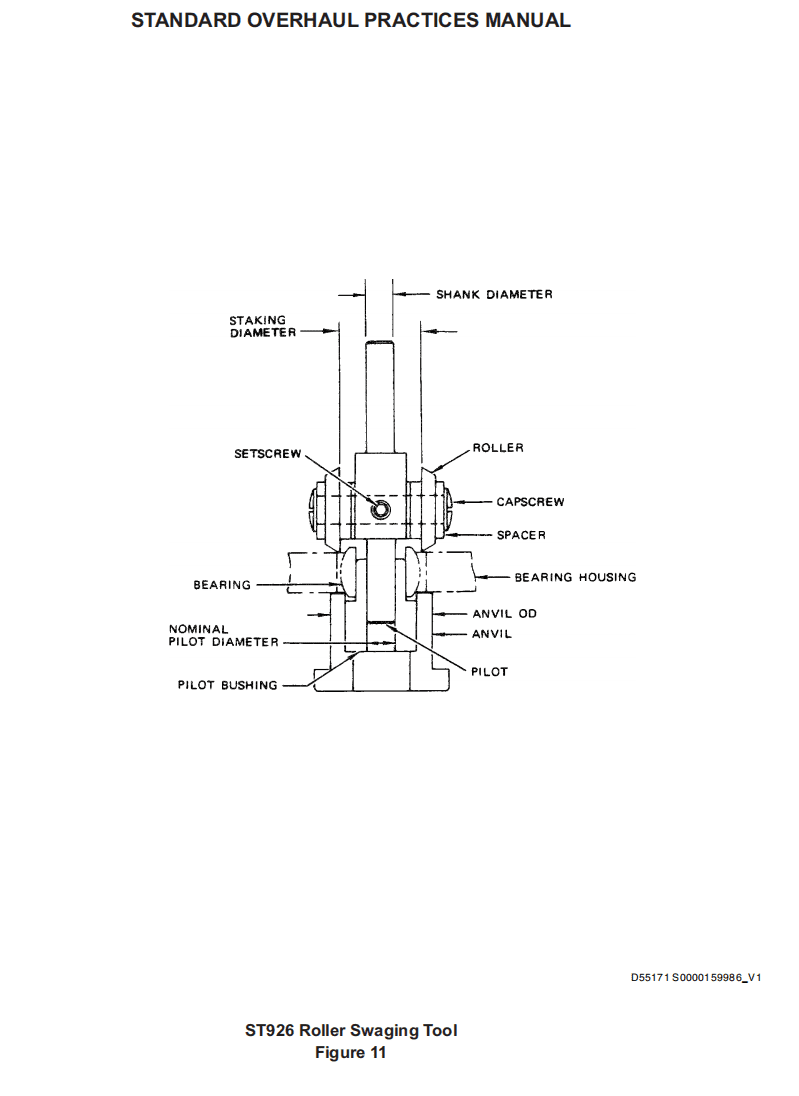
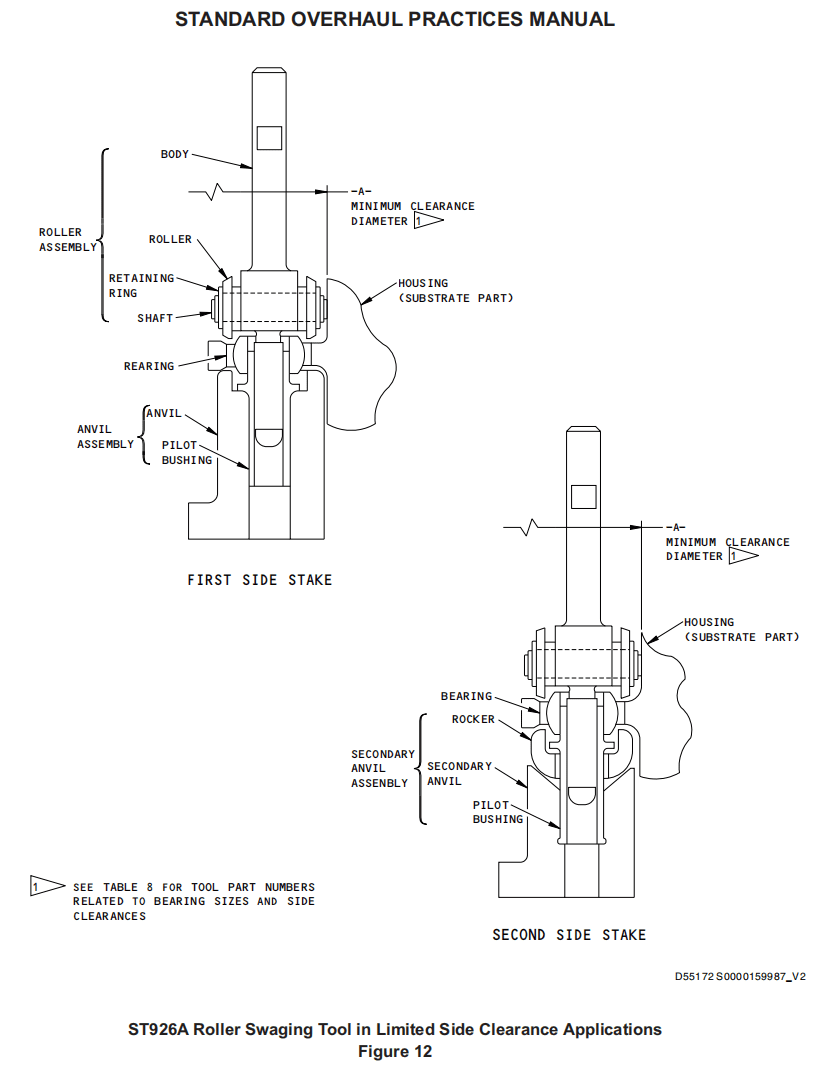
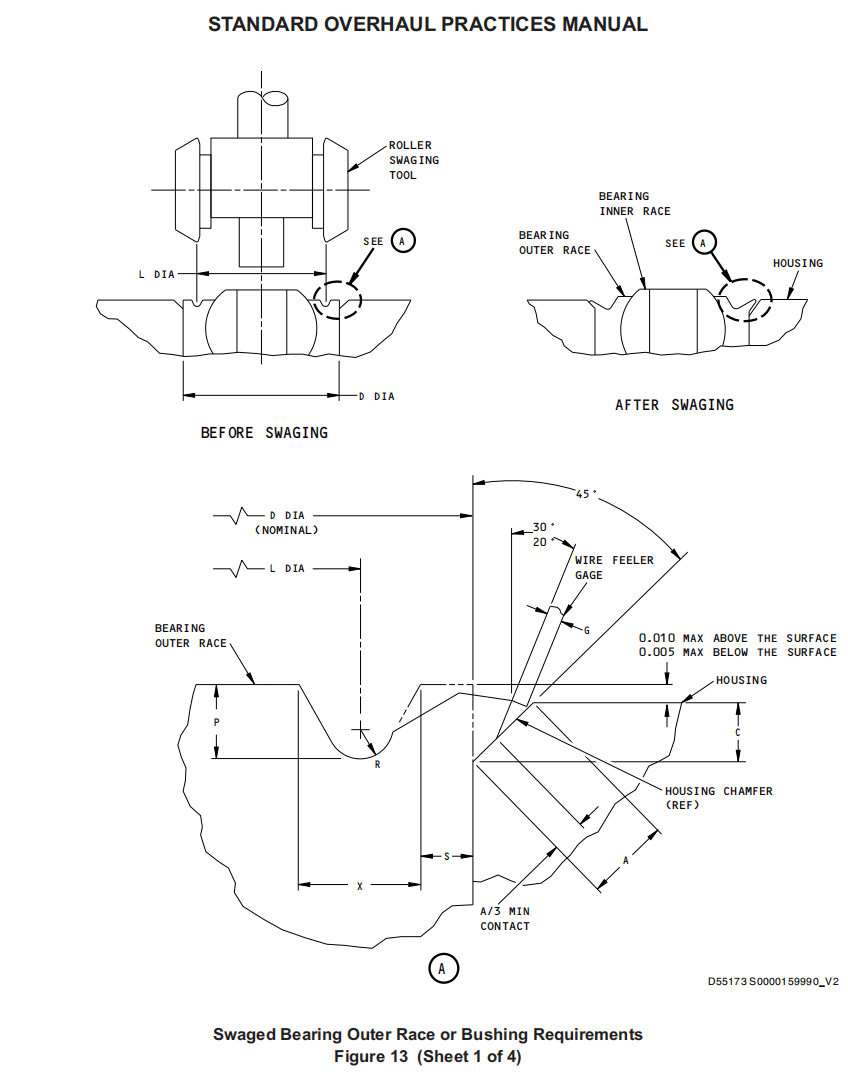
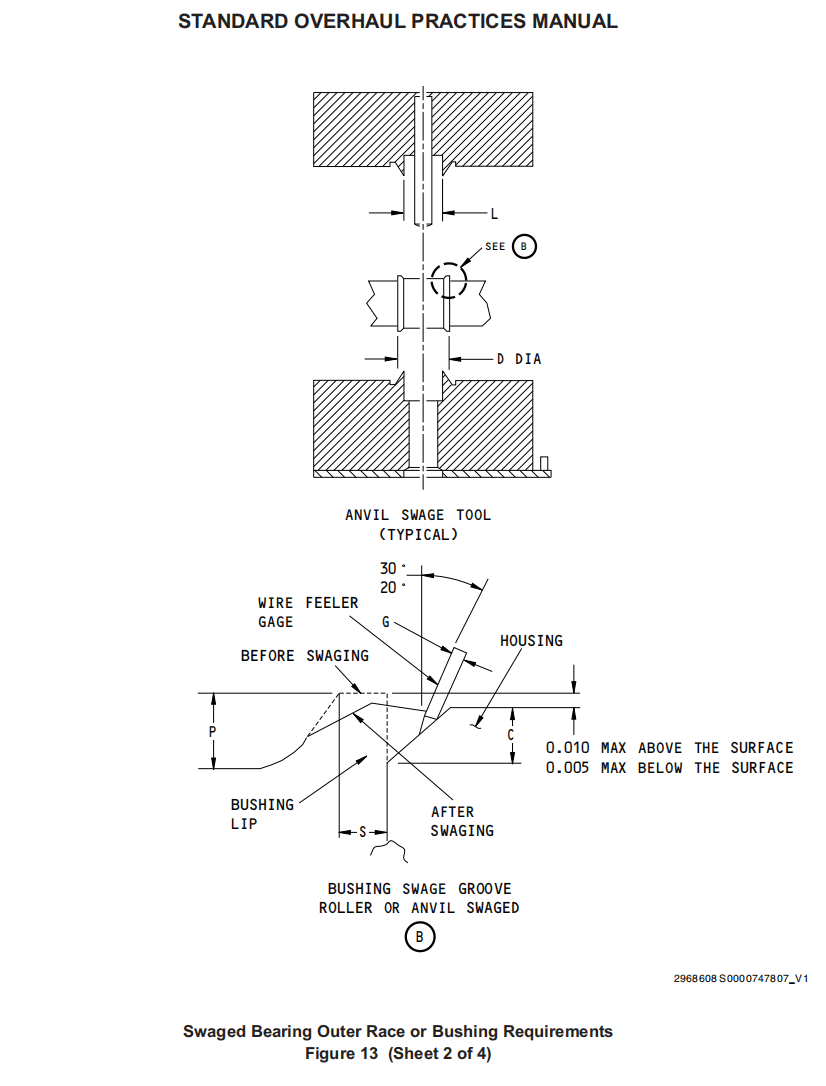
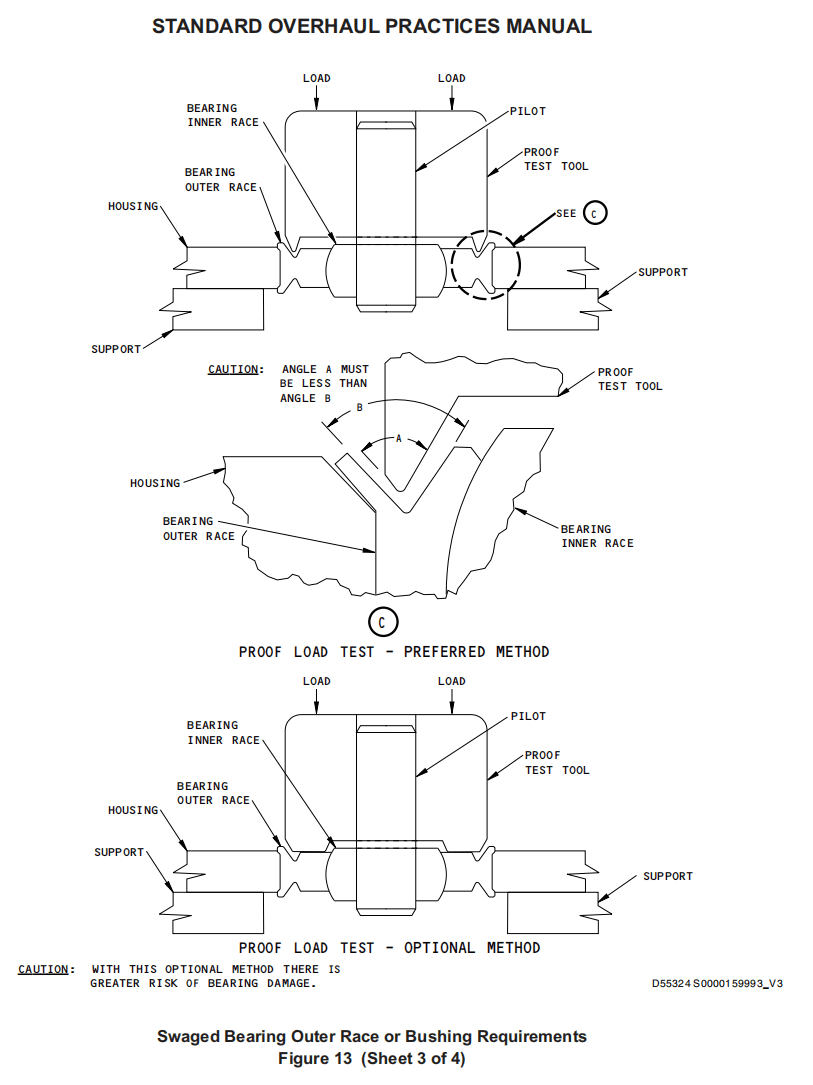


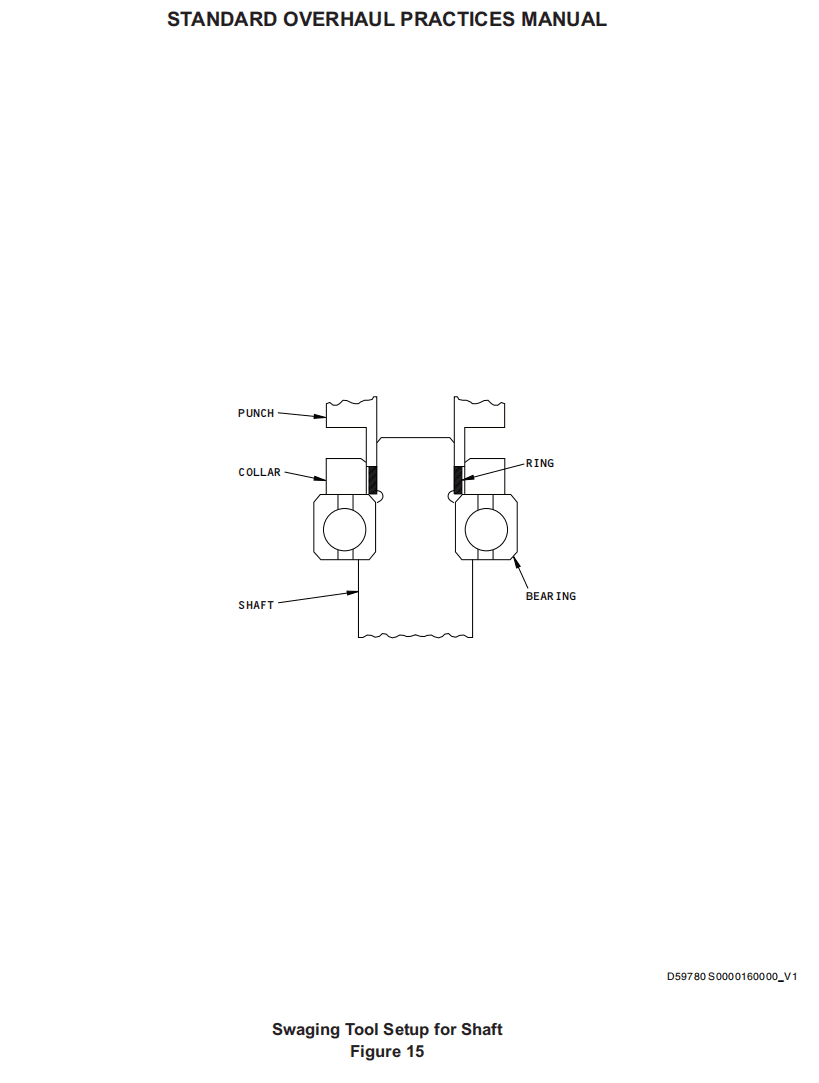

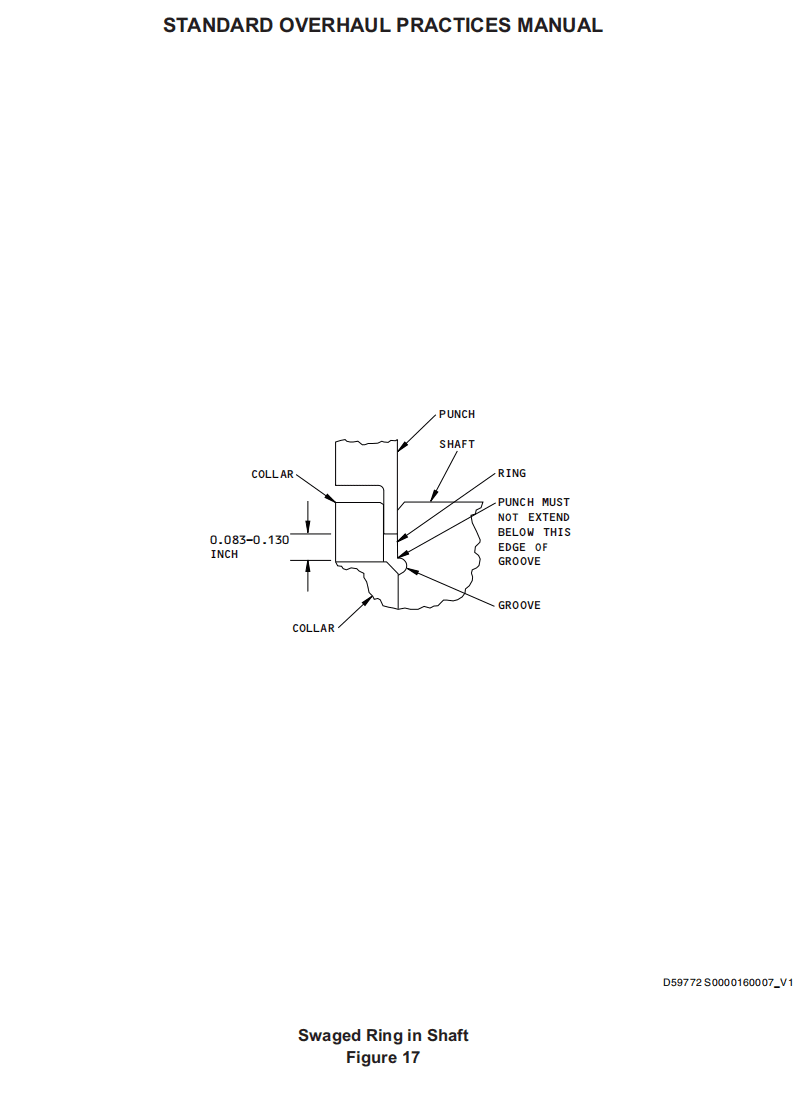
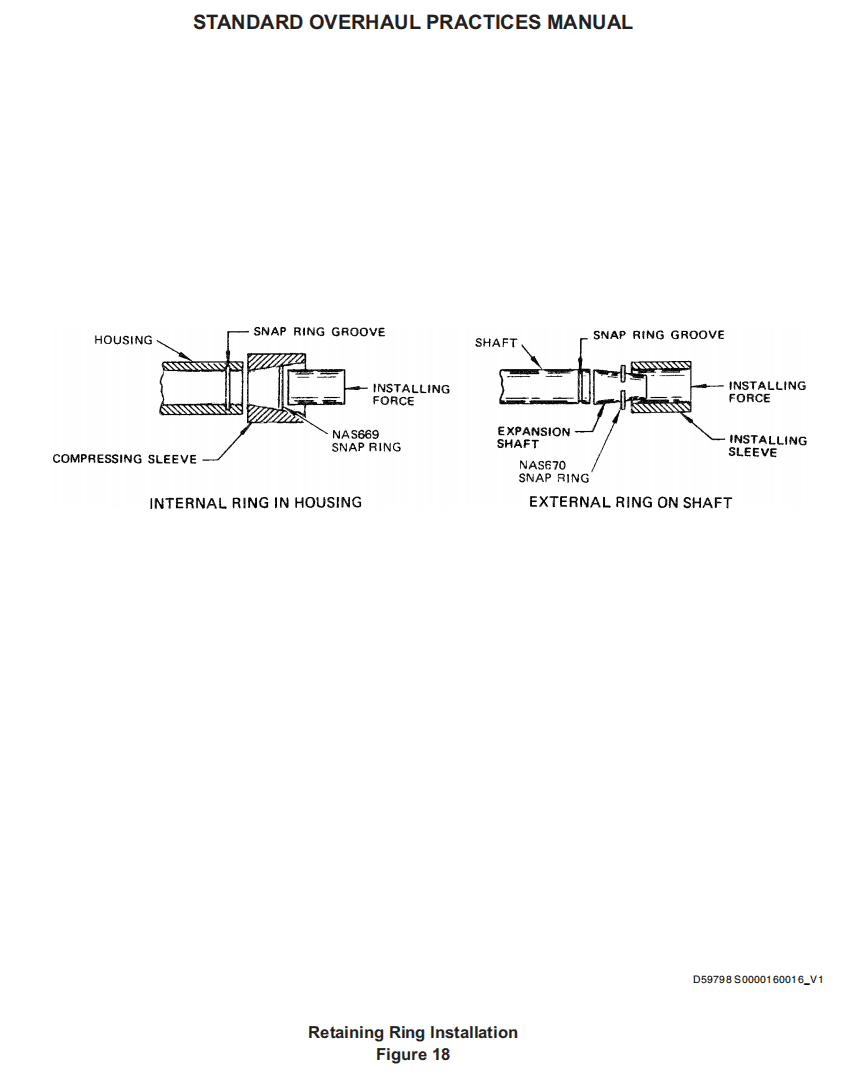
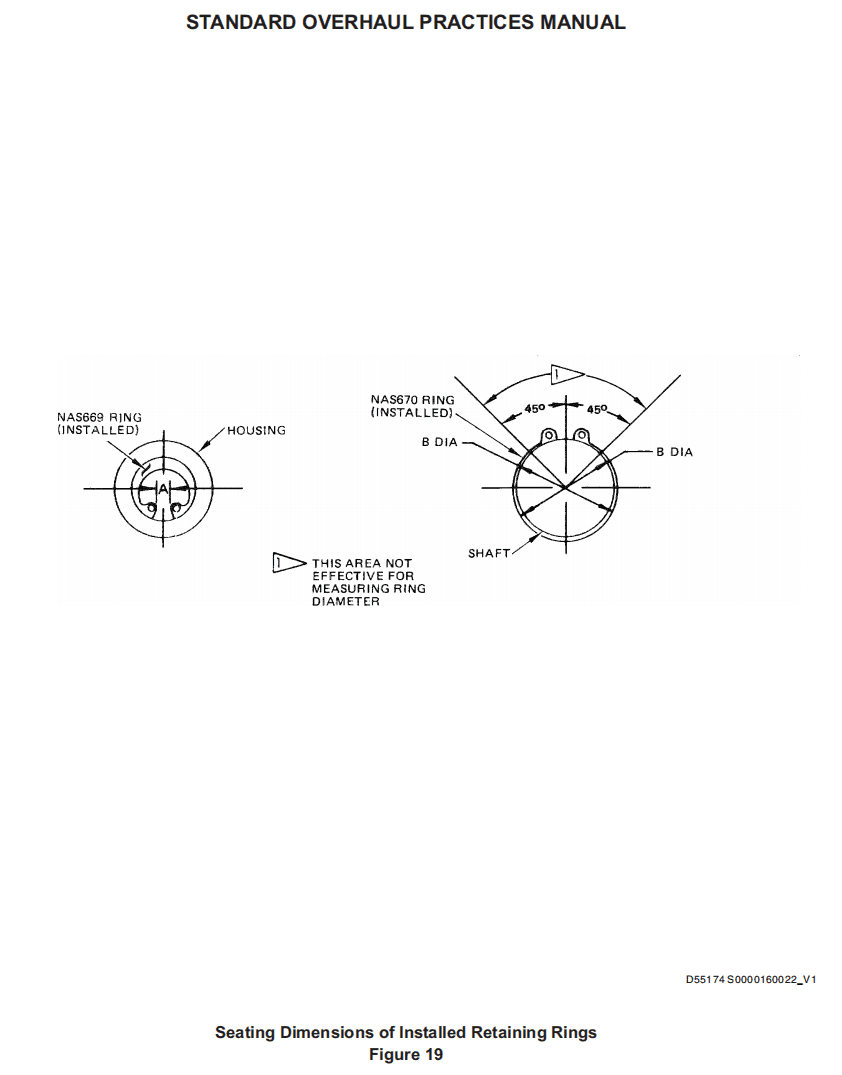
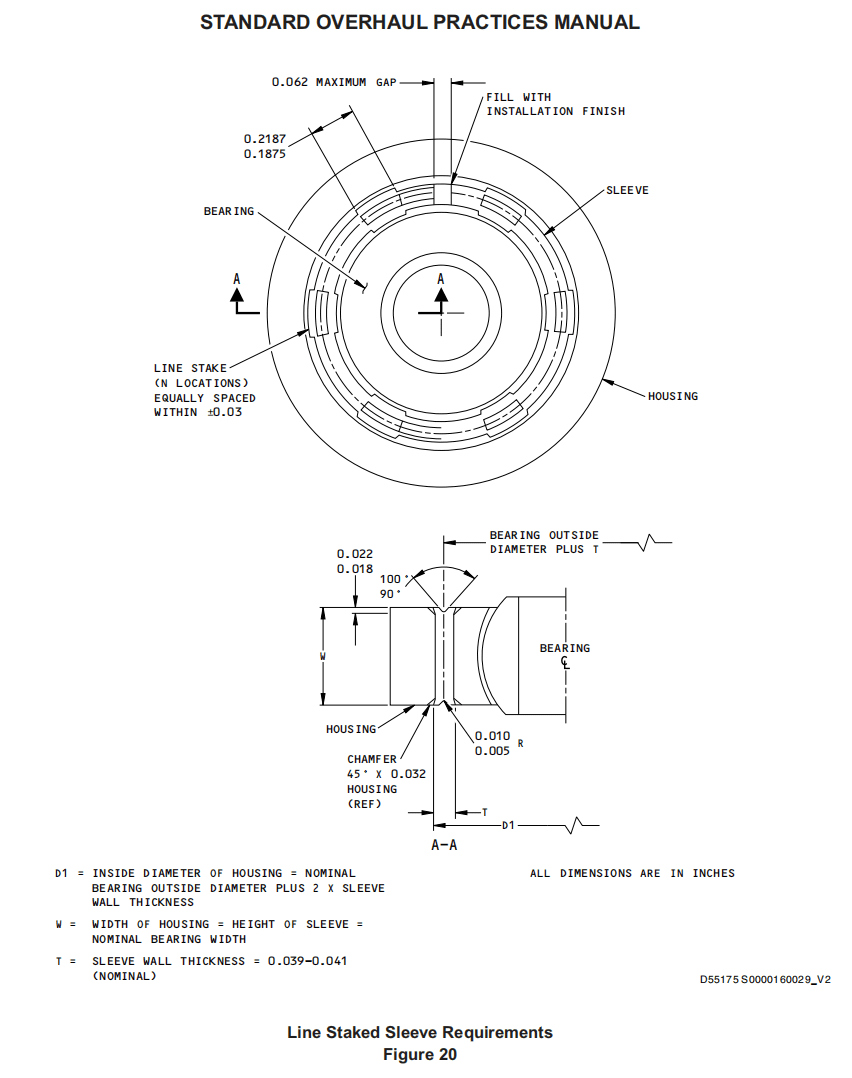
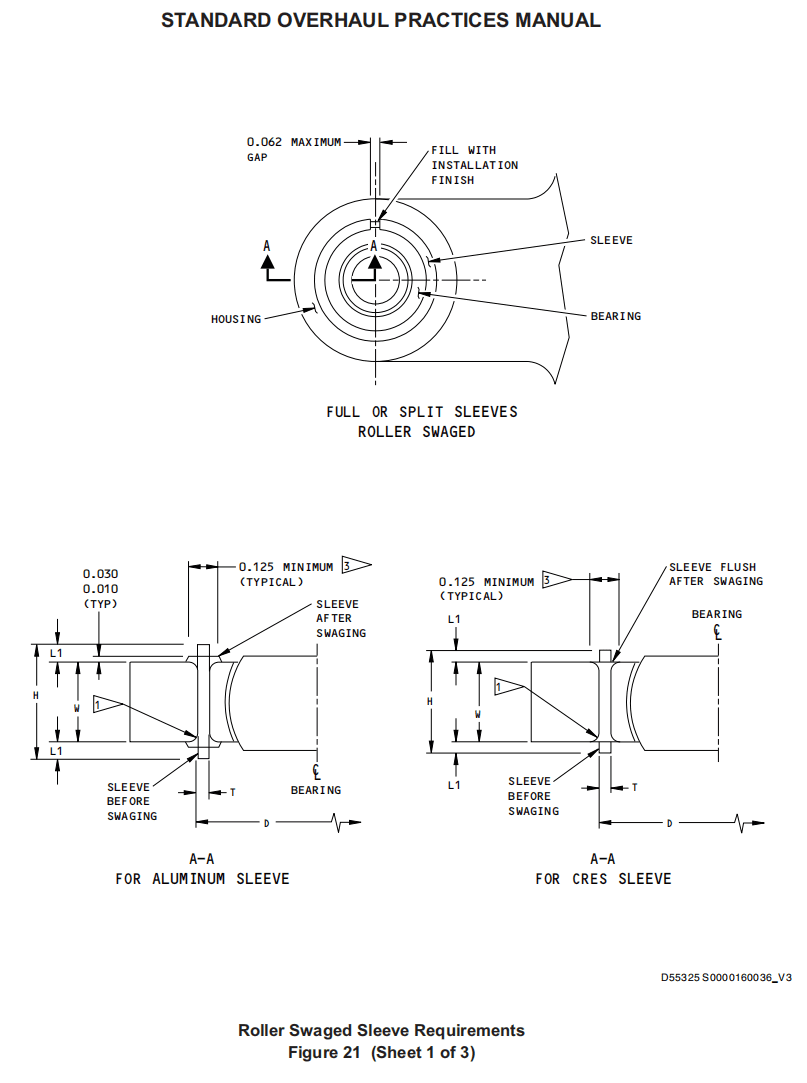
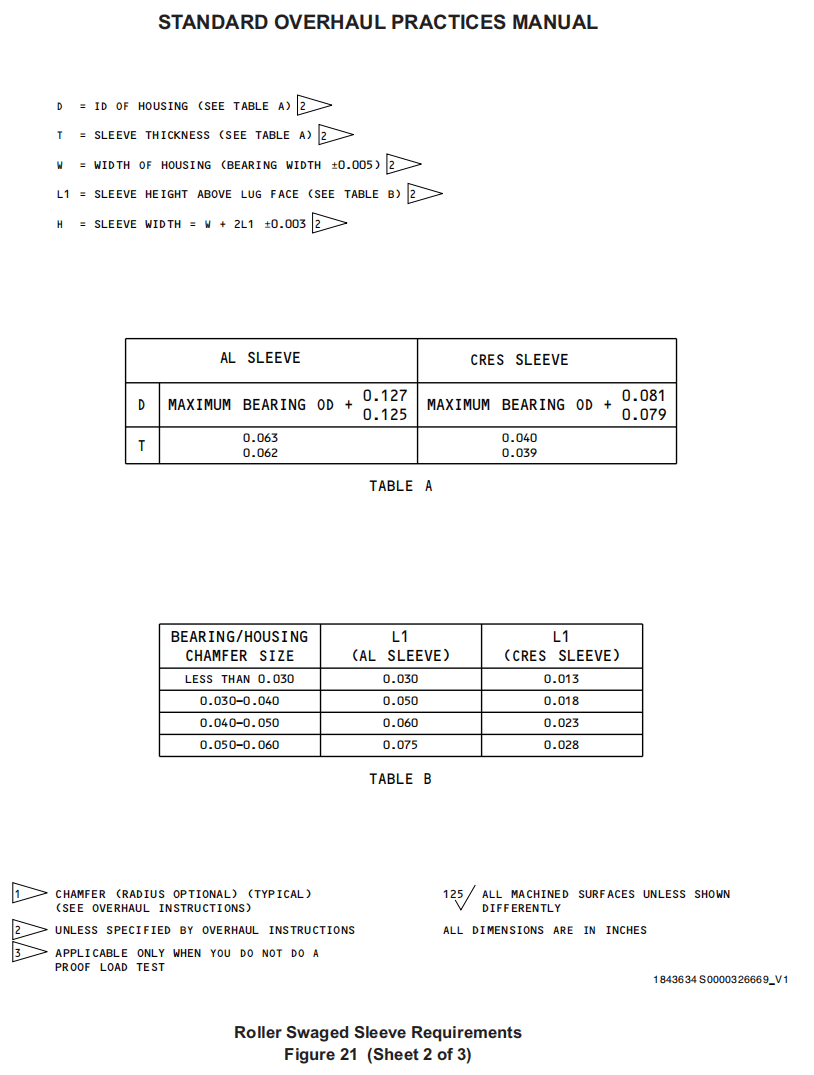

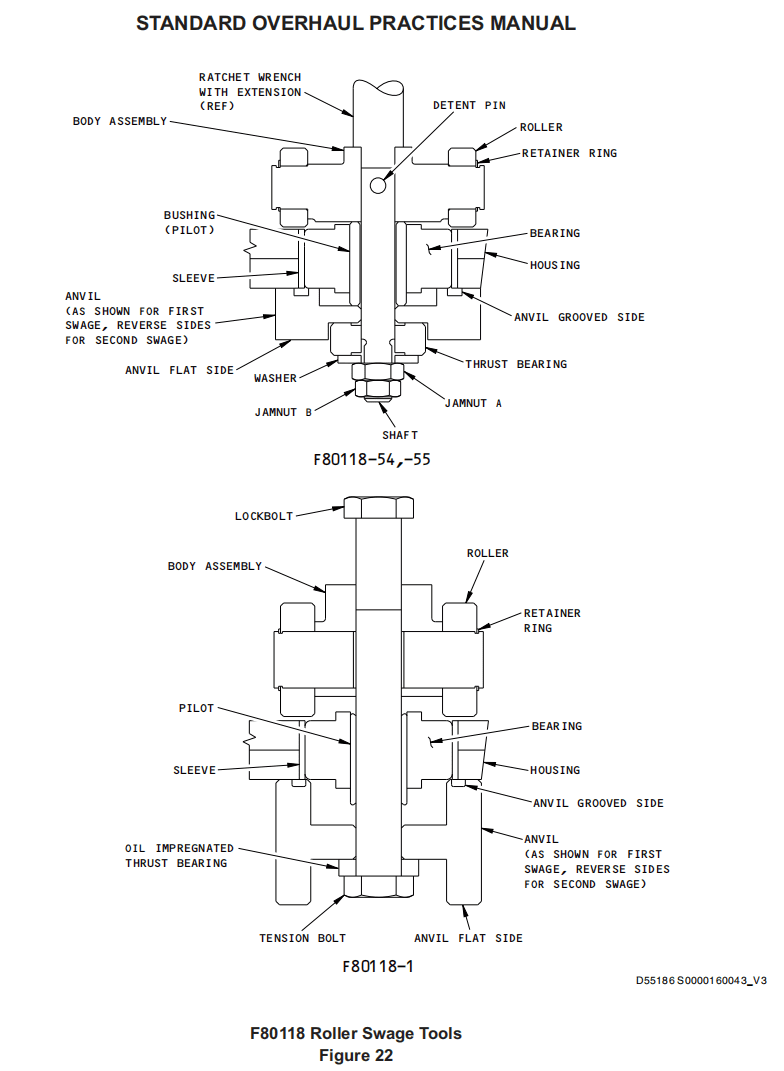
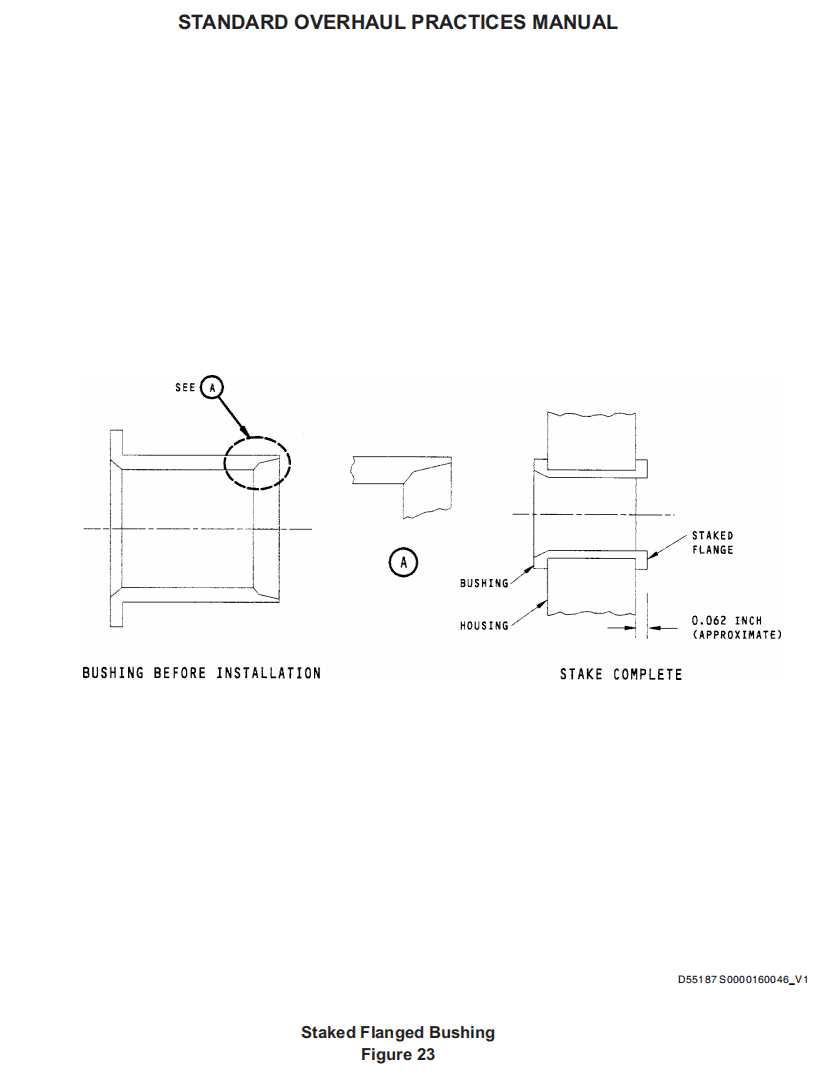
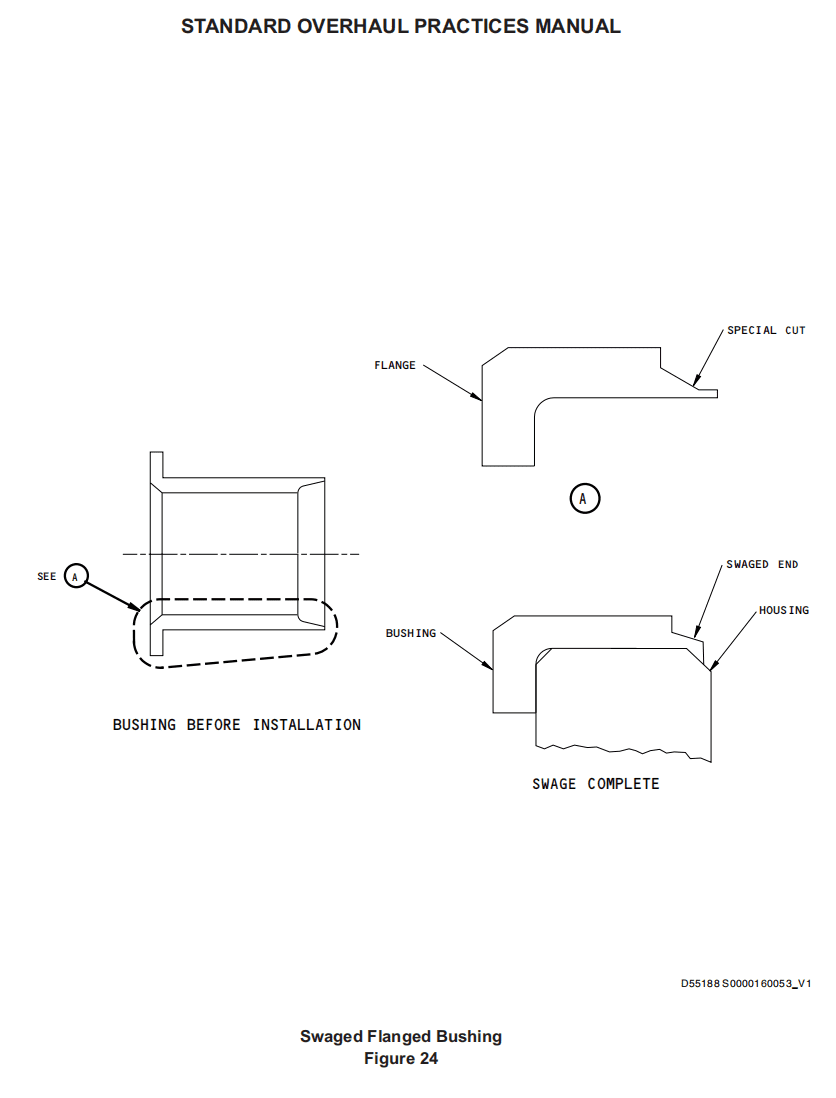
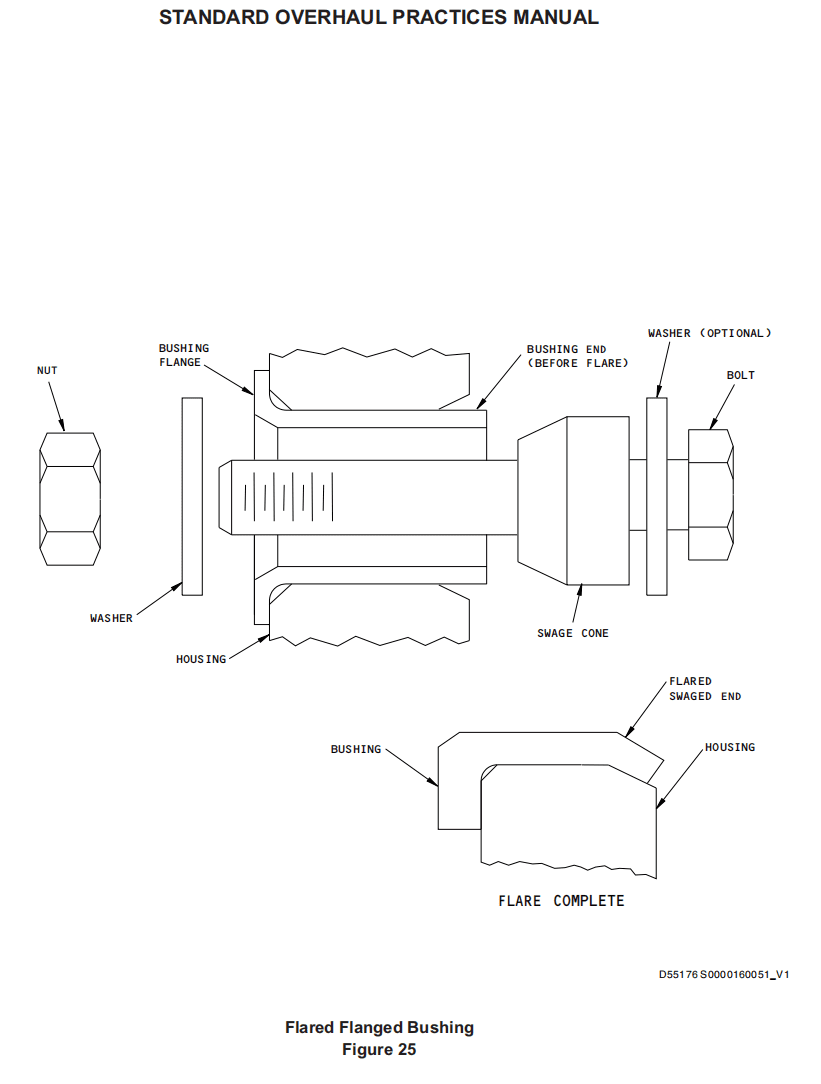
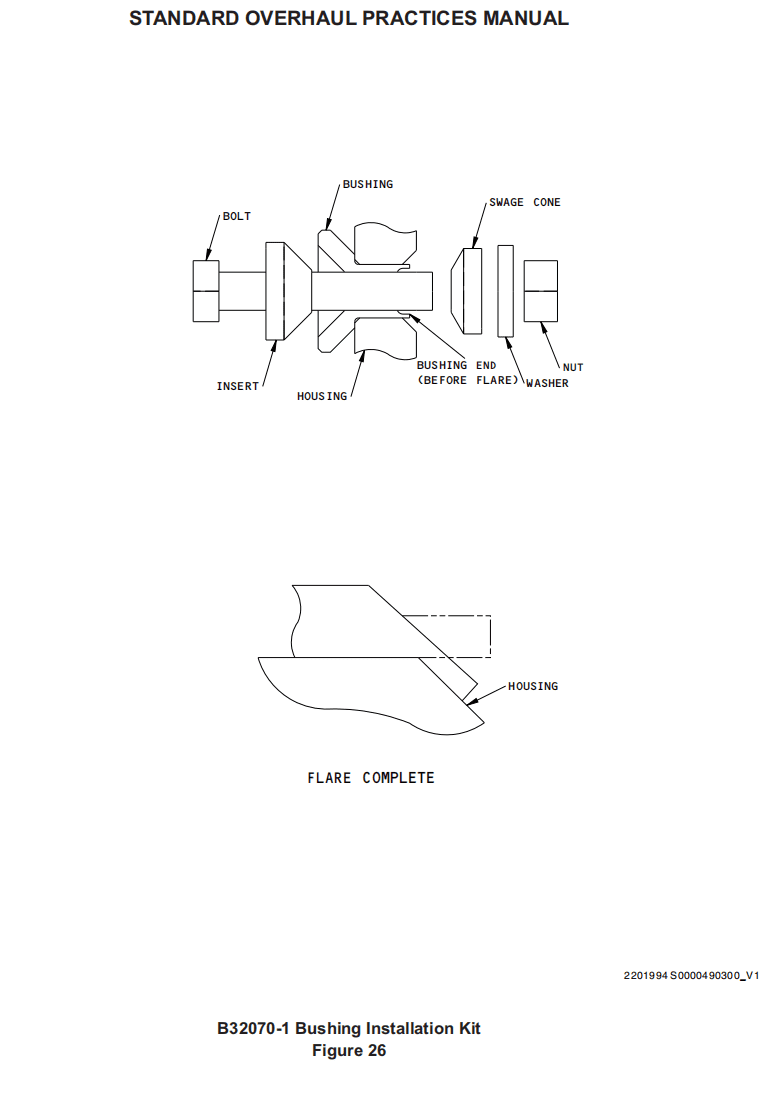
9. BEARING RETENTION WITH ADHESIVES 用粘合剂固定轴承
A. If the overhaul instructions tell you to bond a bearing in the housing with adhesive, use these procedures.
如果大修说明要求用粘合剂粘合外壳中的轴承,请使用以下程序。
(1) Methods 1 and 2 come from Boeing drawing 66-19908 and use EA913 adhesive or BAC5010 Type 70 (BMS 5-92) adhesive.
方法 1 和 2 来自波音图 66-19908,使用 EA913 胶或 BAC5010 类型 70 (BMS 5-92)胶。
(2) Method 3, which came from Boeing document D-14780, is obsolete and is deleted. If the overhaul instructions specify this method, get advice from Boeing for an alternative procedure.
方法 3 来自波音文件 D-14780,已废弃并删除。如果大修说明规定了此方法,请向波音公司咨询替代程序。
B. Method 1 — Installation with EA913 adhesive (optional to Method 2)
方法 1 — 使用 EA913 粘合剂安装(方法 2 的可选项)
WARNING :THIS ADHESIVE CONTAINS ASBESTOS FIBERS. DO NOT MAKE OR BREATHE DUST. ASBESTOS DUST CAN CAUSE SERIOUS BODILY HARM.
警告 :该粘合剂含有石棉纤维。不要制造或吸入粉尘。石棉粉尘会对身体造成严重伤害。
(1) If the housing is aluminum, lightly sand the faying surface with 400 grit paper, solvent clean with a Series 88 solvent (SOPM 20-30-88), and then chemical treat as specified in SOPM 20-43-03. If the housing is bare steel, lightly sand the faying surface with 400 grit paper and wipe with solvent. If the faying surface is cadmium plated steel, do not sand the surface, but wipe it with solvent.
如果外壳是铝制的,用 400 号砂纸轻轻打磨接合表面,用 88 系列溶剂 (SOPM 20-30-88)进行溶剂清洗,然后按照 SOPM 20-43-03 的规定进行化学处理。如果外壳是裸钢,则用 400 号砂纸轻轻打磨涂层表面,然后用溶剂擦拭。如果外壳表面是电镀镉钢,则不要打磨表面,用溶剂擦拭即可。
(2) Lightly sand the faying surfaces of a steel or aluminum bearing with 400 grit paper and then wipe with solvent. Then chemical treat the faying surfaces of the aluminum bearing.
用 400 号砂纸轻轻打磨钢或铝轴承的装配表面,然后用溶剂擦拭。然后对铝轴承的装配表面进行化学处理。
(3) Give protection to the ball edges of the bearing outer race.
保护轴承外圈的球边。
WARNING :USE RUBBER GLOVES WHEN YOU WORK WITH THE ADHESIVE INGREDIENTS. COMPONENT C IS GLACIAL ACETIC ACID AND CAUSES SEVERE BURNS. DO NOT BREATHE THE VAPORS. USE ONLY WITH SUFFICIENT VENTILATION. DO NOT GET IN EYES, ON SKIN OR ON CLOTHING. KEEP AWAY FROM FIRE.
警告 :在使用粘合剂成分时,请戴上橡胶手套。成分 C 是冰乙酸,会导致严重烧伤。切勿吸入蒸汽。使用时要充分通风。切勿使其进入眼睛、皮肤或衣物。远离火源。
(4) Two adhesive systems are available, EA913 or EA913.1. Refer to Table 5 for mixing proportions and pot life. If applicable, mix the accelerator (component C) into the hardener (component B), then add this mixture to resin (component A). Mix thoroughly.
有两种粘合剂系统可供选择:EA913 或 EA913.1。有关混合比例和固化时间,请参见表 5。如果适用,将促进剂(成分 C)混入固化剂(成分 B)中,然后将此混合物加入树脂(成分 A)中。充分混合。
(5) Apply a layer of the adhesive to the faying surfaces of the housing and the bearing. Install the bearing in the housing. Immediately wipe off unwanted adhesive to let a fillet of the adhesive stay at the bondline. Cure as specified in Table 5.
在外壳和轴承的接合面涂上一层粘合剂。将轴承安装到外壳中。立即擦去不需要的粘合剂,使粘合剂在粘合线处留下一角。按照表 5 的规定固化。

C. Method 2 — Installation with BMS 5-92 adhesive (Preferred to Method 1).
方法 2 — 使用 BMS 5-92 粘合剂安装(优于方法 1)。
(1) Bond the bearing with BAC5010 Type 70 adhesive (SOPM 20-50-12).
用 BAC5010 70 型粘合剂(SOPM 20-50-12)粘合轴承。
D. Method 3 — Installation with BMS 5-25, Grade 1 adhesive — Deleted (obsolete)
方法 3 — 使用 BMS 5-25 1 级粘合剂安装 — 已删除(过时)
10. TOOLS 工具
A. This section tells about Boeing standard tools for bearing removal, installation and retention. These tools are used along with the procedures given earlier to replace bearings as specified in the applicable component overhaul instructions. Also, some tools come with special instructions, frequently on a placard attached to the tool storage box.
本节介绍用于拆卸、安装和固定轴承的波音标准工具。这些工具与前面给出的程序一起使用,按照适用部件大修说明的规定更换轴承。此外,某些工具还附有特殊说明,通常附在工具存放箱的标牌上。
B. Tool Descriptions (Table 6 thru Table 10)
工具说明(表 6 至表 10)
(1) See Table 6 for descriptions of some of the usual bearing tools, with some examples of dash number codes. References to airplane component locations by part name or number are only examples. Do not use the data in Table 6 to try to find the correct tool by name or location. Because component overhaul must start with component identification, you must know the part number of the bearing before you can identify the correct tools to use. After you know the bearing part number, see Table 11 to identify the tools for it.
一些常用轴承工具的说明见表 6,并附有一些破折号代码示例。以零件名称或编号表示的飞机部件位置仅为示例。请勿使用表 6 中的数据试图通过名称或位置找到正确的工具。由于部件大修必须从部件识别开始,因此必须先知道轴承的零件编号,然后才能确定要使用的正确工具。知道轴承零件号后,请参见表 11 以确定其工具。
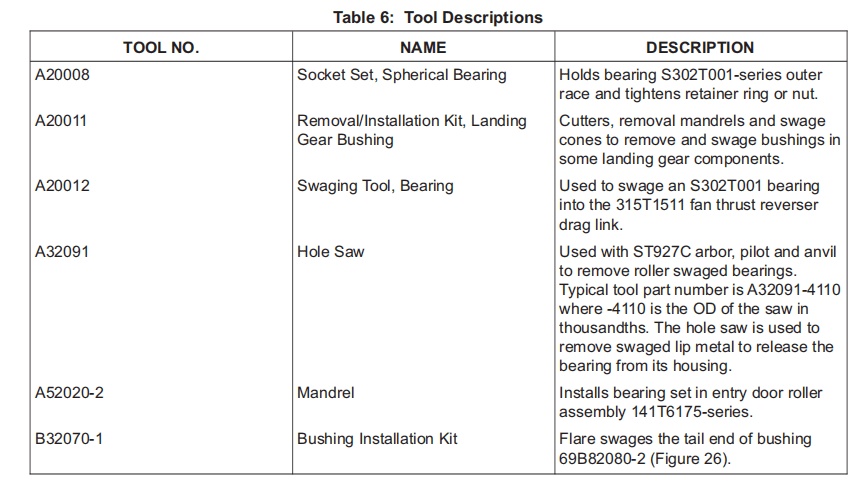
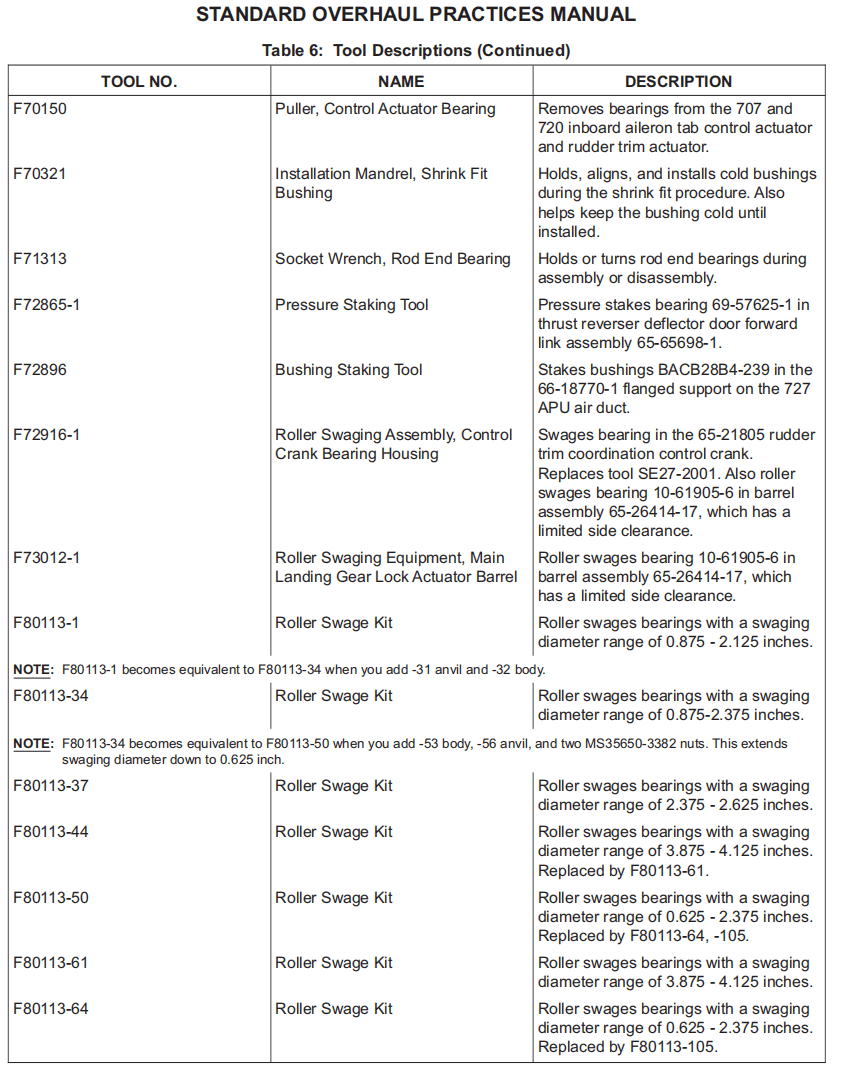
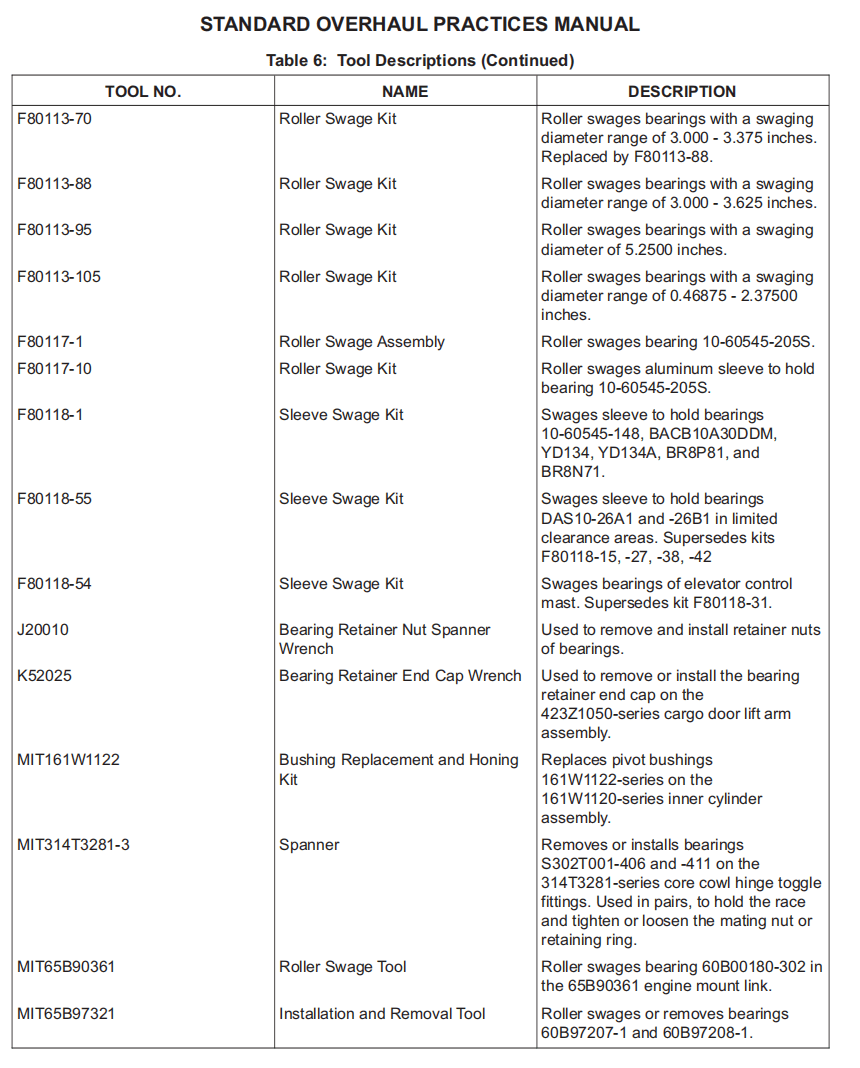
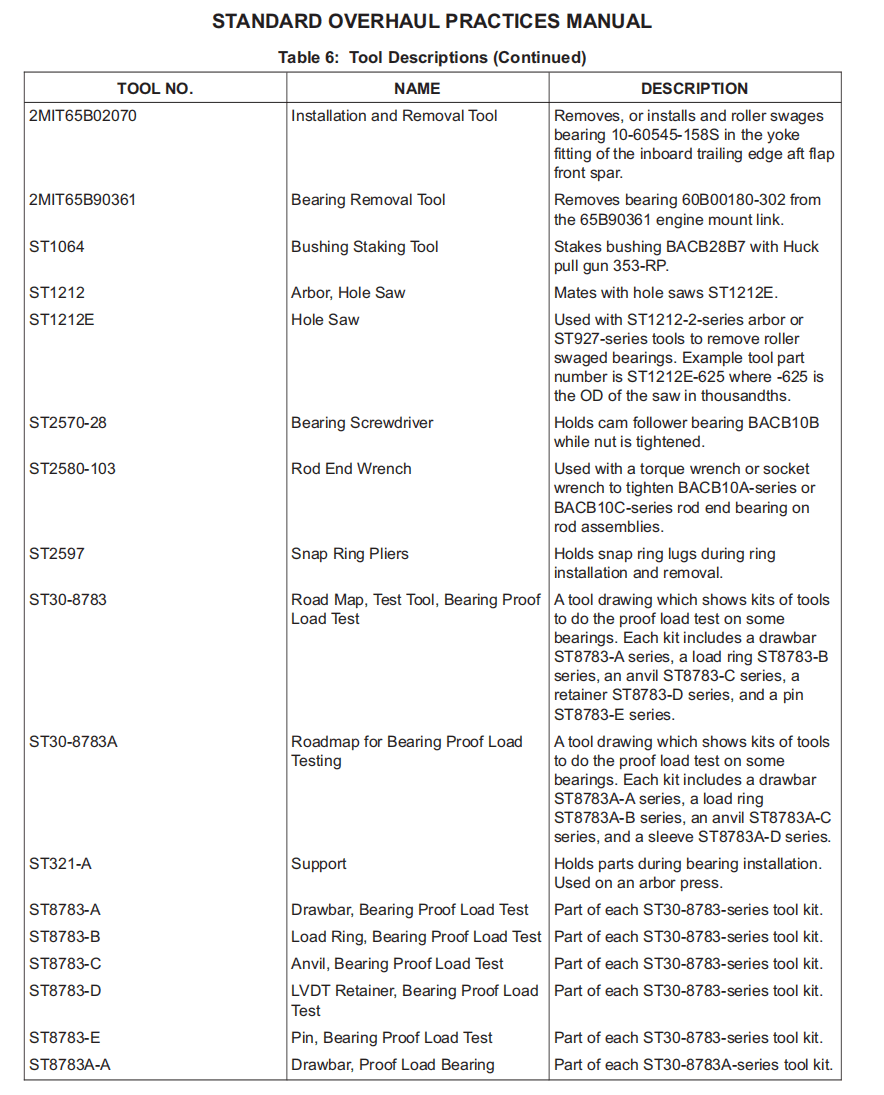
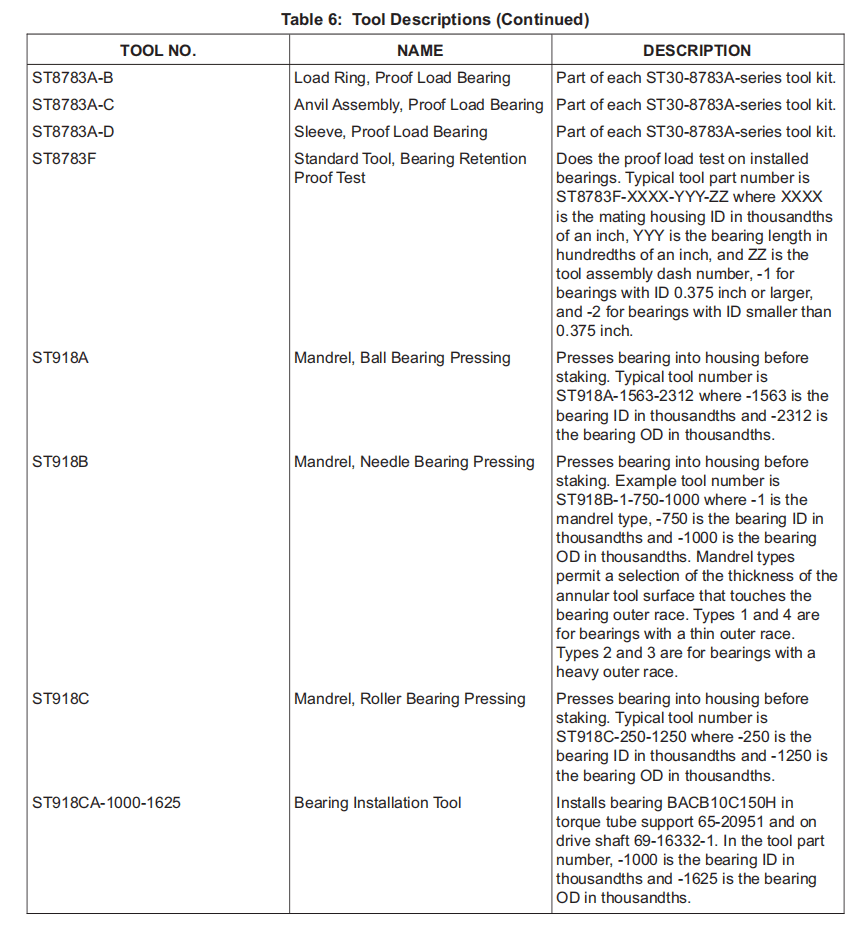
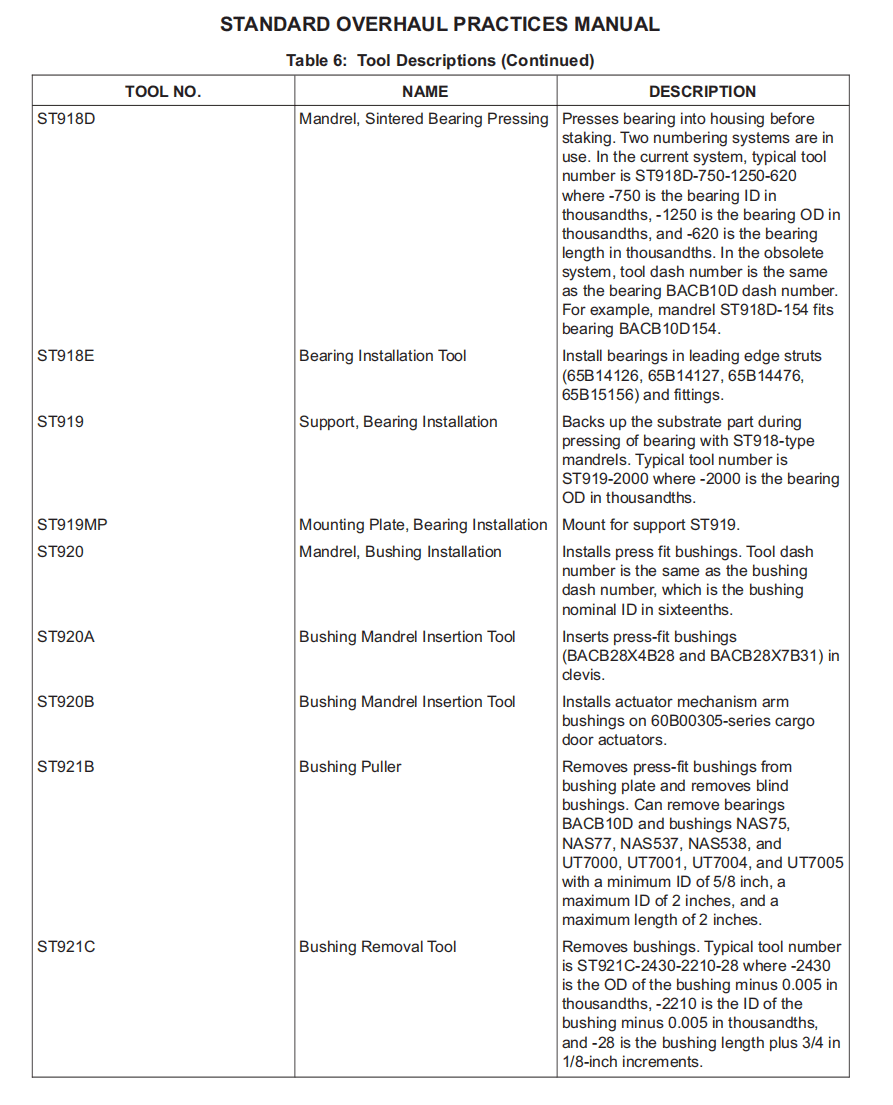
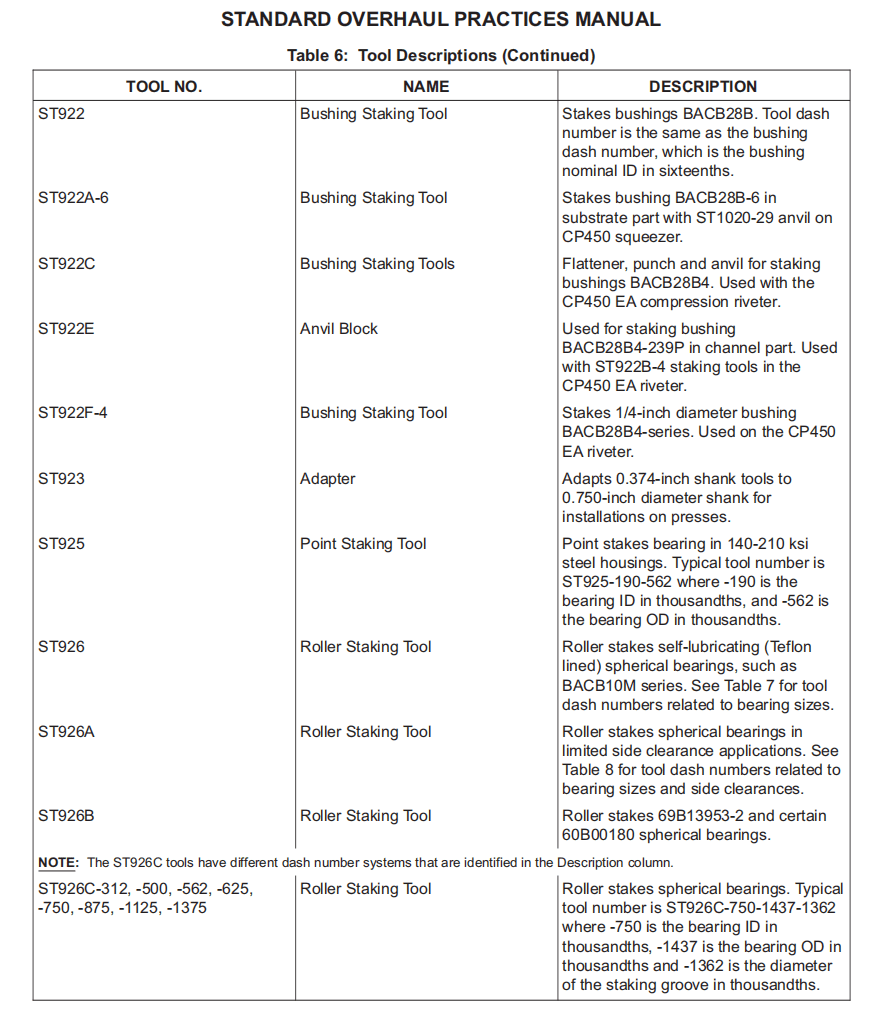
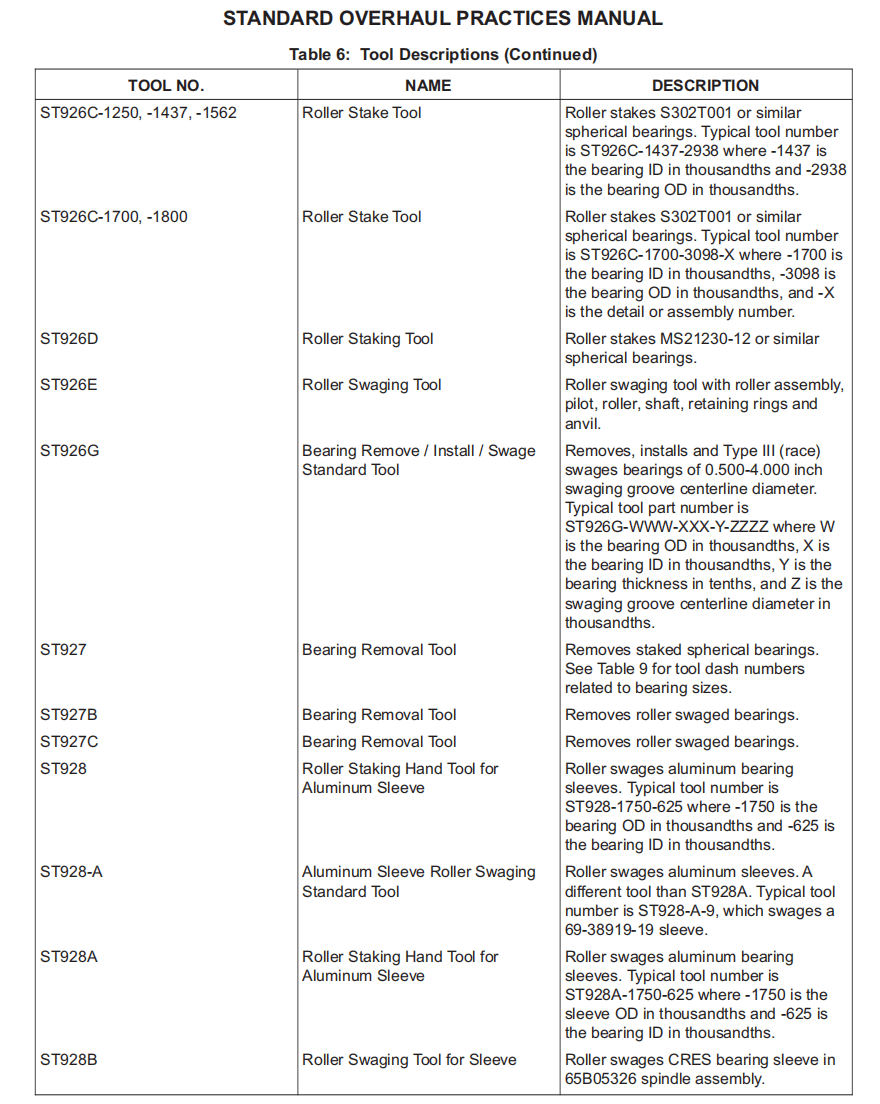

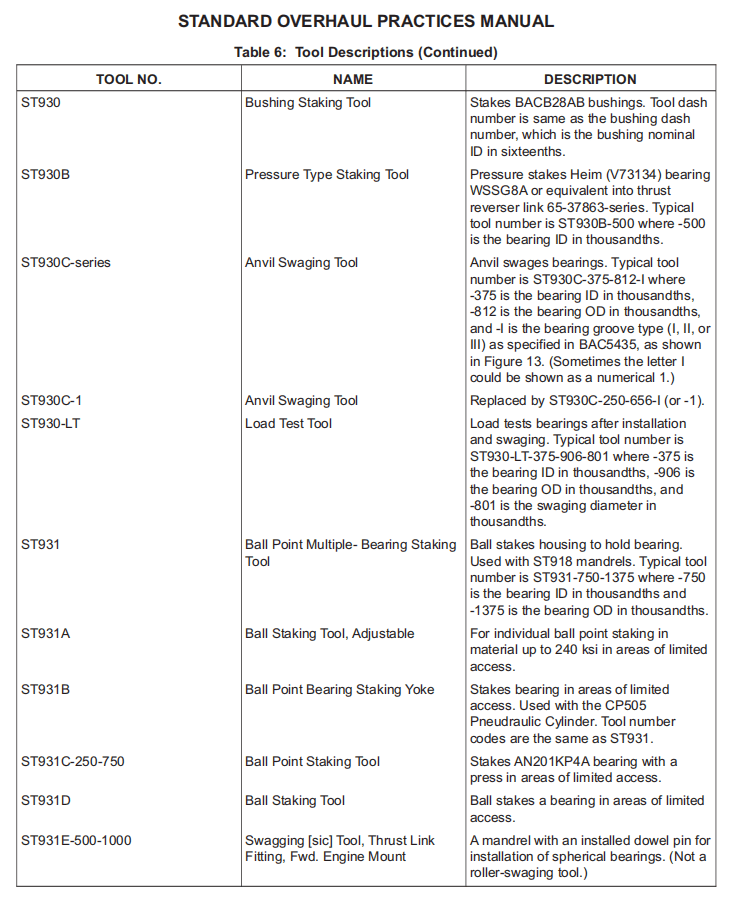
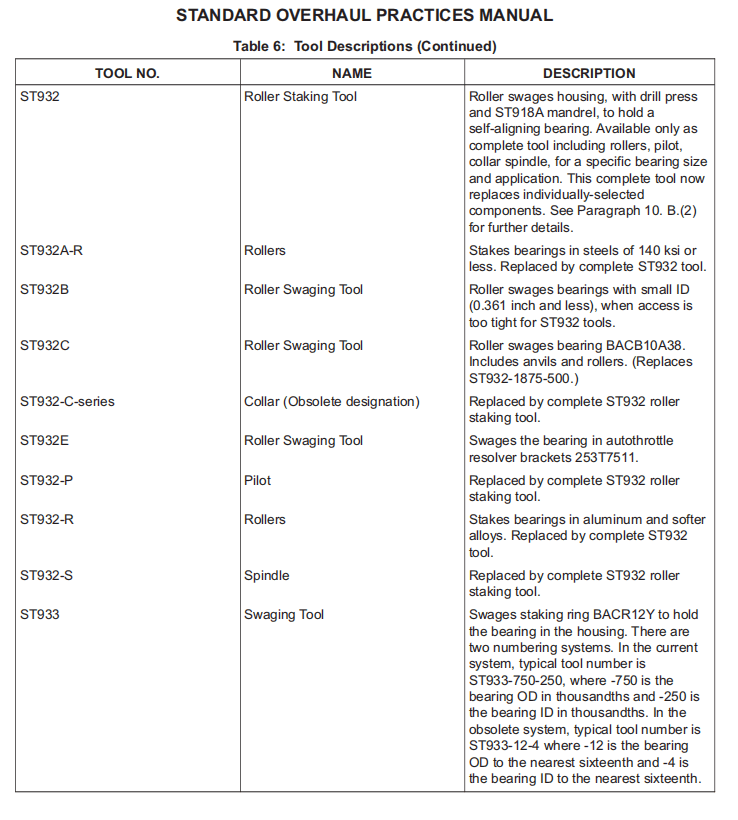
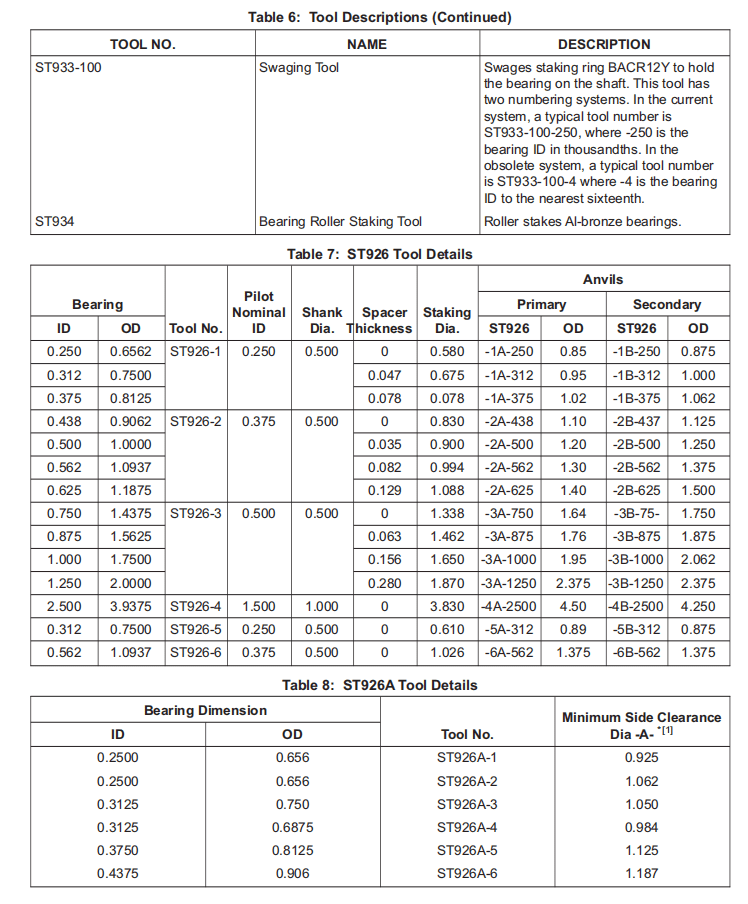

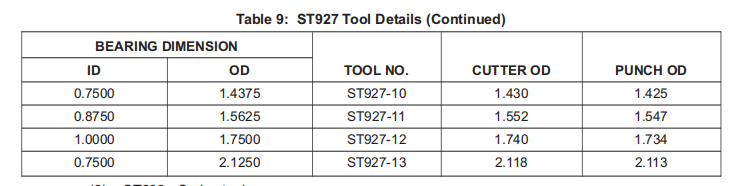
(2) ST932 – Series tools
ST932 – 系列工具
NOTE: The ST932P (pilot) and ST932C (collar) designations, and the buildup of the required tool by selection of rollers and spindle, have been replaced by a system similar to that of ST925 and ST931 tools.
注: ST932P(先导)和 ST932C(轴环)的名称,以及通过选择滚子和主轴来建立所需的工具,已被一个类似于 ST925 和 ST931 工具的系统所取代。
(a) Current System — Pilot, collar, rollers and spindle are included in a single tool part number defined by quoting bearing ID, bearing OD, diameter of swaging rollers, and housing material. The tool part number is as follows:
当前系统 — 先导、轴环、滚轮和主轴包含在一个工具零件编号中,该编号由轴承内径、轴承外径、压接滚轮直径和外壳材料确定。工具零件编号如下:
1) ST932-WWW-XXX-Y-Z, where:
ST932-WWW-XXX-Y-Z,其中
a) ST932 is the basic number.
ST932 是基本编号。
b) WWW is the bearing ID, in thousandths of an inch.
WWW 是轴承内径,单位为千分之一英寸。
c) XXX is the bearing OD, in thousandths of an inch.
XXX 是轴承外径,单位为千分之一英寸。
d) Y is the diameter of swaging rollers
Y 是压接滚子的直径
<1> -1 or -3: 1.500 in.
-1 或 -3: 1.500 英寸。
<2> -2 or -4: 1.875 in.
-2或-4:1.875 英寸。
e) Z is the housing material
Z 是外壳材料
<1> -1: steel (up to 140 ksi)
-1: 钢(最高 140 ksi)
<2> -2: aluminum or other soft metal.
-2:铝或其他软金属。
NOTE: As an example, to roller swage bearing BACB10CF10PP in an aluminum housing, the ST932 tool part number to use is ST932-625-1062-1-2 because the bearing ID is 0.625 inch, the bearing OD is 1.062 inches, the tool comes with 1.500 inch diameter rollers unless otherwise specified, and the tool will be used to swage the bearing into an aluminum part.
注: 例如,要将 BACB10CF10PP 轴承滚子压入铝制外壳,应使用的 ST932 工具零件编号为 ST932-625-1062-1-2,因为轴承内径为 0.625 英寸,轴承外径为 1.062 英寸,工具配有直径为 1.500 英寸的滚子,除非另有规定,并且该工具将用于将轴承压入铝制零件。
(b) Obsolete System
已废弃系统
NOTE: The part numbers given below for pilot and collar are for use of existing tool components only, and are no longer procurable separately. When replacement is necessary, order the complete ST932 tool as specified in Paragraph 10.B.(2)(a)
注: 下面给出的先导和轴环零件编号仅用于现有工具部件,不再单独采购。需要更换时,应按照第 10.B.(2)(a)段的规定订购完整的 ST932 工具
1) Pilot ST932-P: Dash number is bearing ID in thousandths, minus 0.001 inch.
导套 ST932-P:短划线编号是轴承内径的千分之一,减去 0.001 英寸。
2) Collar ST932-C: Dash number is related to bearing OD as shown in Table 10.
轴环ST932-C: 破折号与轴承外径有关,如表 10 所示。

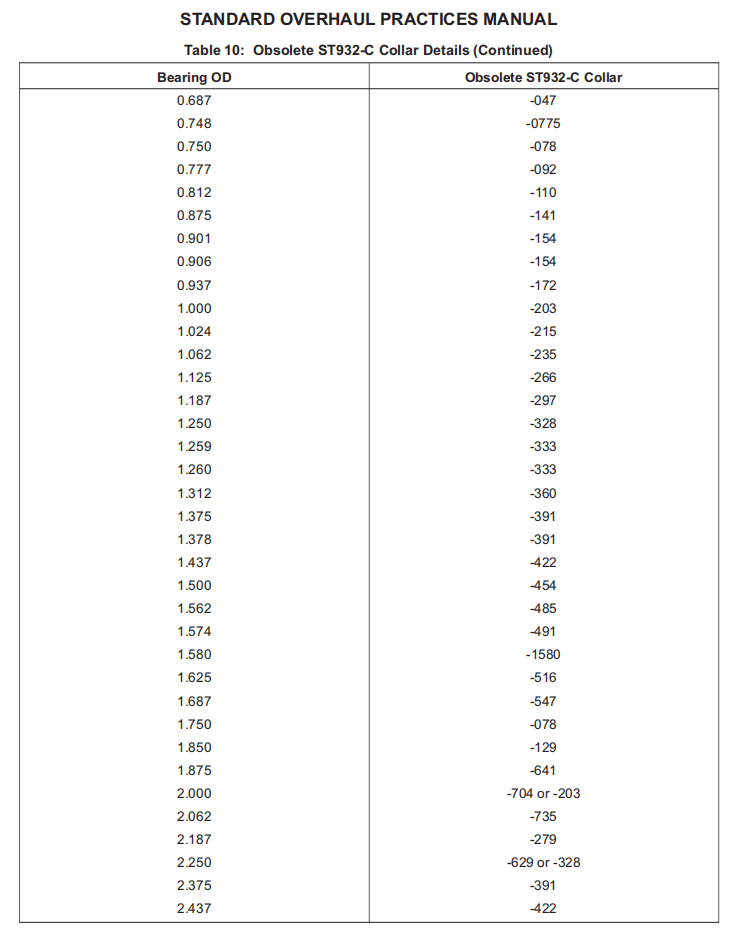

C. Tool Selector Guide (Table 11)
工具选择指南(表 11)
(1) This is a list, by bearing part number, of tools that can be used for the different overhaul operations. The tool vendor is Boeing (V81205) unless identified by a different vendor code.
这是一份按轴承零件编号列出的可用于不同大修操作的工具清单。工具供应商为波音(V81205),除非有不同的供应商代码。
(a) Specification-controlled bearings are in the list only with the applicable Boeing, military, or Federal Specification part number and not with the equivalent vendor part number.
受规范控制的轴承在列表中只列出适用的波音、军用或联邦规范零件号,而不列出等效的供应商零件号。
1) For cross references between the Boeing BAC-series specification numbers and vendor equivalent part numbers, refer to the parts list in the applicable overhaul instructions, the applicable BAC part standard document, or an equivalent document.
波音 BAC 系列规格编号与供应商等效零件编号之间的交叉引用,请参阅适用的大修说明中的零件清单、适用的 BAC 零件标准文件或等效文件。
2) For cross references between the Boeing specification part numbers (10-series, 60B-series, or S-series) and the vendor equivalent part numbers, refer to the Boeing Specification Cross-Reference Index, Document D6-42448, or the equivalent site on-line.
波音规格零件号(10 系列、60B 系列或 S 系列)与供应商等效零件号之间的交叉参考,请参阅波音规格交叉参考索引、文件 D6-42448 或在线等效网站。
(b) Bearing part numbers are in the list without letter suffixes, such as:
轴承零件号在列表中不带字母后缀,例如
1) The A in S302T001-302A, if the bearing with the letter suffix uses the same tools as the bearing without the letter suffix
S302T001-302A 中的 A,如果带字母后缀的轴承与不带字母后缀的轴承使用相同的工具
2) Letter suffixes that indicate a coated or plated bearing, such as the C in the GC suffix, which indicates a coated version of a bearing with a swaging groove (code G).
表示涂层或电镀轴承的字母后缀,如后缀 GC 中的 C 表示带装配槽的涂层型轴承(代码G).
(c) Many bearings are in the list with single-digit bore dash numbers (such as the 6 in BACB10AB6). Bearings with leading zero bore dash numbers (such as the 06 in BACB10AB06) use the same tools.
列表中许多轴承的孔径破折号为个位数(如 BACB10AB6 中的 6)。内孔破折号为零的轴承(如 BACB10AB06 中的 06)使用相同的工具。
(2) The tools in the list are not the only ones that could be used in a given situation.
列表中的工具并非在特定情况下可以使用的唯一工具。
(a) Equivalent substitutes can be used. Some vendors can supply alternatives to the tools in the list, or if there is no tool in the list for a specific application. Try these vendors:
可以使用等效替代品。一些供应商可以提供列表中工具的替代品,或者在特定应用中没有列表中工具的情况下。试试这些供应商:
1) Aero Staking, Inc., V4M6P3
2) Cabco Industries, Inc., V50830
3) Rexnord Industries, Inc., V77896
(b) Multiple tool numbers in the list for one operation generally identify alternative tools, or tools for special applications, such as when the clearance is too tight for the standard tools.
列表中用于一项操作的多个工具编号通常表示替代工具,或用于特殊应用的工具,例如当间隙对于标准工具来说太紧时。
(3) Some of the bearings in this list could be installed by different procedures when a given bearing is used in different components in the airplanes. For example, a bearing shown in this list with tools for roller swaging could be roller swaged in one installation or location, but in a different location it could be held in position with special hardware or mating parts or with a press fit. You must refer to the applicable overhaul instructions for the component or installation to identify the correct procedure for your specific situation. Do not try to use this list by itself to make the decision about the correct procedure.
当某一轴承用于飞机的不同部件时,本清单中的某些轴承可以通过不同的程序进行安装。例如,本列表中带有滚子压接工具的轴承可以在一个安装或位置上进行滚子压接,但在另一个位置上可以用特殊硬件或配合零件或压力配合进行固定。您必须参考适用于部件或安装的大修说明,以确定适合您具体情况的正确程序。请勿尝试单独使用此清单来决定正确的程序。
(4) If a bearing is installed with a sleeve which is then swaged, the applicable tools are in the list under the bearing part number, not the sleeve part number. This is because a given sleeve could be used with many different bearings of different shapes and sizes.
如果轴承与轴承套一起安装,然后将轴承套装入,则适用的工具列在轴承零件编号下,而不是轴承套零件编号下。这是因为一个特定的轴承套可用于许多不同形状和尺寸的轴承。
(5) If a bearing is installed with special hardware, such as a retainer to be tightened over the bearing, the applicable tools are in the list under the bearing part number. The special hardware is not in the list. Refer to the applicable overhaul instructions for the procedure to install the hardware.
如果轴承在安装时使用了特殊硬件,例如在轴承上拧紧的挡圈,则适用工具列在轴承零件编号下。特殊硬件不在列表中。有关安装硬件的程序,请参阅适用的大修说明。
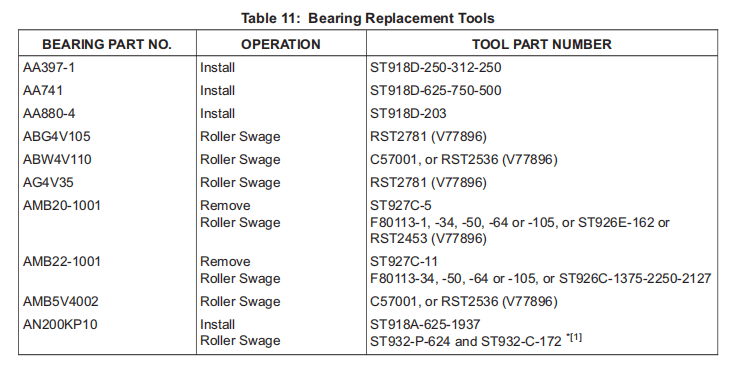
说明:Table 11: Bearing Replacement Tools约有100页左右,需要则请在原文件查询