O型圈和特氟龙密封的安装INSTALLATION OF O-RINGS AND TEFLON SEALS
1. INTRODUCTION 介绍
A. The data in this subject comes from Boeing process specification BAC5506 for installation of elastomeric seals. The etch procedure for bonded teflon seal rings comes from BAC5481. Other data comes from seal vendors. The airline has a copy of the Boeing Process Specification Manual.
本主题中的数据来自关于弹性密封件安装的波音公司工艺规范BAC5506。粘合特氟龙密封环的蚀刻工艺来自BAC5481。其他数据来自密封件供应商。航空公司有一份波音工艺规范手册。
B. The data is general. It is not about all situations or specific installations. Use this data to help you write minimum standards.
数据为通用数据。它不适用于所有情况或特定安装。使用这些数据来帮助您制定最低标准。
C. Refer to SOPM 20-00-00 for a list of all the vendor names and addresses.
有关所有供应商名称和地址的列表,请参阅 SOPM 20-00-00。
2. GENERAL 通用
A. Destroy removed O-ring seals so they cannot be used again.
销毁取下的 O 型密封圈,使其无法再次使用。
B. Be very careful when you remove seals not to scratch or damage the sealing surfaces. Use your fingers to remove the seals, or use tools made of soft wood or plastic.
拆卸密封件时务必小心,不要刮伤或损坏密封表面。用手指或软木或塑料制成的工具拆卸密封件。
C. Unless specified by the overhaul instructions, clean all sealing surfaces before seal installation.
除非大修说明另有规定,否则在安装密封件之前,必须清洁所有密封表面。
D. Any cuts, scratches, dents, distortions or deposits of foreign material must be removed from O-ring grooves and adjacent flat surfaces before you clean the sealing surfaces.
在清洁密封表面之前,必须清除O形圈凹槽和相邻平面上任何切口、划痕、凹痕、变形或异物沉积。
E. Clean all sealing surfaces and installation tools with clean, lint-free gauze wet with aliphatic naphtha or methyl ethyl ketone or methyl propyl ketone. When you install omniseals (Paragraph 14.), clean tools with DuPont Freon Precision Cleaning Agent (V18873), filtered through a 5-micron absolute filter. Wipe the solvent off the surface with clean gauze before it evaporates.
用蘸有脂肪族石脑油、甲基乙基酮或甲基丙基酮的干净无绒纱布清洁所有密封表面和安装工具。安装全能密封件(第14段)时,用DuPont氟利昂精密清洁剂(V18873)清洁工具,并使用5微米绝对过滤器的过滤。在溶剂蒸发之前,用干净的纱布将其从表面擦去。
F. If parts with seals must be vapor degreased, remove all of the seals first. Install new seals after the part is cleaned.
如果带有密封件的零件必须进行蒸汽脱脂,请先取下所有密封件。零件清洁后安装新的密封件。
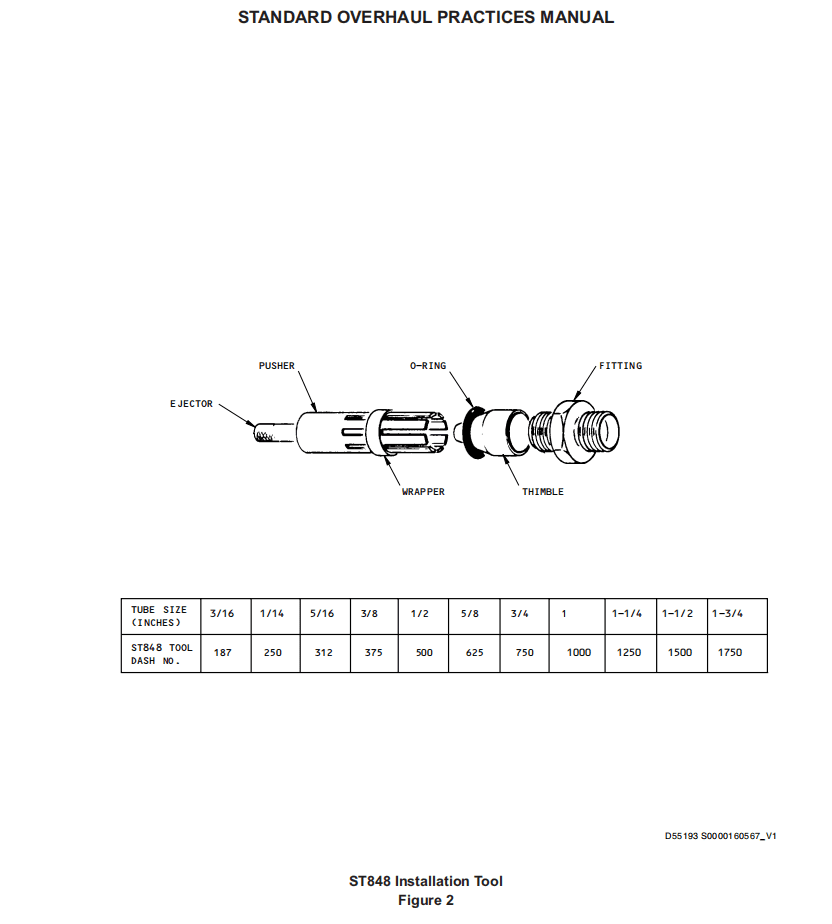
G. Use ST-848 series O-ring installation tools or other protective cover when you install O-rings over sharp edges such as threaded fasteners, keyways, slots, splines and ports.
在螺纹紧固件、键槽、插槽、花键和端口等尖锐边缘上安装O形圈时,请使用ST-848系列O形圈安装工具或其他保护罩。
H. Do not stretch the internal diameter of elastomeric O-ring seals more than 50 percent during installation.
在安装过程中,弹性O形密封圈的内径拉伸不得超过50%。
I. Do not stretch the internal diameter of seals made of Teflon, polyethylene or other plastics more than 5 percent during installation.
在安装过程中,不要将特氟龙、聚乙烯或其他塑料制成的密封件的内径拉伸超过5%。
J. If the O-ring seals must be rolled into their grooves, make sure all twists are removed before you close the gland.
如果必须将O形密封圈卷入其凹槽中,在关闭密封压盖之前,确保所有扭曲都已消除。(即密封不得扭曲)
K. Make sure the O-rings are not pinched before you continue with assembly. Make sure the related fasteners are correctly tightened.
在继续进行组装之前,确保O形密封圈没有被夹住。确保相关紧固件已正确拧紧。
L. Keep all O-rings sealed in the packages until immediately before installation, to make sure they are clean and to permit age control and identification.
在安装前,将所有O形圈密封在包装中,以确保其清洁,并便于进行时寿控制和识别。
3. CLEANING 清洁
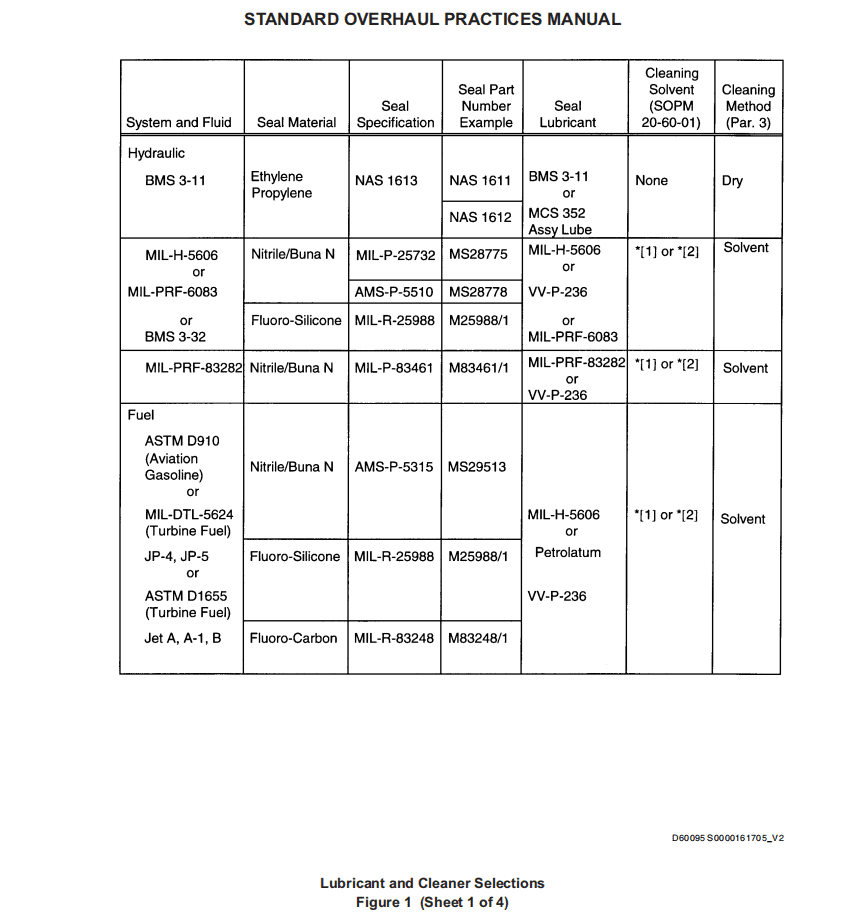
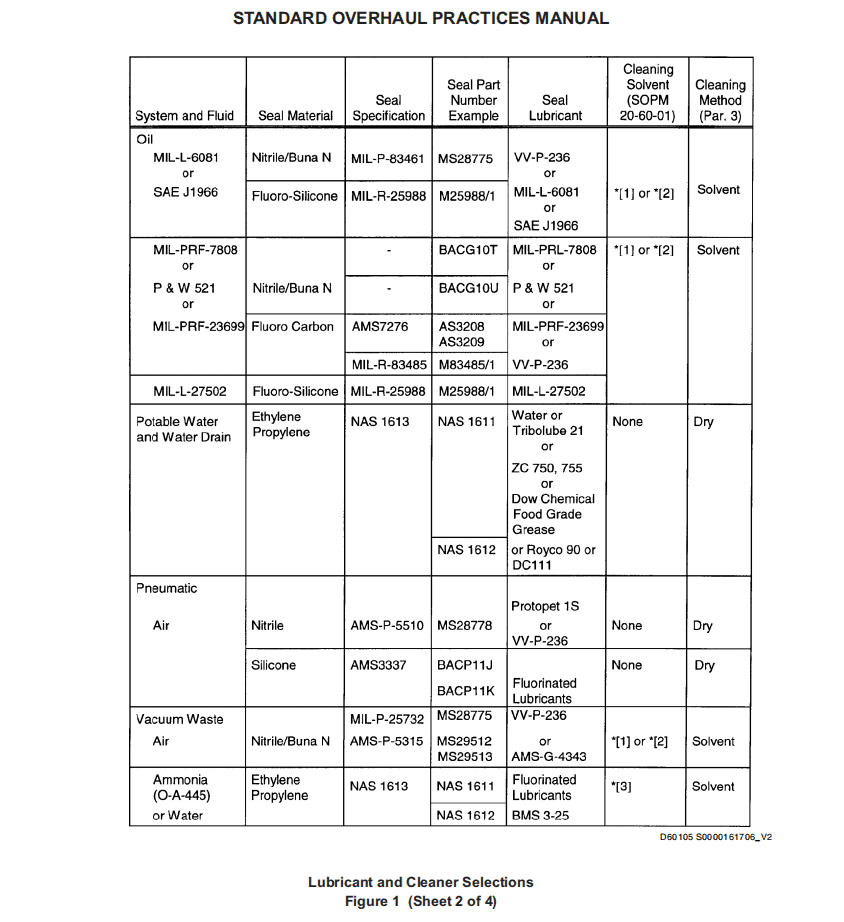
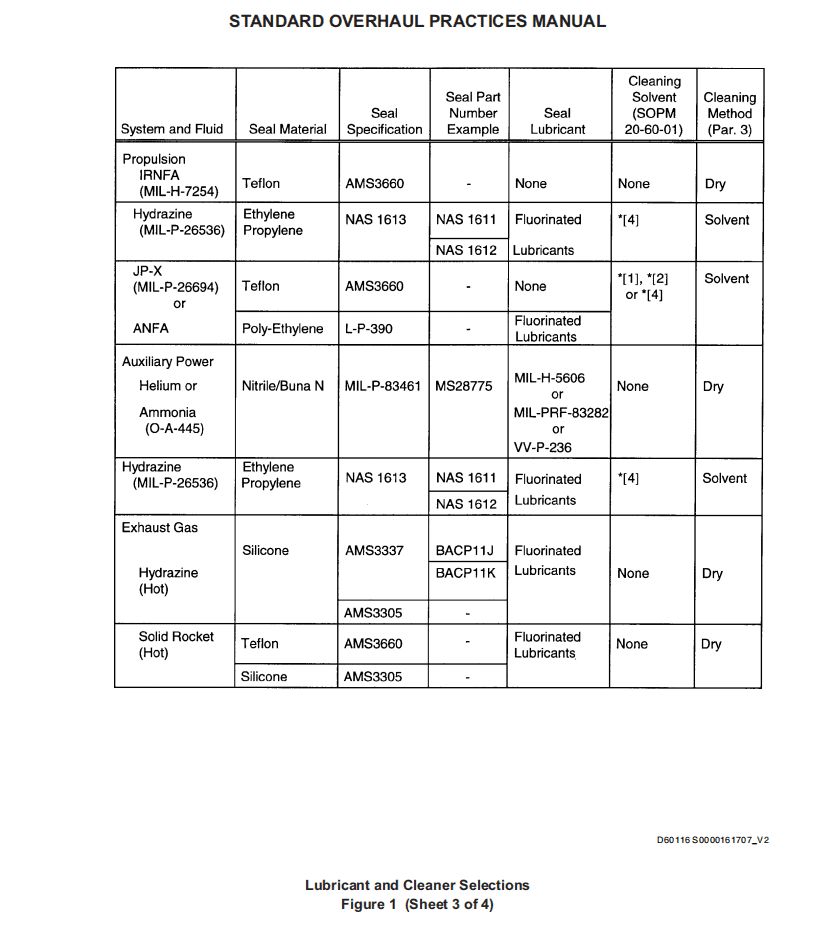
A. Unless specified by the overhaul instructions, clean all seals before installation, by the solvent cleaning method or the dry wiping method (when no solvent is called out), as specified in Figure 1.
除非大修说明中另有规定,否则应在安装前按照图1所示,使用溶剂清洁法或干擦法(在没有溶剂的情况下)清洁所有密封件。
(1) Method 1 — Solvent cleaning
方法 1——溶剂清洗
CAUTION :SEALS USED IN SYSTEMS WITH FIRE RESISTANT HYDRAULIC FLUID (BMS 3-11) MUST NOT BE CLEANED WITH SOLVENT. USE ONLY THE DRY WIPE METHOD.
注意:用于含有防火液压油(BMS 3-11)系统的密封件不得使用溶剂清洗。只能使用干擦法。
(a) Wipe the seal with clean, lint-free gauze wet with cleaning solvent per Figure 1.
用干净的、无绒的纱布擦拭密封件,纱布应按照图 1 所示用清洗溶剂浸湿。
(b) Immediately wipe dry with clean, lint-free gauze. Do not let the solvent evaporate dry.
立即用干净的无绒纱布擦干。不要让溶剂蒸发干。
(c) Do steps (a) and (b) again, if necessary, until all unwanted matter is removed.
如有必要,重复步骤 (a) 和 (b),直到所有多余的物质被清除。
(2) Method 2 — Dry wipe
方法 2——干擦
(a) Wipe the seal with clean, dry, lint-free gauze until all contamination is removed. Do not use a solvent.
用干净、干燥、无绒的纱布擦拭密封件,直到所有污染物被清除。不要使用溶剂。
4. INSPECTION/CHECK 检查
A. Examine all of the surface of the seal carefully for cuts, nicks, grooves, excessive flash or dents. Do not use O-rings with these defects or if they have cracks, decomposition, or other deterioration.
仔细检查密封件的所有表面,查看是否有划痕、缺口、凹槽、过度毛边或凹痕。不要使用有这些缺陷或出现裂纹、腐烂或其他恶化的O形圈。
B. Examine the O-ring and sealing surfaces of the fitting or component for dirt, chips, grease or other contamination. Make sure there are no rough areas or burrs.
检查O形圈和接头或组件的密封表面是否有污垢、碎屑、油脂或其他污染物。确保没有粗糙区域或毛刺。
C. Obey the limits on storage time to be sure of a serviceable O-ring. If not, O-ring cracks and deterioration, and unusually short service life can occur. Refer to SOPM 20-70-01 for more details.
遵守储存时限,确保O型圈仍可使用。否则,O型圈会出现裂纹和恶化,使用寿命也会异常短。更多详情,请参阅SOPM 20-70-01。
5. LUBRICATION 润滑
A. Static seals
静态密封
(1) Apply a thin layer of the lubricant, as specified per Figure 1, to all surfaces of the seal. Be careful not to put contamination in the lubricant or on the surfaces.
按图1所示,在密封件的所有表面涂抹一层薄薄的润滑剂。注意不要将污染物带入润滑剂或表面。
(2) Remove unwanted lubricant with clean, lint-free gauze after installation.
安装后,用干净的无绒纱布清除多余的润滑剂。
B. Dynamic seals
动态密封
(1) Put the seal in the lubricant as specified per Figure 1. Then let the seal drip drain for a maximum of 1 minute before installation. When the specified lubricant is grease, apply a thin smooth layer of the grease to the seal before installation.
按图1所示将密封件放入润滑剂中。安装前,让密封件滴干最多1分钟。如果规定的润滑剂是润滑脂,请在安装前在密封件上涂抹一层薄薄的光滑润滑脂。
(2) By hand, apply a large quantity of lubricant to all surfaces over which the seal will slide during operation. Use a clean, lint-free gauze to apply lubricant.
用手将大量润滑剂涂抹在密封件在操作过程中将滑动的所有表面上。使用干净的无绒纱布涂抹润滑剂。
(3) Remove unwanted lubricant after installation.
安装后,清除多余的润滑剂。

6. INSTALLATION OF O-RINGS O型圈的安装
A. Before installation, lubricate the O-ring seals per Figure 1, to let the seal slide into position easily and seal correctly (Figure 2).
安装前,按照图1所示润滑O型圈密封件,以便密封件轻松滑动到位并正确密封(图2)。
B. Use a O-ring installation tool, ST848 or equivalent, to install the O-ring seals over sharp threads as shown.
使用O型圈安装工具ST848或类似工具,如图所示将O型圈密封件安装在尖锐的螺纹上。
CAUTION :O-RINGS ARE EASILY DAMAGED DURING INSTALLATION. ELASTOMERIC O-RINGS MUST NOT BE STRETCHED TO MORE THAN 50 PERCENT INCREASE IN ID. PLASTIC (TEFLON, POLYETHYLENE, ETC.) O-RINGS MUST NOT BE STRETCHED MORE THAN 5 PERCENT INCREASE IN ID.
注意:O型圈在安装过程中很容易损坏。弹性O型圈的内径拉伸不得超过50%。塑料(聚四氟乙烯、聚乙烯等)O型圈的内径拉伸不得超过5%。
C. Use the correct tool dash number for the tube or fitting diameter. (Dash number is the same as nominal tube size in thousandths of an inch.) This will make sure the O-ring is not stretched too much.
使用正确的工具仪表号来测量管子或接头的直径。(仪表号与公称管尺寸相同,以千分之一英寸为单位)这样可以确保O形圈不会过度拉伸。
D. Adjust the finger stiffness of the tool to let the pusher slide over the thimble easily, but still touch the thimble and not go up over the O-ring. Move the wrapper forward to increase finger stiffness. Move the wrapper back to make the fingers more flexible.
调整工具的指尖硬度,使推杆能够轻松滑过套管,但仍然接触套管,不会越过O形圈。向前移动包装器,增加指尖硬度。向后移动包装器,增加指尖灵活性。
E. With the stiffness correctly adjusted, put the thimble in position over the threads. Put the O-ring seal and the backup washer (if applicable) on the thimble.
正确调整硬度后,将套管放在螺纹上方。将O形密封圈和备用垫圈(如果适用)放在套管上。
F. Use the pusher to slide the O-ring seal and the backup washer over the thimble and into the groove.
用推杆将O形密封圈和备用垫圈滑过套管,放入凹槽中。
G. Remove the tool from the fitting. Remove the thimble.
从接头中取出工具。取出套管。
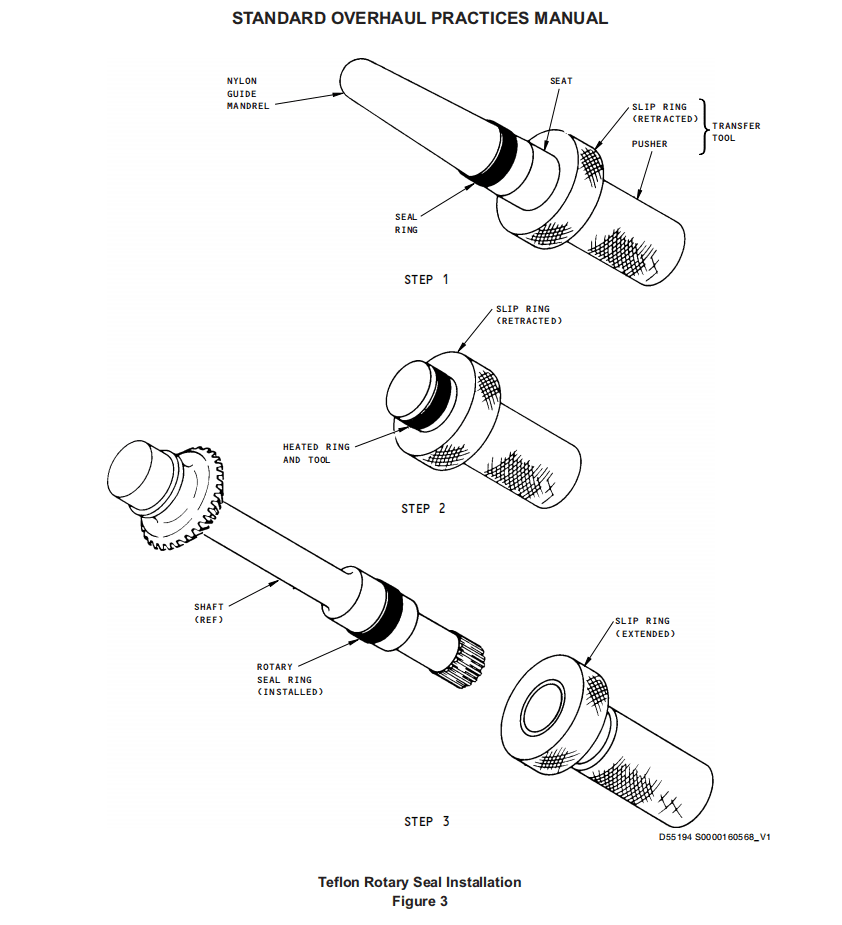
7. INSTALLATION OF LOW PRESSURE ROTARY SEAL RINGS (OD) 低压旋转密封环(OD)的安装
CAUTION :DO NOT GET UNWANTED FOREIGN MATERIAL BETWEEN SEAL RING AND SHAFT. MAKE SURE THAT INSTALLATION TOOLS HAVE NO BURRS OR SURFACE DEFECTS THAT COULD DAMAGE OR LOCALLY STRETCH THE HEATED SEAL RING.
注意:不要让密封环和轴之间有多余的异物。确保安装工具没有毛刺或表面缺陷,以免损坏或局部拉伸加热的密封环。
A. Thin cylindrical rotary seal rings of teflon for 85% teflon and 15% molybdenum disufide such as Boeing 69-27219 are used on some shafts to make a low-friction surface between the shaft and the O-ring seal, which is installed over the rotary seal ring. This procedure uses a special tool and a heat-shrink method.
某些轴上使用85%的聚四氟乙烯和15%的二硫化钼制成的薄圆柱形旋转密封环(如波音69-27219),以在轴和O形密封圈之间形成低摩擦表面,O形密封圈安装在旋转密封环上。此过程使用特殊工具和热收缩方法。
B. Use a suitable F72789 tool or equivalent.
使用合适的 F72789 工具或类似工具。
C. Slide the rotary seal ring on the nylon guide mandrel as shown in step 1 of Figure 3.
如图 3 步骤 1 所示,将旋转密封环滑到尼龙导轴上。
D. Move the seal ring to the transfer tool as shown in step 2 of Figure 3, then remove the nylon guide mandrel.
如图 3 步骤 2 所示,将密封环移到传递工具上,然后取出尼龙导轴。
E. Heat the mating shaft in an oven for a minimum of 15 minutes.
在烤箱中加热配合轴至少 15 分钟。
WARNING :DO NOT HEAT THE SEAL OVER 400°F, BECAUSE POISONOUS GASES COULD BE RELEASED. USE CLEAN, HEAT-RESISTANT GLOVES TO HOLD THE HEATED PARTS. THEY WILL BE TOO HOT TO TOUCH WITHOUT HAND PROTECTION.
警告:密封件加热温度不得超过400°F,否则可能释放有毒气体。请使用干净、耐热的隔热手套拿取加热后的零件。如果不戴手套,零件会烫得无法触碰
F. Heat the transfer tool and the seal ring to 260-300°F (molybdenum disulfide-Teflon rings) or 315-335°F (Teflon rings).
将传输工具和密封环加热到260-300°F(二硫化钼-特氟龙环)或315-335°F(特氟龙环)。
G. Put the tool on the shaft.
将工具放在轴上。
H. Move the slip ring to push the seal ring off the tool and on the shaft, as shown in step 3 of Figure 3.
移动滑环,将密封环从工具上推到轴上,如图3步骤3所示。
I. Let the shaft and the seal ring slowly get cool. Do not let too much air flow around the parts, to let the seal ring cool as slowly as the shaft.
让轴和密封圈慢慢冷却。不要让过多的空气流过零件,让密封圈像轴一样慢慢冷却。
8. INSTALLATION OF TEFLON CHANNEL SEALS (ID) 安装特氟龙槽型密封件(ID)
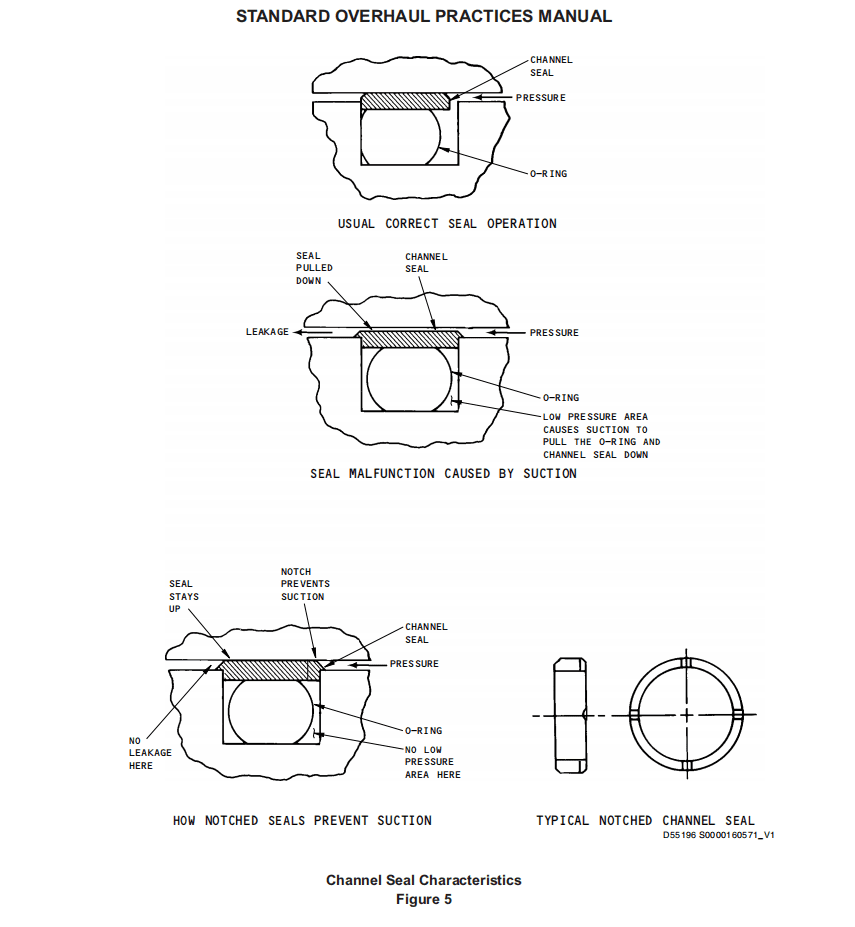
A. In some pressure conditions, cap or channel seals can change their shape and cause a malfunction of the unit in which they are installed (Figure 4). A seal that fits tightly against the two sides of the groove can partially be pulled down by suction into the groove and permit fluid leakage (Figure 5). If notched seals can make the pressure equal inside the groove and decrease the risk of this problem, we recommend you use notched seals as replacements if permitted by the overhaul instructions as optional or preferred to the seals without notches.
在某些压力条件下,盖形密封件或槽型密封件可能会改变形状,导致安装它们的设备发生故障(图4)。密封件紧贴凹槽两侧,可能会被凹槽中的吸力部分拉下,导致液体泄漏(图5)。如果带凹槽的密封件能够使凹槽内的压力相等,降低出现此问题的风险,我们建议您在大修说明允许的情况下,使用带凹槽的密封件作为备选方案,或优先于不带凹槽的密封件。
B. Install Teflon channel seals into the bore of the part as follows:
按以下步骤将特氟龙槽密封件安装到零件孔中:
(1) Clean the seal groove and the bore of the part.
清洁零件的密封槽和孔。
WARNING :IF TEFLON SEALS ARE HEATED ABOVE 400°F, THEY COULD GIVE OFF POISONOUS GAS.
警告:如果将特氟龙密封件加热到400°F以上,可能会释放出有毒气体。
(2) Heat the Teflon channel seal to 100-200°F with an incandescent heat lamp or hot water. If you use hot water, dry the seal with clean gauze before installation.
用白炽灯或热水将特氟龙密封件加热到100-200°F。如果使用热水,请在安装前用干净的纱布擦干密封件。
NOTE: Teflon material will not absorb water, thus will not keep water inside which could come out later to cause corrosion in the part.
注意:特氟龙材料不会吸水,因此不会将水留在内部,导致日后渗出并腐蚀零件。
(3) Heat to 125-175°F the component to get the seal. Make sure the component is not too hot to touch by hand.
将零件加热到125-175°F,以便安装密封件。确保零件温度不会过高,用手触摸时不会感到灼热。
CAUTION :DO NOT USE METAL TOOLS TO INSTALL TEFLON CHANNEL SEALS OR DAMAGE TO SEALS WILL OCCUR. USE TOOLS OF NYLON OR EQUIVALENT MATERIAL.
注意:请勿使用金属工具安装特氟龙槽型密封件,否则会损坏密封件。请使用尼龙或类似材质的工具。
(4) Get a nylon plug or rod which can fit into the bore and which will stop the seal at the groove.
准备一个可插入孔内的尼龙塞子或杆,以将密封件固定在凹槽处。
(5) Lubricate the O-ring with the lubricant specified in Figure 1, then install it into the channel seal.
用图1中指定的润滑剂润滑O形圈,然后将其安装到槽型密封件中。
(6) Bend theTeflon channel seal into an elliptical shape and slide it into the channel as shown. With a rod approximately 1/4 inch in diameter, push the remaining sections of the seal into the groove.
将特氟龙槽型密封件弯曲成椭圆形,然后如图所示将其滑入槽中。用直径约1/4英寸的杆将密封件的剩余部分推入凹槽。
(7) Smooth out the wrinkles, creases or waves which could occur in the installed Teflon channel seal with your fingers or a small smooth nylon rod or an equivalent tool.
用手指或光滑的小尼龙棒或类似工具抚平已安装的特氟龙槽型密封件上可能出现的褶皱、折痕或波纹。
NOTE: Tools to install Teflon channel seals are available from Busak & Shamban (V09257).
注意:Busak & Shamban公司(V09257)有安装特氟龙槽型密封件的专用工具。
C. Install the shaft through the Teflon channel seals.
将轴穿过特氟龙槽型密封件。
(1) Lubricate the shaft per Figure 1.
按图1所示润滑轴。
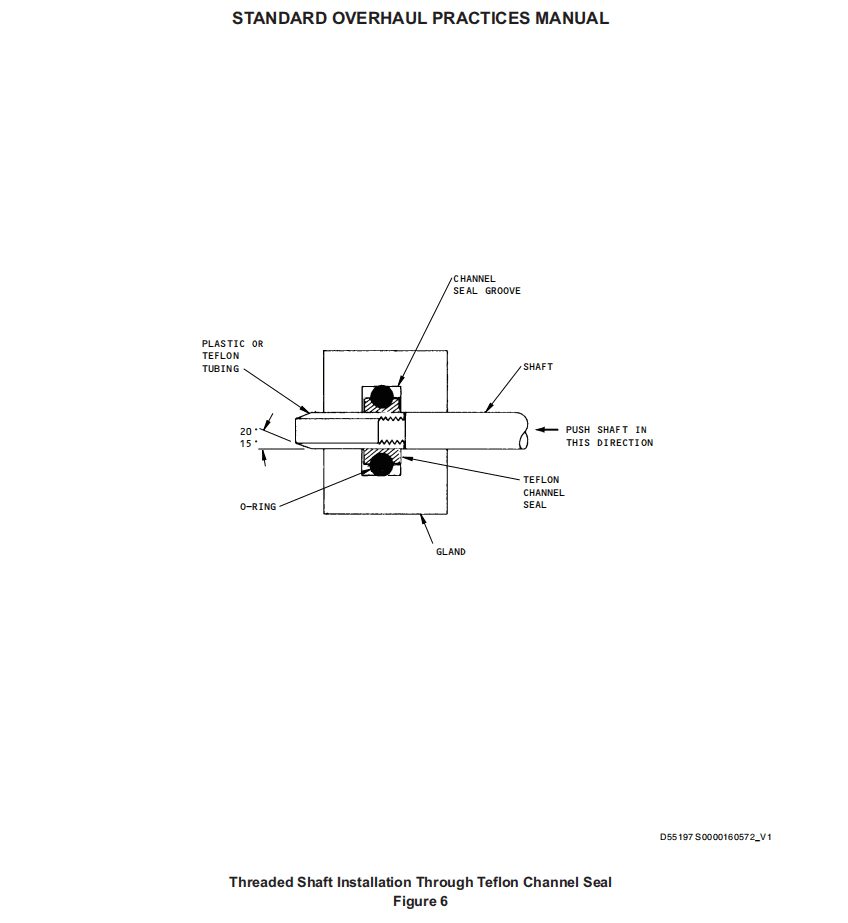
(2) If the shaft has external threads, give the channel seal protection from the sharp threads at the shaft end (Figure 6) as by the following:
如果轴有外螺纹,则应采取以下措施,保护槽型密封件免受轴端锋利螺纹的损伤(图6):
(a) Get a piece of Teflon or plastic tubing with an ID slightly smaller than the major diameter of the threads and an OD the same size as the shaft.
准备一段内径略小于螺纹大直径、外径与轴直径相同的特氟龙或塑料管。
(b) Chamfer the end of the tubing as shown.
如图所示,将管子末端倒角。
(c) Turn the tubing onto the threaded part of the shaft until the end is against the shoulder of the shaft, as shown.
将管子拧到轴的螺纹部分,直到末端抵住轴肩,如图所示。
(d) Lubricate the tubing per Figure 1.
按图1所示润滑管子。
(e) Push the end of the tubing through the channel seal as you twist the shaft. This will expand the channel seal into the groove and get the shaft through the channel seal.
在拧轴时,将管子末端穿过槽型密封件。这将使槽型密封件膨胀到凹槽中,使轴穿过槽型密封件。
(f) Continue to push shaft through the gland until the shaft is in the correct final position.
继续推动轴穿过压盖,直到轴到达正确的最终位置。
(g) Remove the plastic tubing protection.
取下塑料管保护。
(3) If the shaft has no threads on its end, carefully push and twist the shaft through the seal until the shaft end is completely through the seal. Then push the shaft straight through until it is in the correct final position.
如果轴端没有螺纹,小心地推动并扭转轴穿过密封件,直到轴端完全穿过密封件。然后直接推动轴,直到它到达正确的最终位置。

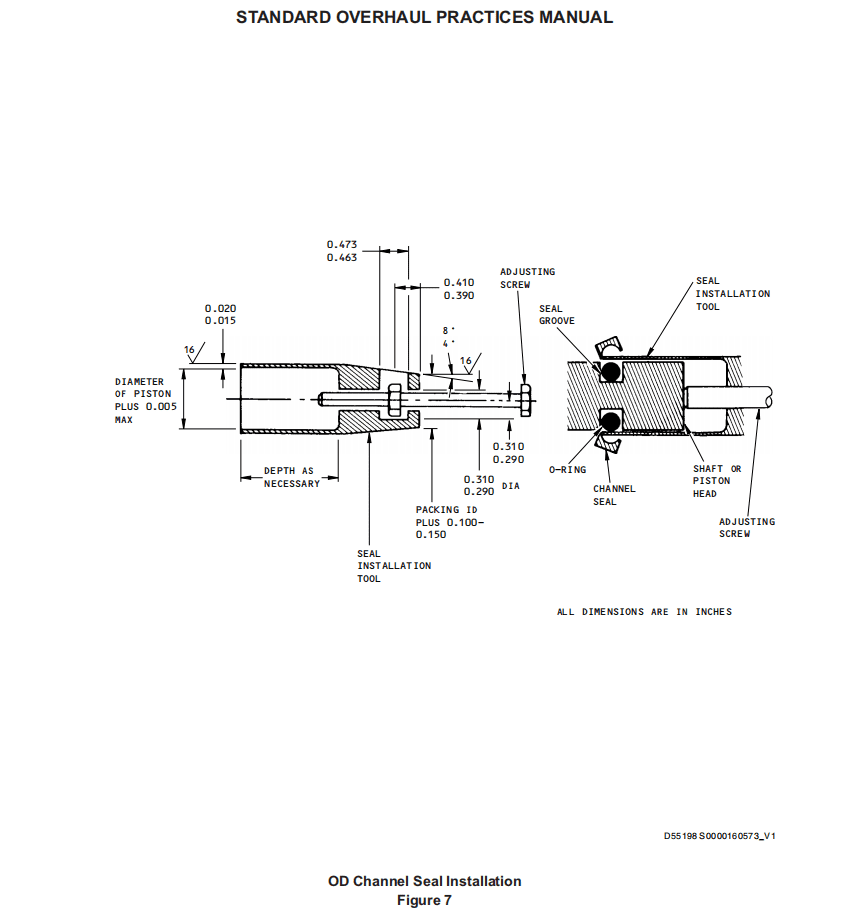
9. INSTALLATION OF TEFLON CHANNEL SEALS (OD) 安装特氟龙槽型密封件(外径)
NOTE: Refer to Paragraph 8.A. for recommendations about notched seals.
注意:有关带凹槽密封的建议,请参阅第8.A段。
A. Install the O-ring into the seal groove on the component (Figure 7).
将O形圈安装到部件上的密封槽中(图7)。
B. Heat the Teflon channel seal to 100-200°F with an incandescent lamp or hot water. If hot water is used, dry the seal with a clean sponge before installation.
用白炽灯或热水将特氟龙槽型密封加热到100-200°F。如果使用热水,请在安装前用干净的海绵擦干密封。
NOTE: Teflon material will not absorb water, thus will not keep water inside which could come out later to cause corrosion in the part.
注意:特氟龙材料不会吸水,因此不会在内部积聚水分,导致日后渗出腐蚀零件。
C. Use a tool as shown. The tool can be locally made, or purchased from Busak & Shamban (V09257) as tool No. 16-130/OD.
使用如图所示的工具。该工具可以自制,也可以从Busak & Shamban(V09257)购买,编号为16-130/OD。
D. Lubricate the tool and the Teflon channel seal with lubricant per Figure 1.
如图1所示,用润滑剂润滑工具和特氟龙槽型密封件。
E. Put the tool over the end of the component with the end of the tool over the O-ring as shown. Adjust the screw to hold the tool in this position.
将工具放在组件末端,工具末端应位于O形环上方,如图所示。调整螺钉,将工具固定在原位。
F. Hold the tool with a clean, dry cloth to not let it slip. Hold the tool behind the channel seal and slide the channel seal over the tool until one leg of the channel seal goes into the seal groove, as shown.
用一块干净、干燥的布固定工具,防止其滑动。将工具放在槽型密封件后面,将槽型密封件滑到工具上,直到槽型密封件的一侧进入密封槽,如图所示。
G. Turn the screw on the tool to pull the tool back, until the edge of the tool is aligned with the edge of the groove and the other leg of the channel seal drops into the groove. Make sure the O-ring is between the legs of the teflon channel seal.
转动工具上的螺钉,将工具拉回,直到工具边缘与凹槽边缘对齐,并且槽型密封件的另一条腿掉入凹槽中。确保O形环位于特氟龙槽型密封件的腿之间。
H. If the part is a large piston with a narrow rim between the seal groove and the piston end, you can put one edge of the seal in the groove and stretch the remaining part of the seal over the piston into the groove. (This is almost the same as how an automobile tire is installed on a wheel.)
如果零件是带有狭窄边缘的大活塞,密封槽和活塞端之间,您可以将密封件的一侧放入凹槽中,然后将密封件的剩余部分拉伸到活塞上,放入凹槽中。(这几乎与汽车轮胎安装在车轮上的方式相同。)
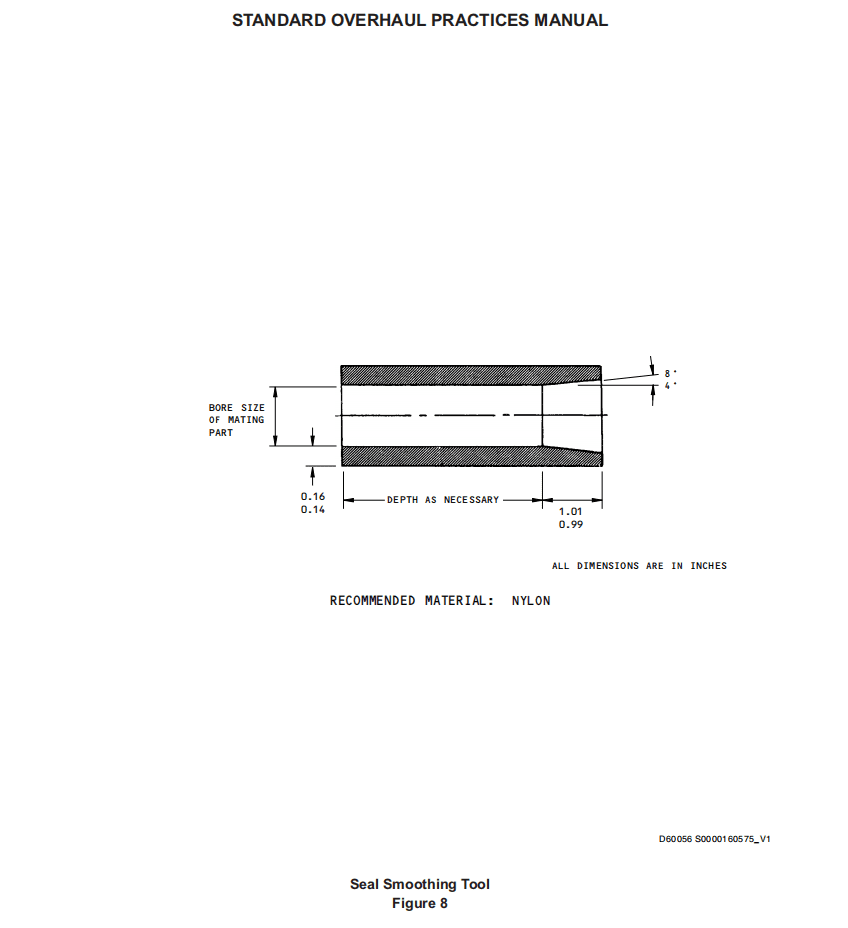
I. When two or more channel seals will be installed on a part, use a smoothing tool (Figure 8) to make it easier to put the seals in.
当两个或多个槽型密封件将安装在零件上时,请使用平滑工具(图8)以方便放置密封件。
J. Before you complete the assembly, slip the smoothing tool over the channel seals and press each seal against its O-ring. Twist and slide the tool at the same time to push on the seal surface until it is smooth. If there is only one teflon channel seal, you can do this by hand.
在完成组件之前,将平滑工具滑过槽型密封件,并使每个密封件紧贴其O形圈。同时扭转并滑动工具,以推动密封件表面,直到其光滑为止。如果只有一个特氟龙槽型密封件,则可以手动完成此操作。
10. INSTALLATION OF TEFLON SQUARE RING AND CAP RING SEALS 特氟龙方形环和盖形环密封件的安装
NOTE: Refer to Paragraph 8.A. for recommendations about notched seals.
注意:有关带凹槽密封的建议,请参阅第8.A.段。
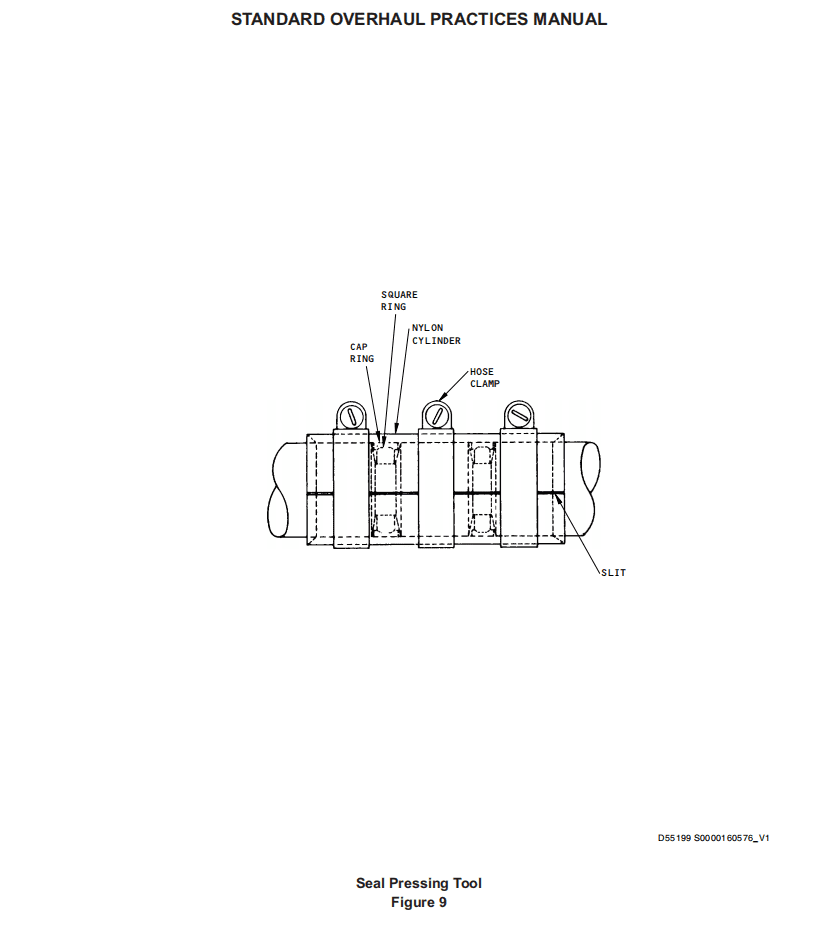
A. Install square ring and cap ring seals (Figure 9) as follows:
按照以下步骤安装方形环和盖形环密封件(图9):
(1) Install the Teflon square ring in the seal groove.
将特氟龙方形环安装在密封槽中。
(2) Install the cap ring in with the same procedure as Teflon channel seals, steps 9.A. through J.
按照与特氟龙槽型密封件相同的步骤(第9.A.至J.步)安装盖形环。
B. Assemble shaft or piston into mating part.
将轴或活塞组件装入配合零件。
(1) Get or make a seal pressing tool as shown in Figure 9. This tool is a nylon cylinder with its internal diameter equal to the bore size of the mating part. One wall of the cylinder has a slit longitudinally to permit installation over the seals, and the bore has a chamfer at each end to help prevent damage to the seals.
获取或制作如图9所示的密封压紧工具。该工具是一个尼龙圆柱体,其内径与配合零件的孔径相同。圆柱体的一侧壁纵向开有一条缝隙,以便安装到密封件上,圆柱体的两端有倒角,以防止损坏密封件。
(2) Install the tool over the seals as shown in Figure 9.
如图9所示,将工具安装在密封件上。
(3) Install hose clamps around the cylinder. Carefully tighten the clamps to compress the seals, but do not pinch the cap rings.
将软管夹安装在作动筒周围。小心拧紧夹子,压缩密封件,但不要夹住密封盖形环。
(4) Put the clamped assembly in an atmosphere colder than -70°F for 15-20 minutes.
将夹紧的组件放在低于-70°F的环境中15-20分钟。
WARNING :DO NOT TOUCH THE COLD ASSEMBLY WITH BARE HANDS. IT CAN CAUSE FROSTBITE AND DAMAGE TO HUMAN TISSUE.
警告:请勿赤手触摸冷的组件。这可能会导致冻伤和人体组织损伤。
(5) Remove the pressing tool and immediately install the chilled assembly into its mating part.
取出压紧工具,立即将冷却组件安装到其配合零件中。
11. INSTALLATION OF BACR12BD CAP RINGS (ID) BACR12BD 盖形环(内径)的安装
NOTE: Refer to Paragraph 8.A. for recommendations about notched seals.
注意:有关带凹槽密封件的推荐,请参阅第 8.A 节。
A. Put the cap ring on the shaft as shown (Figure 10).
如图所示将盖形环放在轴上(图 10)。
B. Stretch the O-ring onto the cap ring. Use the same size O-ring as the cap ring for cap rings BACR12BD110, BACR12BD210 and BACR12BD325. For all other cap ring sizes, use O-rings one size smaller than the cap ring.
将O形圈拉伸到盖形环上。对于盖形环BACR12BD110、BACR12BD210和BACR12BD325,使用与盖形环相同尺寸的O形圈。对于所有其他尺寸的盖形环,使用比盖形环小一个尺寸的O形圈。
C. Slide the assembled O-ring and cap ring into the seal cavity.
将组装好的O形圈和盖形环滑入密封腔。
D. Install the retainer.
安装固定器。

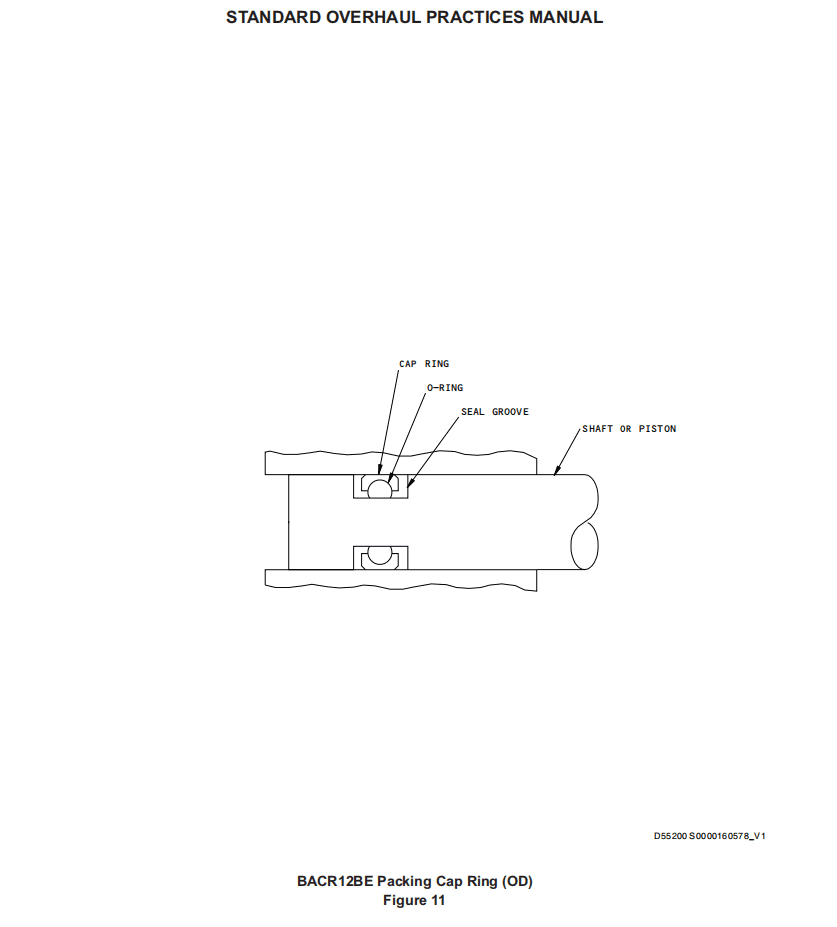
12. INSTALLATION OF BACR12BE CAP RINGS (OD) BACR12BE 盖形环(外径)的安装
NOTE: Refer to Paragraph 8.A. for recommendations about notched seals.
注意:有关带凹槽密封的建议,请参阅第 8.A 段。
A. Put the O-ring into the seal groove as shown (Figure 11). Use the same size O-ring as the cap ring for cap rings BACR12BE110, BACR12BE210, and BACR12BE325. For all other cap rings, use O-rings one size smaller than the cap ring.
将O形圈放入密封槽中,如图所示(图11)。对于盖形环BACR12BE110、BACR12BE210和BACR12BE325,使用与盖形环相同尺寸的O形圈。对于所有其他盖形环,使用比盖形环小一个尺寸的O形圈。
B. Get or make an installation tool as shown in Figure 7.
获取或制作如图7所示的安装工具。
C. Put the installation tool on the shaft or piston head with the edge of the open end just covering over the O-ring. Adjust the screw to hold the tool in this position.
将安装工具放在轴或活塞头上,开口端的边缘刚好盖住O形圈。调整螺钉,将工具固定在原位。
D. Lubricate the cap ring, the O-ring seal and the installation tool with the lubricant specified in Figure 1.
用图1中指定的润滑剂润滑盖形环、O形圈密封件和安装工具。
E. Hold the tool with a clean dry cloth, and slide the cap ring up the tool until one leg of the cap ring goes into the seal groove as shown in Figure 7.
用一块干净干燥的布握住工具,将盖形环沿工具向上滑动,直到盖形环的一根腿进入密封槽,如图7所示。
F. Adjust the screw to retract the tool until the open end starts to uncover the O-ring.
调整螺钉,收回工具,直到开口端开始露出O形圈。
G. Slide the remaining leg of the cap ring into the seal groove.
将盖形环的剩余腿滑入密封槽。
H. Smooth the cap ring by hand and push and squeeze the seal assembly to remove all caught air, bumps, wrinkles or waves, until the cap is correctly in the groove. Use a smoothing tool as shown in Figure 8. This is important for the small packing cap ring sizes BACR12BE006 through BACR12BE012.
用手抚平密封环,并推挤密封组件,以去除所有残留的气泡、凸起、皱纹或波纹,直到密封环正确地位于凹槽中。如图8所示,使用平滑工具。这对于尺寸为BACR12BE006至BACR12BE012的小型密封盖形环非常重要。
I. Carefully push the shaft into the bore. Twist and turn the shaft as necessary.
小心地将轴推入孔中。根据需要扭转轴。
NOTE: To make installation and assembly easier, use an insertion tool as shown in Figure 6 if the shaft ends have external threads.
注意:为方便安装和组件,如果轴端有外螺纹,请使用图6所示的插入工具。
J. Wipe off unwanted lubricant with clean lint-free cloth.
用干净的无绒布擦去多余的润滑剂。
13. INSTALLATION OF ROTARY SEAL RINGS (OD) — BONDING METHOD 旋转密封环(外径)的安装——粘接法
A. If seal rings are not already etched, etch them as follows:
如果密封环尚未蚀刻,请按以下步骤进行蚀刻:
CAUTION :THE TFE ETCHING SOLUTIONS CONTAIN SODIUM DISSOLVED IN A FLAMMABLE ORGANIC SOLVENT. BE CAREFUL WHEN YOU USE THEM. KEEP THEM AWAY FROM FLAMES. IF THERE IS A FIRE, USE ONLY A SODATYPE FIRE EXTINGUISHER.
注意:TFE蚀刻溶液中含有溶于易燃有机溶剂中的钠。使用时务必小心。远离明火。如果发生火灾,请仅使用钠型灭火器。
(1) Mask the outside diameter of the seal ring.
遮盖密封圈的外径。
(2) Soak the ID of the ring in TFE etching solution until the surface becomes a light tan to a dark brown color. The time could be 5-30 seconds or more because of the different solution types or strengths. Use one of these or an equivalent:
将密封圈的ID浸泡在TFE蚀刻溶液中,直到表面变成浅棕色至深棕色。由于溶液类型或浓度不同,时间可能为5-30秒或更长。请使用以下产品或类似产品:
(a) Bondaid S16943 Etchant, V09257
(b) Chemgrip Etchant, V18632
(c) Fluorobond, V00986
(d) Tetra-Etch, V17217 or V60622
(3) If the part does not become a dark brown color in 60 seconds, the etchant is too old or weak. Do the etch procedure again with new solution.
如果零件在60秒内没有变成深棕色,说明蚀刻剂太旧或太弱。请用新的溶液重新进行蚀刻处理。
(4) Immediately after treatment, wash the etched surface with a 3 to 5% solution by volume of water in n-butyl alcohol to stop the etch process.
处理后立即用体积比为3%至5%的n-丁醇水溶液清洗蚀刻表面,以停止蚀刻过程。
(5) Wash the part in clean water (180°F maximum). Remove masking. Wash the part with acetone or MEK. Dry it with a clean cloth, but do not rub it.
用清水(最高温度180°F)清洗零件。去除遮蔽层。用丙酮或MEK清洗零件。用干净的布擦干,但不要用力擦拭。
B. With methyl ethyl ketone or methyl propyl ketone, clean the shaft and seal ring bonding surfaces, and all parts and tools which will touch the contact seal ring ID during installation. Bond surfaces must not have dust, lint, oil or other contamination.
用甲基乙基酮或甲基丙基酮清洁轴和密封环接合面,以及安装过程中会接触密封环内径的所有零件和工具。接合面不得有灰尘、棉绒、油污或其他污染物。
C. Install the seal ring on the expanding tool (Figure 7). Slide the tool over the shaft to put the seal ring adjacent to the grooves in the shaft.
将密封环安装在膨胀工具上(图7)。将工具滑过轴,使密封环紧贴轴上的凹槽。
D. Apply a thin even coat of BMS 5-126, Type 1 or Type 2 adhesive per SOPM 20-50-12, Type 38.
按照SOPM 20-50-12,类型38,均匀涂抹一层薄薄的BMS 5-126,类型1或类型2粘合剂。
E. Slide the seal ring from the expanding tool onto the shaft groove and remove the tools. With the fingers only, immediately turn the seal ring approximately one turn to distribute the adhesive.
将密封环从膨胀工具上滑到轴槽上,然后取下工具。仅用手指立即将密封环旋转大约一圈,以分散粘合剂。
F. If there is more than one seal on the shaft, do steps C., D., E. again.
如果轴上不止一个密封圈,请重复步骤C、D、E。
G. Wipe off unwanted adhesive with a lint-free cloth wet with methyl ethyl ketone or methyl propyl ketone.
用蘸有甲基乙基酮或甲基丙基酮的无绒布擦去多余的粘合剂。
H. After 10 minutes try to turn each seal ring again with the fingers. If the adhesive is set, this will not be necessary.
10分钟后,尝试用手指再次转动每个密封圈。如果粘合剂已经固化,则无需这样做。
I. Let the adhesive cure 24 hours minimum at room temperature before you use the part. As an optional cure method, put the part in an oven preheated to 270-290°F. Remove the part from the oven after 2 minutes and turn each seal ring approximately one turn. Put the part back in the oven for 10-12 more minutes. Remove the part from the oven and let it air-cool to room temperature. Do not put the part in a coolant or a flow of air to make it cool faster.
在使用零件前,至少在室温下放置24小时,让粘合剂固化。作为可选的固化方法,将零件放入预热至270-290°F的烤箱中。2分钟后从烤箱中取出零件,并转动每个密封环约一圈。将零件放回烤箱中再放置10-12分钟。从烤箱中取出零件,让其自然冷却至室温。不要将零件放入冷却剂或气流中使其更快冷却。
J. Remove unwanted cured adhesive with a cloth moistened with epoxy paint stripper per SOPM 20-30-02.
按照SOPM 20-30-02,用蘸有环氧脱漆剂的布去除多余的固化粘合剂。
K. Clean the shaft and the seal rings with methyl ethyl ketone or methyl propyl ketone. Let this air dry. Dip the complete shaft in MIL-H-5606 hydraulic fluid or a rust inhibitor.
用甲基乙基酮或甲基丙基酮清洁轴和密封环。让其风干。将整个轴浸入MIL-H-5606液压油或防锈剂中。
14. INSTALLATION OF OMNISEALS 全能密封的安装
CAUTION :BE VERY CAREFUL WHEN YOU USE AND INSTALL OMNISEALS TO PREVENT DAMAGE SUCH AS NICKS, CUTS, AND GROOVES ON THE SEALING SURFACES OF THE SEAL.
注意:在使用和安装全能密封时,请格外小心,防止密封表面出现划痕、切口和凹槽等损坏。
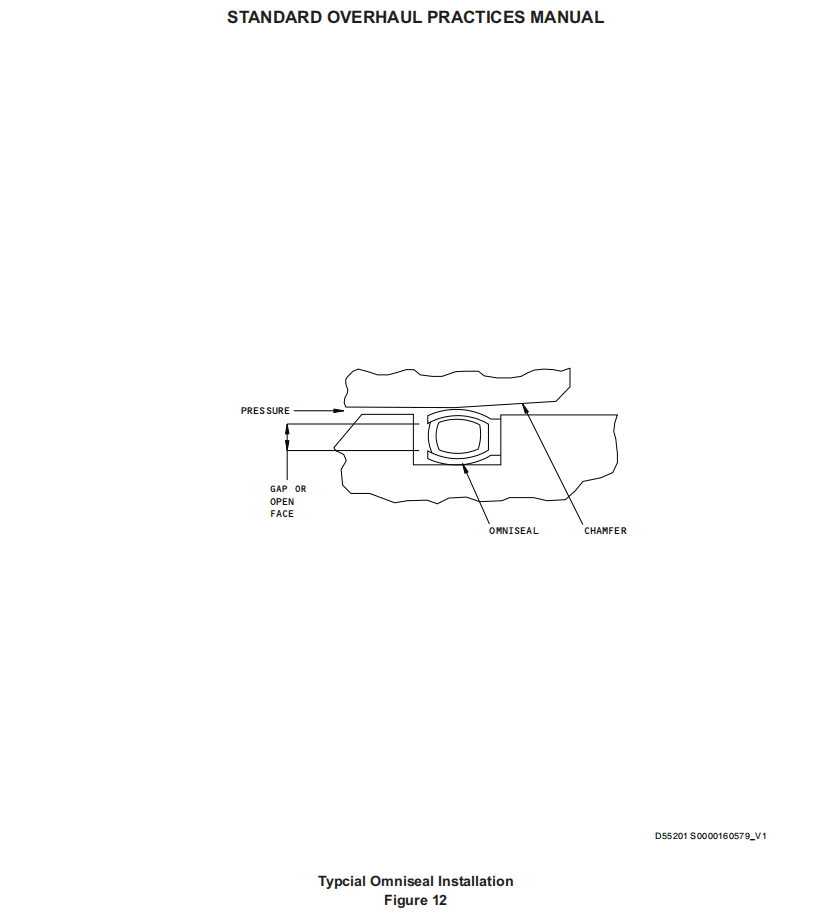
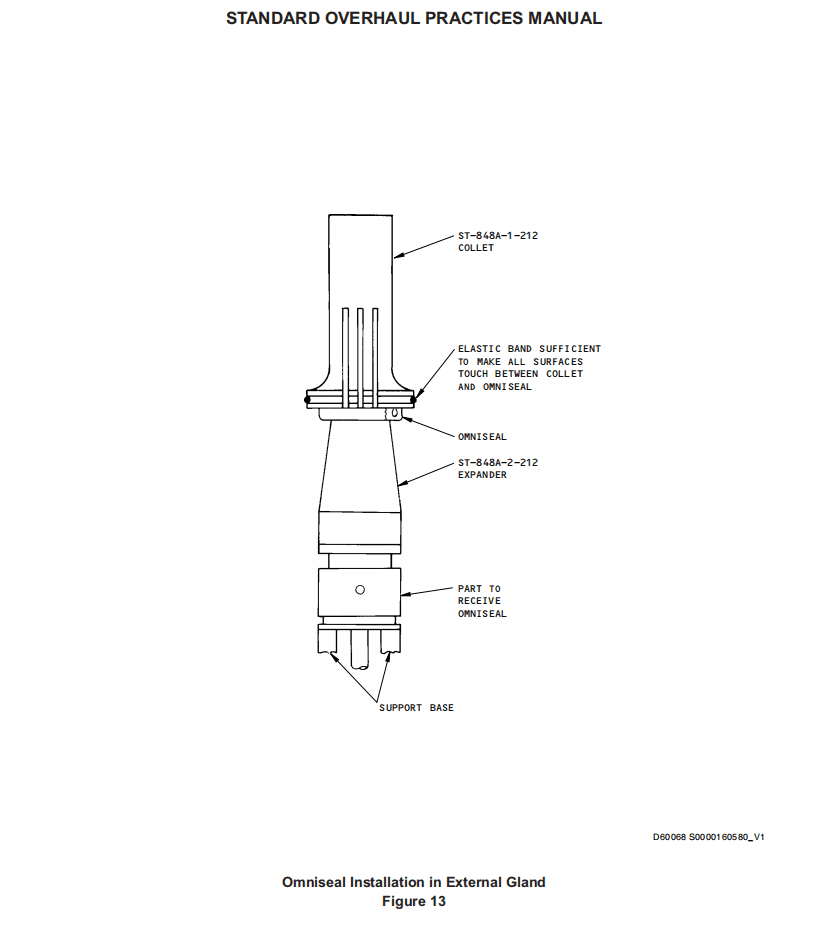
A. Unless specified by the overhaul instructions, install the omniseal with the open side of the cover on the side of the pressure, as shown (Figure 12, Figure 13). In this position, the pressure will permit the seal to become internally pressurized.
除非大修说明另有规定,否则安装时,密封圈开口侧应朝向压力一侧,如图所示(图12、图13)。在此位置,压力将使密封圈内部加压。
B. Omniseals in External Glands
外压盖中的全能密封圈
CAUTION :THE INSTALLATION TOOL YOU USE MUST NOT STRETCH THE OMNISEAL TO MORE THAN A 30 PERCENT INCREASE IN INTERNAL DIAMETER OR DAMAGE TO THE SEAL WILL OCCUR.
注意:您使用的安装工具不得将全能密封圈的内径拉伸超过30%,否则密封圈将损坏。
(1) Lubricate the expander tool (ST-848A-2-212) and the part to get the omniseal, with hydraulic fluid per Figure 1. Put the tool in position over the external gland of the part.
按照图1所示,用液压油润滑扩张工具(ST-848A-2-212)和零件,以便取出全能密封。将工具放置在零件外部压盖上方。
(2) Put the seal on the expander tool in the correct direction as specified by the overhaul instructions. Lubricate with hydraulic fluid the end of collet tool ST848A-1-212 which will touch the seal. Put the collet over the expander tool ST848A-2-212 until it touches the omniseal (Figure 13).
按照大修说明中规定的正确方向将密封件放在扩张工具上。用液压油润滑ST848A-1-212夹头工具的末端,该末端将接触密封圈。将夹头套在扩张器工具 ST848A-2-212 上,直到其接触到密封圈(图 13)。
(3) Push the omniseal into position in the part with a good quick push on the collet. Then remove the collet and the expander tool.
快速推动夹头,将密封圈推入零件中。然后取下夹头和扩张器工具。
(4) Visually examine the omniseal for damage. Make sure the omniseal expander spring is not extruded from the seal, and that the omniseal is fully down in its groove in the correct direction. There must be no longitudinal marks on the sealing surface when examined under 10X magnification.
目视检查密封圈是否有损坏。确保密封圈膨胀器弹簧没有从密封圈中挤出,并且密封圈完全向下,方向正确。在10倍放大镜下检查时,密封面上不得有纵向痕迹。
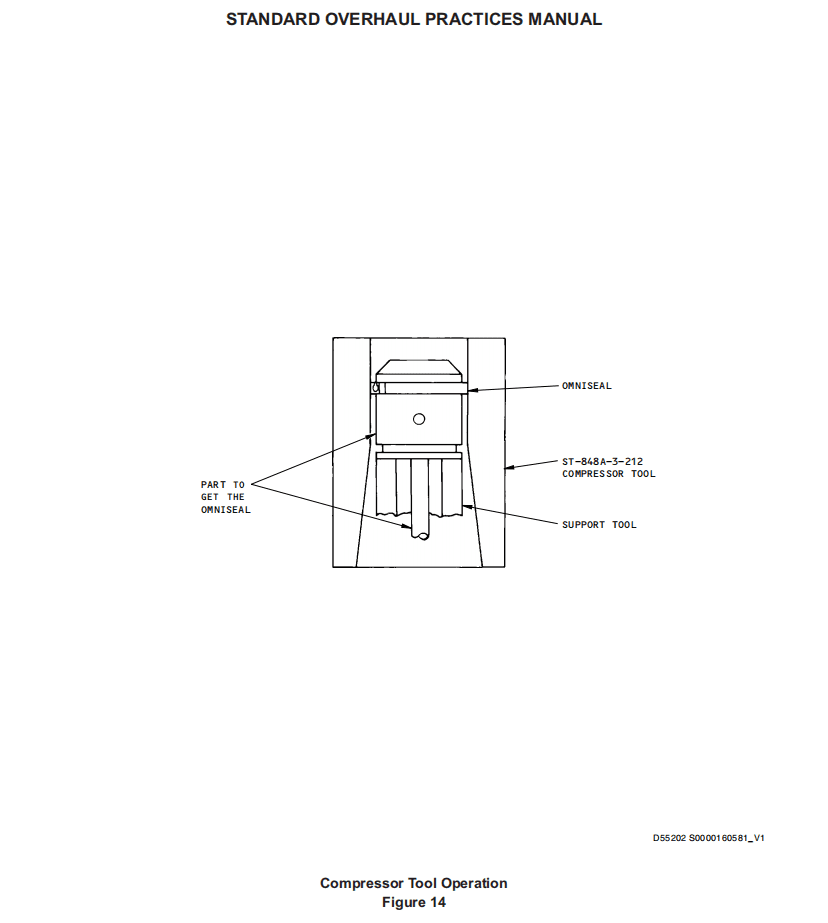
(5) Lubricate the compressor tool ST848A-3-212 with the filtered hydraulic fluid specified in Figure 1.
用图1中指定的过滤液压油润滑压缩工具ST848A-3-212。
(6) Lubricate the seal again, then put the compressor tool over the part as shown in Figure 14, with the larger diameter of the tool on the omniseal first.
再次润滑密封件,然后将压缩工具放在零件上,如图14所示,先将工具较大的直径一端放在密封件上。
(7) Push the compressor tool over the part, and make sure you put a constant pressure on the omniseal. Make sure the omniseal is fully inside the cylindrical opening of the compressor tool. Let the part stay inside the compressor tool for 10-15 minutes to let the seal get back to approximate original dimensions.
将压缩工具推到零件上,确保对密封件施加恒定的压力。确保密封件完全位于压缩工具的圆柱形开口内。让零件在压缩工具内停留10-15分钟,使密封件恢复到近似原始尺寸。
CAUTION :DO NOT BACK OFF THE COMPRESSOR TOOL FROM THE OMNISEAL OR YOU WILL DAMAGE THE SEAL.
注意:请勿将压缩工具从密封件上移开,否则会损坏密封件。
(8) Push the compressor tool through, over the omniseal, and onwards off the part, only in this same direction. Remove unwanted hydraulic fluid with solvent per Figure 1.
将压缩机工具穿过密封件,并沿同一方向从零件上移开。用溶剂清除多余的液压油,如图1所示。
(9) Examine the omniseal per step 14.B (4).
按照步骤 14.B (4) 检查密封圈。
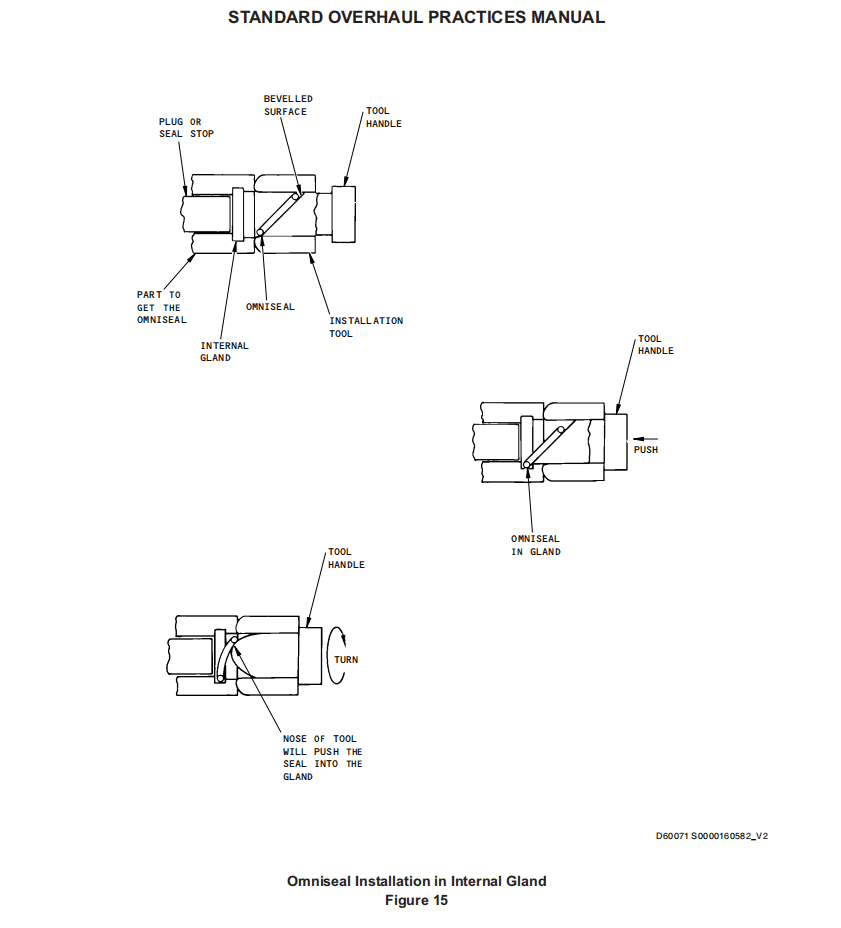
C. Omniseals in Internal Glands
内压盖中的全能密封圈
(1) Get the installation tools as shown in Figure 15. Clean all tools before you use them, with solvent per Figure 1.
如图 15 所示,准备好安装工具。使用前,按照图 1 所示用溶剂清洁所有工具。
(2) Install a plug in the bore of the part to stop the omniseal at the internal gland.
在零件孔中安装一个塞子,以将密封圈固定在内压盖上。
(3) Put the omniseal on the bevelled surface of the tool. Place the tool against the bore of the part, then carefully push on the handle until the seal goes into the gland.
将密封圈放在工具的斜面上。将工具靠在零件的孔上,然后小心地推动手柄,直到密封圈进入压盖。
(4) Turn the handle of the tool to put the omniseal completely in its groove, as shown.
转动工具的手柄,将密封圈完全放入其凹槽中,如图所示。
(5) Visually examine the omniseal per step 14.B (4).
根据第14.B (4)步目视检查密封圈。
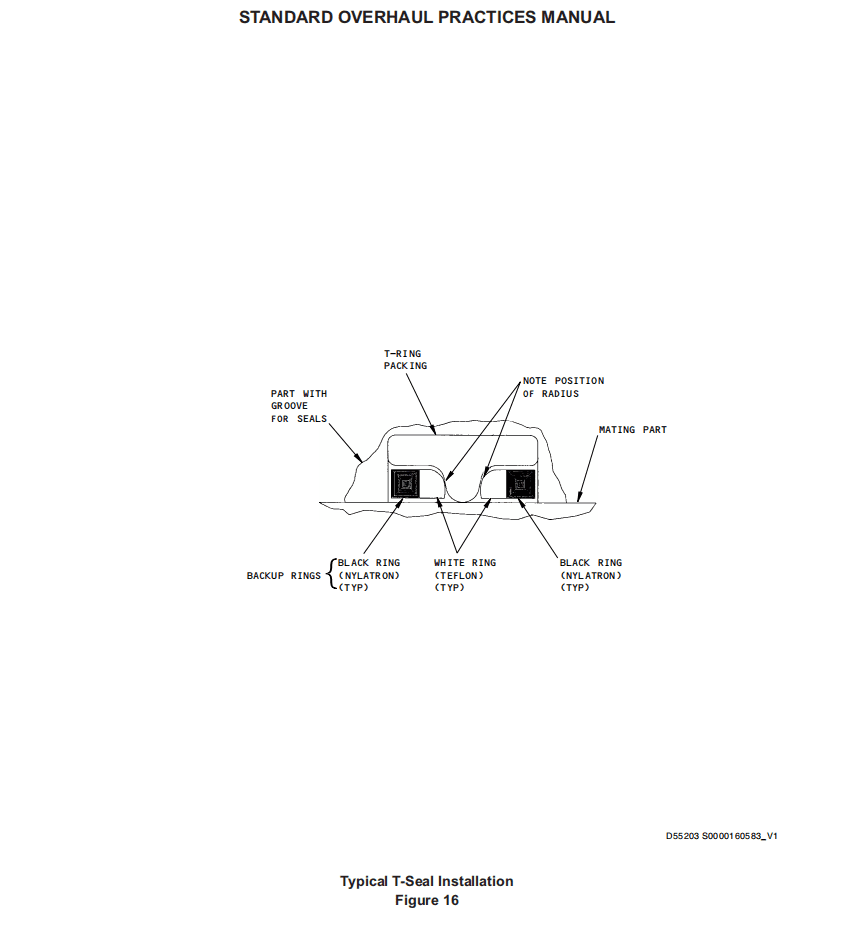
15. T-SEALS T型密封圈
A. When you install T-seals, such as those made by Greene Tweed (V5F573), be sure to install the backup rings with the radius against the T-seal (Figure 16). Decreased T-seal life could occur if the backup rings are installed with the sharp square edge against the T-seal.
安装T型密封圈时,例如Greene Tweed(V5F573)生产的密封圈,请确保将半径朝下的挡圈安装到T型密封圈上(图16)。如果挡圈的锋利直角边缘朝下安装到T型密封圈上,可能会缩短T型密封圈的使用寿命。
16. NYLON BACKUP RINGS 尼龙挡圈
A. These rings are usually installed in pairs, one on each side of an O-ring in an ID seal groove. The backup rings are usually made of nylon, usually nylon 6/6.
这些挡圈通常成对安装,一个安装在ID密封槽中O形圈的两侧。挡圈通常由尼龙制成,通常是尼龙6/6。
B. Install the backup rings, with the O-ring in between, by a procedure equivalent to that shown for teflon channel seals, Paragraph 8.
按照与第8段中所示的特氟龙槽型密封件相同的步骤,安装垫圈,中间放置O形圈。
C. The nylon material will absorb water, but only if kept in water a long time. If you use hot water to make the backup rings warm and soft before installation, do not let them stay in the hot water more than 8 hours. After this long a soak, the nylon will start to change dimensions which could cause fit problems. But the amount of water absorbed by the nylon is not sufficiently large to cause corrosion problems. Hot vegetable oil can be used as an alternative to hot water if the rings must stay in the bath longer than 8 hours. Nylon will not absorb oil.
尼龙材料会吸水,但前提是必须长时间浸泡在水中。如果在安装前用热水使挡圈变热变软,不要让它们在热水中浸泡超过8小时。浸泡时间过长后,尼龙会开始变形(尺寸改变),从而造成配合问题。但尼龙吸收的水分不足以造成腐蚀问题。如果支撑环必须在热水中浸泡超过8小时,可以用热植物油代替热水。尼龙不会吸收油分。