如何安装钢丝螺套HOW TO INSTALL THREADED INSERTS
1. INTRODUCTION 介绍
A. The data in this subject comes from Boeing Process Standard BAC5064. The airline has a copy of the Boeing Process Specification Manual.
本主题中的数据来自波音工艺标准 BAC5064。航空公司拥有一份波音工艺规范手册。
B. The data is general. It is not about all situations or specific installations. Use this data to help you write minimum requirements.
数据为通用数据。它不适用于所有情况或特定安装。使用这些数据来帮助您编写最低要求。
C. Refer to SOPM 20-00-00 for a full list of all the vendor names and addresses.
供应商名称和地址的完整列表请参考 SOPM 20-00-00。
2. MATERIALS 材料
NOTE: Equivalent substitutes can be used.
注意:可以使用等效替代品。
A. Primer — BMS10-11, Type 1 (SOPM 20-60-03).
底漆——BMS10-11,类型 1(SOPM 20-60-03)。
3. EQUIPMENT 设备
NOTE: Equivalent substitutes can be used.
注意:可以使用等效替代品。
A. Helical coil insert tools — See BAC5064.
螺旋线圈插入工具——参见 BAC5064。
B. Key-locked insert tools — See BAC5064.
锁定键插入工具——参见 BAC5064。
C. Soft-nosed hammer.
软头锤。
4. GENERAL 通用
A. Finished holes must have no burrs or other defects unless shown differently. BAC5064 gives hole defect limits.
除非另有说明,否则加工好的孔不得有毛刺或其他缺陷。BAC5064 给出了孔缺陷的极限值。
B. Unless the overhaul instructions are different, use the hole sizes shown in BAC5064.
除非大修说明另有规定,否则应使用 BAC5064 中所示的孔尺寸。
C. Fastener holes must be perpendicular to the surface within 2 degrees.
紧固件孔必须与表面垂直,偏差不超过2度。
5. HELICAL COIL INSERTS 螺旋线圈钢丝螺套
A. Hole preparation
孔的制备
(1) Cut threads in the hole with the applicable tap.
用合适的丝锥在孔中切螺纹。
(2) Make a check of the threads with the applicable helical coil thread plug gage.
用合适的螺旋线圈螺纹塞规检查螺纹。
B. Insert installation
钢丝螺套的安装
(1) Install inserts 3/4 to 1-1/2 turns below the top surface of the hole, unless the overhaul instructions are different.
除非大修说明另有规定,否则应将钢丝螺套安装在孔顶面以下3/4到1-1/2圈的位置。
(2) When you install inserts in dissimilar metal, install them with wet primer on the threads.
当在不同金属上安装钢丝螺套时,应在螺纹上涂上湿底漆。
C. Insert removal
钢丝螺套的拆卸
(1) Use the applicable extracting tool.
使用合适的拆卸工具。
(2) Put the blade of the tool into the hole with one side of the blade 1/4 turn from the end of the insert.
将工具的刀片插入孔中,刀片的一侧距离钢丝螺套的末端1/4圈。
(3) Lightly tap the head of the tool with a hammer.
用锤子轻轻敲击工具的头部。
(4) Push down hard on the handle and turn the handle slowly counterclockwise. Keep the pressure on the handle while the inserts turns back out.
用力向下按住手柄,并缓慢地逆时针转动手柄。在钢丝螺套被旋出时,保持手柄的压力。
(5) You can now install an insert on the same part number in this hole, without more repairs to the hole.
现在,可以将同一件号的钢丝螺套安装到该孔中,而无需对孔进行更多修理。
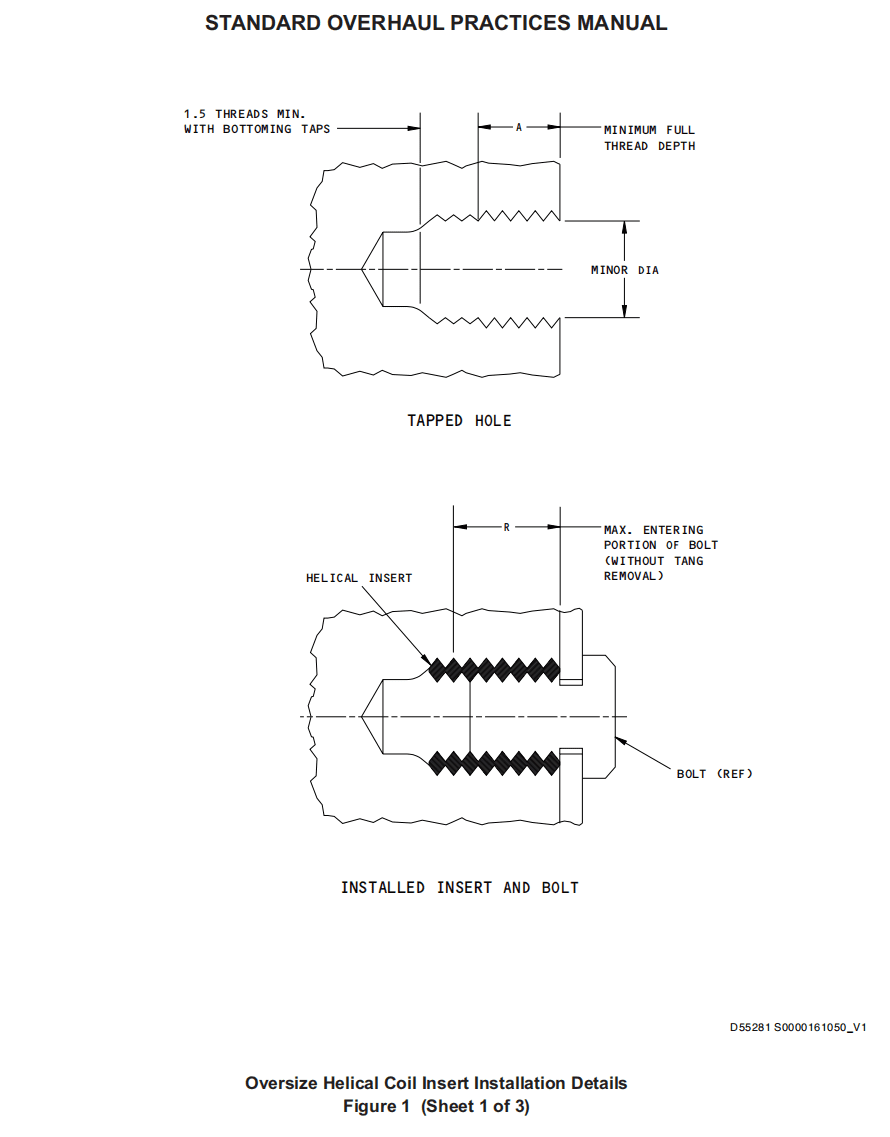
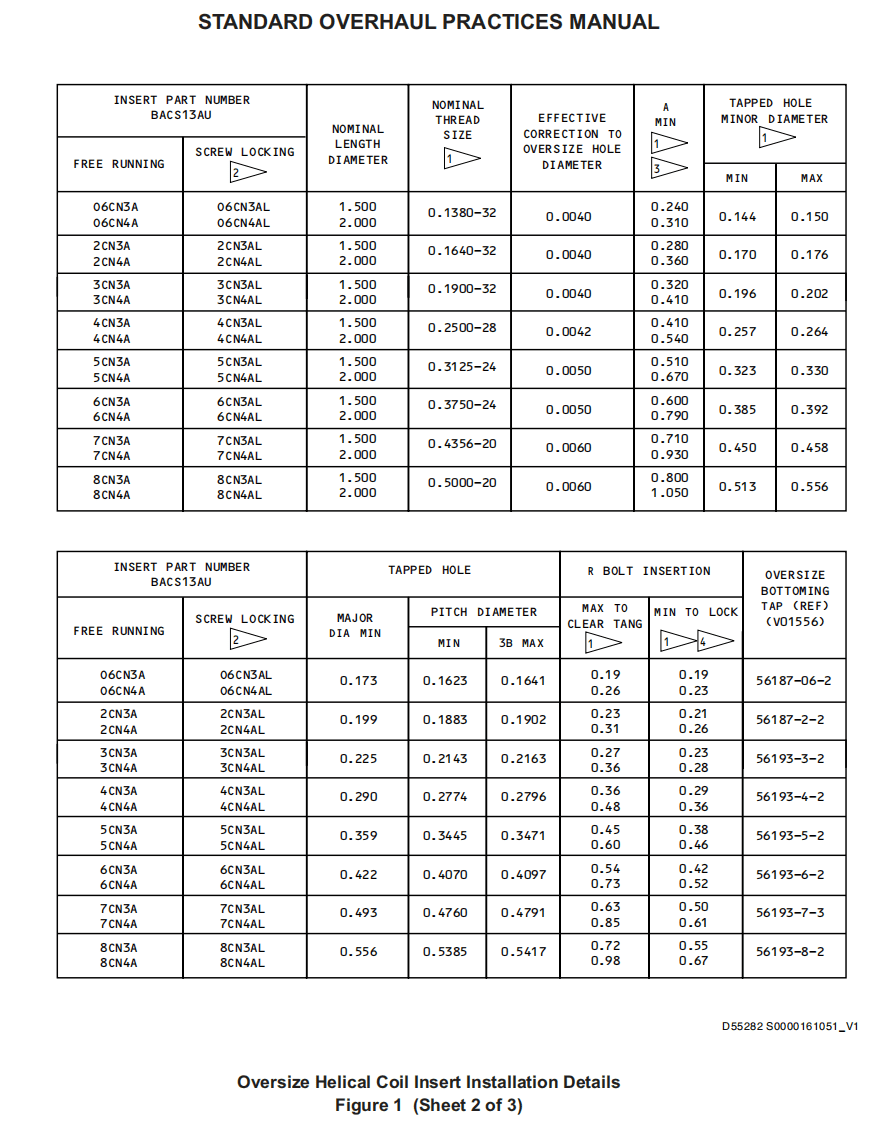
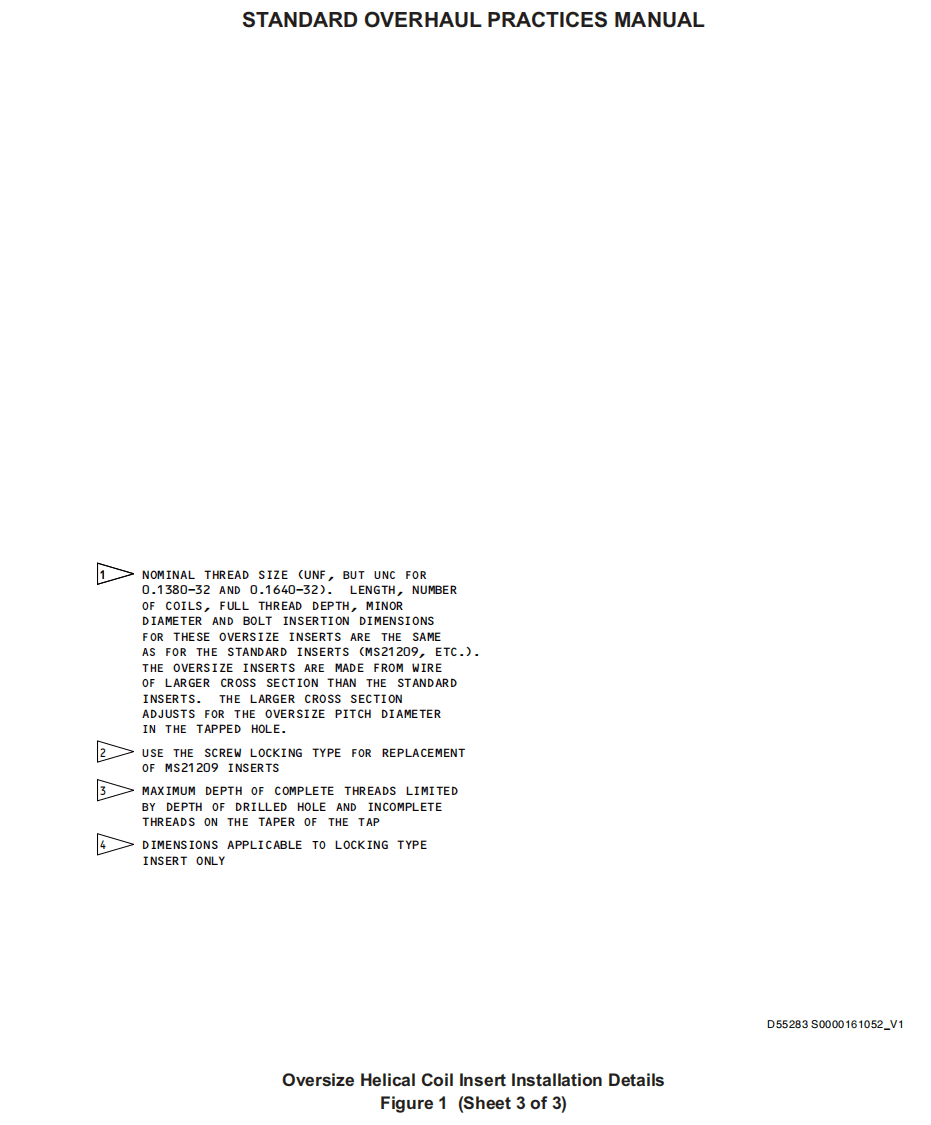
(6) See Figure 1 for installation of BACS13AU oversize inserts.
参见图1,了解BACS13AU超大号钢丝螺套的安装。
6. KEY-LOCKED INSERTS 锁定键钢丝螺套
A. Insert installation
钢丝螺套的安装
(1) Remove burrs, slivers, and other unwanted matter from the hole.
清除孔中的毛刺、碎屑和其他不需要的物质。
(2) If the part has tensile strength more than 60 ksi:
如果零件的抗拉强度超过 60 ksi:
(a) Insert with two kees
带有两个定位销的钢丝螺套
1) Install the insert to the specified depth.
将钢丝螺套安装到指定深度。
2) Mark the location of one kee.
标记一个定位销的位置。
3) Remove the insert.
取出钢丝螺套。
4) Align a broach blade tool with the mark.
将拉刀工具与标记对齐。
5) Tap the head of the broaching tool only until the head and body of the tool come together.
轻轻敲击拉刀头,直到刀头和刀体接触。
(b) Insert with four kees — No alignment is necessary. Tap the head of the tool until the head and body of the tool come together.
插入四个定位销——无需对齐。敲击工具头,直到工具头和壳体接合。
(c) Remove burrs and slivers from the hole.
清除孔中的毛刺和碎屑。
(3) Install the insert with your fingers or an installation tool.
用手指或安装工具安装钢丝螺套。
(4) After the insert is in position, lift and turn the tool, then drive the kees with a tool, with an arbor press or a hammer.
钢丝螺套就位后,抬起并转动工具,然后用工具、心轴压力机或锤子敲击定位销。
(5) If a tool is not available, you can drive the kees with a hammer and a flat punch, but the kees can easily be bent or broken. Also, brittle parts such as castings can easily break.
如果无法使用工具,可以用锤子和平头冲子敲击销钉,但销钉很容易弯曲或断裂。此外,易碎零件(如铸件)也很容易断裂。
(6) Make sure the installed kees are flush with the surface or 0.030 inch maximum below the surface.
确保安装的销钉与表面齐平,或最多低于表面0.030英寸。
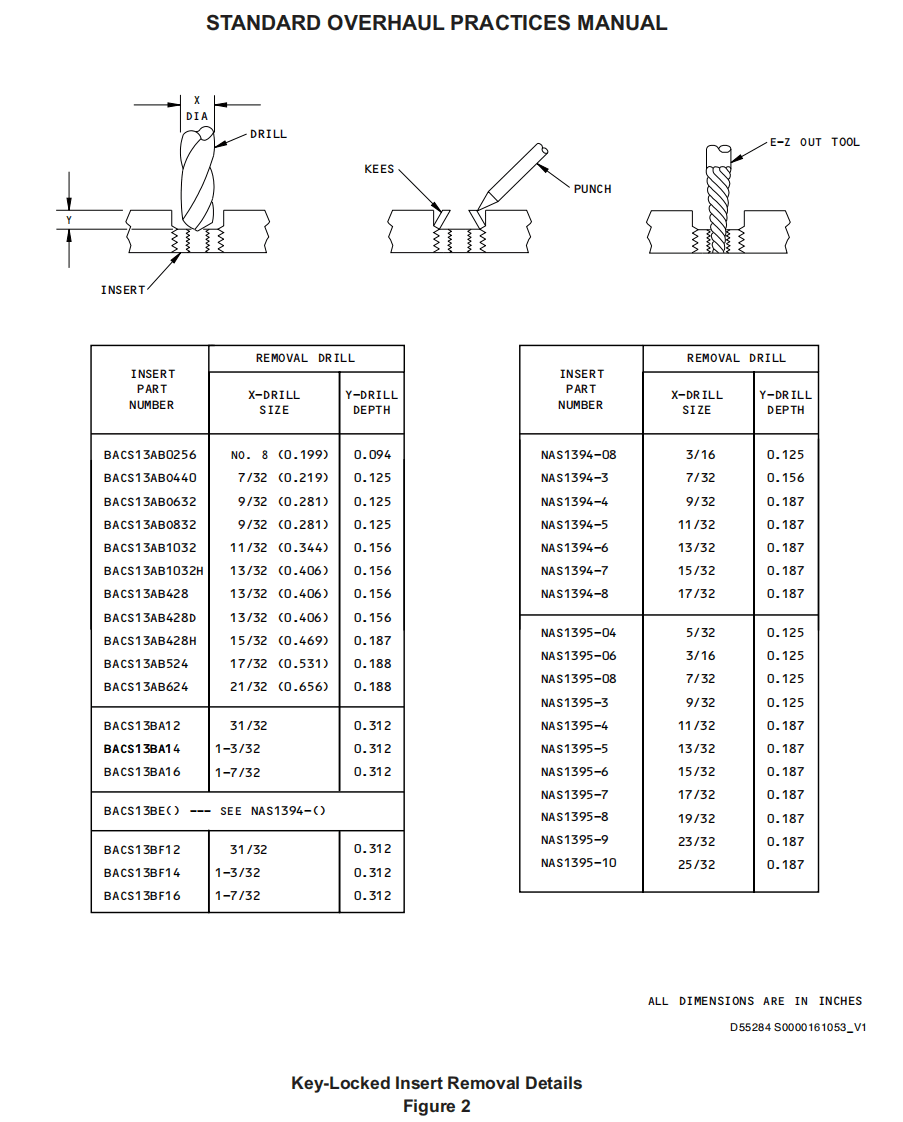
B. Insert removal (Figure 2)
钢丝螺套拆卸(图2)
(1) Drill into the insert to the diameter and depth shown.
按所示直径和深度钻入钢丝螺套。
(2) Bend the kees inward and break them off.
向内弯曲销钉并将其折断。
(3) Remove the insert with an E-Z Out type of tool.
使用E-Z Out类型工具取出插入物。
(4) You can now install an insert of the same part number in this hole, without more repairs to the hole.
现在,可以在此孔中安装具有相同件号的钢丝螺套,而无需对孔进行更多修理。